Bill of Material Layout edit window ( Drawing Editor > double-click a bill)
Tabs :
- Example
- Step-by-step instructions
- " OK " " Cancel " " Reset "
Also see :
|
- Bill of Material Layout (setup window with options similar to those on this window)
- "Bill of Material" tab in Drawing Presentation (setup options similar to those on this window)
- Bill editor ( Bill of Material Layout affects info shown in)
page 1 | contents | double-click a bill | bill of material | top
Example of layout settings and a resulting bill of material :
|
A Bill of Material Layout that sets a distinct " Plot Order " (' 1 ' ' 2 ' ' 3 ' etc.) for each of five distinct categories (' Unit Quantity " etc.). |
|
A bill of material that was printed per the settings defined in the bill layout that is shown above. |
page 1 | contents | double-click a bill | bill of material | top
Changing the order settings or header text on this window (see step 2) affects the arrangement and column headers on the bill of material that you double-clicked in step 1.
1 . On a detail sheet or sheet outline or other drawing type, double-click a bill of material.
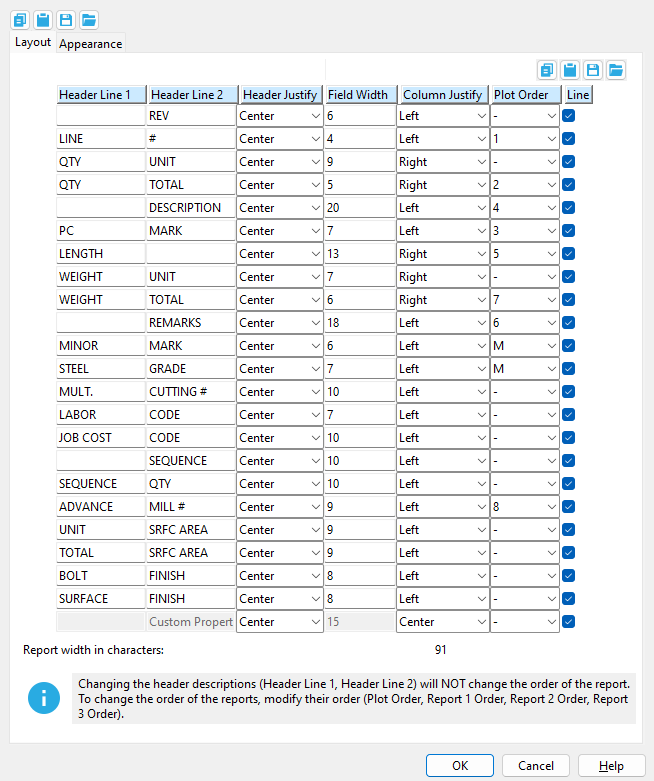
2 . The Bill of Material Layout window opens. You can use up/down arrow keys or Tab to move from cell to cell on this window. You can use this window to specify a different layout, or to change the column heads, on the bill of material. Following is a list of those columns and what they do:
Header Line 1: The 1st line of the header that appears above a column on the bill or report. The length of this cannot exceed the " Field width ."
Header Line 2 : The 2nd line of the header that appears above a column on the bill or report. The length of this cannot exceed the " Field width ."
Header Justify : The text justification of the Header Line 1 and Header Line 2. The typical practice for this is to ' Center ' them, otherwise they may be ' Left ' or ' Right ' justified.
Field Width : Any integer up to 39. This sets the column width (in characters) on the bill or report.
Column Justify : The text justification of the data inside of the Bill of Material. They may be ' Center ' or ' Left ' or ' Right ' justified.
Plot Order: Inactive or a number (1 through 22) or sometimes Merge. ' Inactive ' stops the column from being printed. A ' number ' sets the order in which the column appears on the bill of material (' 1 ' is the leftmost column, ' 3 ' is third from the left). ' Merge ' routes information to another column on the bill of material.
Line :
or
. This option turns the line on and off between Header Line 1 and Header Line 2. If this box is checked (
| Defining the left-to-right order of columns on a bill of material and in the bill editor: |
| Plot Order |
| The number that is entered as the " Plot Order " sets the left-to-right order and which columns that are shown on the physical bill and in Edit Bill . |
| Making entries: ' Inactive ' or a ' number ' (' 1 ' through ' 18 ') and sometimes ' Merge ' are allowable entries. ' Inactive ' stops the column from being printed. A ' number ' sets the order in which the column appears on the bill (' 1 ' is the leftmost column, ' 3 ' is third from the left). ' Merge ' routes information to another column on the bill. |
Report width in characters: The total number of characters that the BOM will be wide. This number is automatically calculated from the " Field width " assigned to categories for which a particular order has been assigned. Making a particular category ' Inactive ' decreases the bill of material width. Assigning a " . . . Order " to a category increases the bill width.
3 . Press one of the following buttons.


"OK" (or the Enter key) closes this window and saves the settings on it. Categories given an " ...Order " will be shown in the bill editor .
"Cancel" (or the Esc key or the
button) closes this window without saving any changes made to it.
"Reset" undoes all changes that were made to this window since you first opened it. The window remains open.
page 1 | contents | double-click a bill | bill of material | top
| Layout | Appearance |
Following is a list of the categories which can be configured to be compiled into columns on the bill of material. These categories appear as rows on this window ( Bill of Material Layout ) and as columns in the bill of material. Note: The name of a category will be different than it is here if you have changed its header . But since changing a header does not change the information that SDS2 compiles for a particular category, this documentation still applies.
Revision: Select a " Plot Order " if you want a column for revisions to be placed on the bill. Choose " Prefix " if you want a delta symbol with the revision number (or letter) to be placed to the left of the revised line in the bill of material that you are editing.
|
||||
| These examples show only one revision noted in the column or the prefix area. More than one revision may be noted. |
Also see: Increment Sheet Revisions sets whether the first-time revision is a letter or number. " Detail with revisions " during Detail Members causes the revision to be updated in the bill and in the revision chart .
Line #: Select a " Plot Order " ( number ) and enter a " Field Width " ( number of characters ) to get a blank column on the physical bill that you are editing. Label Add can be used on the sheet outline to number each line in the column.
Home > Project Settings > Fabricator > Bill of Material Layout: " Line # "
Unit Quantity: The count of pieces of a particular submaterial that are required to fabricate one of the shipping pieces (members).
| Example: | If you have two identical clip angles (a32) on a beam (B_2), the number 2 will show in the bill of material for the member detail under " Unit Quantity " and in the same row as a32. |
| BOM: | A ' number ' to " Plot Order " sets a " Unit Quantity " column to appear on the physical bills of material you are editing. |
| Edit Bill: | This does not affect the columns that appear in the bill editor . The columns that appear in the bill editor are controlled by Fabricator > Sheets and Reports > Bill of Material Layout . |
| Note: | The header " Unit Quantity " may be a different name. However, regardless of its name, the same unit quantity information will automatically be compiled into it. |
Bill of Material Layout: " Unit Quantity "
Edit Bill: " Unit Quantity "
Total Quantity: The count of submaterials required to fabricate the total number of shipping pieces (members).
| Example: | If you have two identical clip angles ( a32 ) on six identical beams ( B_2 ), the number ' 12 ' appears in the " Total Quantity " column on the bill of material in the line for a32 . |
| BOM: | A ' number ' to " Plot Order " sets a " Total Quantity " column on the physical bills of material you are editing. |
| Edit Bill: | This does not affect the columns that appear in the bill editor . The columns that appear in the bill editor are controlled by Fabricator > Sheets and Reports > Bill of Material Layout . |
| Note: | The header " Total Quantity " may be a different name. However, regardless of its name, the same total quantity information will automatically be compiled into it. |
Bill of Material Layout: " Total Quantity "
Edit Bill: " Total Quantity "
Description: A description of the member or material. For a member, the description is the member type. For a submaterial, the description is the section size.
| Example: | The description for the member might read BEAM , while the line beneath BEAM in this same column, corresponding to the member's main material, might read W18x40 , and beneath that might be L3x4x5/16 , corresponding to a submaterial piece with a minor mark. |
| BOM: | A ' number ' to " Plot Order " sets a " Description " column to appear on the physical bills of material you are editing. |
| Edit Bill: | This does not affect the columns that appear in the bill editor . The columns that appear in the bill editor are controlled by Fabricator > Sheets and Reports > Bill of Material Layout . |
| Reports: | This does not affect the Plot Report . The layout for bill reports is controlled by Fabricator > Sheets and Reports > Bill of Material Layout and cannot be overridden on this window. |
Bill of Material Layout: " Description "
Edit Bill: " Description "
Piece Mark: The member piecemark ( piecemark ) of the shipping piece.
| Please note: Minor marks will also be listed in this column if " Minor Mark " on this same window is set to ' Merge '. |
| BOM: | A ' number ' to " Plot Order " sets a " Piece Mark " column to appear on the physical bill of material you are editing. |
| Edit Bill: | This does not affect the columns that appear in the bill editor . The columns that appear in the bill editor are controlled by Fabricator > Sheets and Reports > Bill of Material Layout . |
| Reports: | This does not affect the Plot Report . The layout for bill reports is controlled by Bill of Material Layout and cannot be overridden on this window. |
Bill of Material Layout: " Piece Mark "
Edit Bill: " Piece Mark "
Length: The length of the material along its X material axis.
| Please note: This column must be ' 12 ' or more characters wide for it to be divided into two (the left side for feet, the right side for inches and fractions of an inch) when imperial " Units " are used. |
| BOM: | A ' number ' to " Plot Order " sets a " Length " column to appear on the physical bill of material you are editing. |
| Edit Bill: | This does not affect the columns that appear in the bill editor . The columns that appear in the bill editor are controlled by Fabricator > Sheets and Reports > Bill of Material Layout . |
| Reports: | This does not affect the Plot Report . The layout for bill reports is controlled by Bill of Material Layout and cannot be overridden on this window. |
Unit Weight: For a member, this is the total combined weight of the submaterial pieces required to fabricate one shipping member. For a submaterial, this is the weight of one piece of submaterial.
| Example: | If the main material ( W18x40 ) of six identical beams ( B_2 ) has two submaterials ( a32 clip angles), the " Unit Weight " of the beam will be the combined weight of ONE W18x40 plus TWO a32's. The " Unit Weight " for the twelve a32's will be the weight of ONE a32. |
| BOM: | A ' number ' to " Plot Order " sets a " Unit Weight " column to appear on the physical bill of material you are editing. |
| Edit Bill: | This does not affect the columns that appear in the bill editor . The columns that appear in the bill editor are controlled by Bill of Material Layout . |
Bill of Material Layout: " Unit Weight "
Edit Bill: " Unit Weight "
Total Weight: For a member, this is the total combined weight of the submaterials required to fabricate all shipping members that receive the same major mark. For a submaterial, this is the weight of all pieces of that submaterial.
| Example: | If the main material ( W18x40 ) of six identical beams ( B_2 ) has two submaterials ( a32 clip angles), then the " Total Weight " of the beam (B_2) will be the combined weight of SIX W18x40's plus TWELVE a32's. The " Total Weight " for the twelve a32's will be twelve times the " Unit Weight " of a single a32. |
| BOM: | A ' number ' to " Plot Order " sets a " Total Weight " column to appear on the physical bill of material you are editing. |
| Edit Bill: | This does not affect the columns that appear in the bill editor . The columns that appear in the bill editor are controlled by Home > Project Settings > Fabricator > Sheets and Reports > Bill of Material Layout . |
Bill of Material Layout: " Total Weight "
Edit Bill: " Total Weight "
Remarks: User-entered comments and/or information automatically compiled from fields that are set to ' Merge ' .
| Please note: If the " Steel Grade ," " Mult. Cutting # ," " Labor Code ," " Job Cost Code " and " Advance mill # " are set to ' Merge ', they will automatically be entered into the " Remarks " column. Also, definitions from " routing configuration #4 " are compiled into this column. |
| BOM: | A ' number ' to " Plot Order " sets a " Remarks " column to appear on the physical bill of material you are editing. |
| Reports: | This does not affect the Plot Report . The layout for bill reports is controlled by Home > Project Settings > Fabricator > Bill of Material Layout and cannot be overridden on this window. |
| Edit Bill: | This does not affect the columns that appear in the bill editor . The columns that appear in the bill editor are controlled by Bill of Material Layout . |
| Warning: | The " Advanced Mill # " cannot be merged into " Remarks " when " Sequence " and " Sequence Quantity " are active. |
User Routing Settings: routing configuration #4
Bill of Material Layout: " Remarks "
Edit Bill: " Remarks "
Minor Mark: The submaterial piecemark ( material mark ) of a material.
| BOM: | A ' number ' to " Plot Order " sets a " Minor Mark " column to appear on the physical bill of material you are editing. |
| Reports: | This does not affect the Plot Report . The layout for bill reports is controlled by Home > Project Settings > Fabricator > Bill of Material Layout and cannot be overridden on this window. |
| Edit Bill: | This does not affect the columns that appear in the bill editor . The columns that appear in the bill editor are controlled by Home > Project Settings > Fabricator > Sheets and Reports > Bill of Material Layout . |
| ' Merge ': | ' Merge ' sets minor piecemarks to be compiled into the " Piece Mark " column, and a " Minor Mark " column does not appear on the physical bill of material. The column does, however, appear in the bill editor so that users can manually edit the minor mark. |
Bill of Material Layout: " Minor Mark "
Edit Bill: " Minor Mark "
Steel Grade: The steel grade of the material.
| BOM: | A ' number ' to " Plot Order " sets a " Steel Grade " column to appear on the physical bill of material that you double-clicked to open this window. |
| Reports: | This does not affect the Plot Report . The layout for bill reports is controlled by Home > Project Settings > Fabricator > Bill of Material Layout and cannot be overridden on this window. |
| Edit Bill: | This does not affect the columns that appear in the bill editor . The columns that appear in the bill editor are controlled by Home > Project Settings > Fabricator > Bill of Material Layout . |
| ' Merge ': | ' Merge ' sets steel grade information to compile into the " Remarks " column, and a " Steel Grade " column does not appear on the physical bill of material. The column does, however, appear in the bill editor so that users can manually edit the steel grade. |
Bill of Material Layout: " Steel Grade "
Edit Bill: " Steel Grade "
Mult Cutting #: Any user-entered string .
| Where " Mult Cutting " info comes from: The bill data shown in this column may be a definition from routing configuration #1 that was applied to a member or material, or it may be that a user has manually typed information to the " Mult. Cutting # " column in the bill editor . |
| BOM: | A ' number ' to " Plot Order " sets a " Mult Cutting # " column on the physical bill of material that you double-clicked to open this window. |
| Reports: | This does not affect the Plot Report . The layout for bill reports is controlled by Home > Project Settings > Fabricator > Sheets and Reports > Bill of Material Layout and cannot be overridden on this window. |
| Edit Bill: | This does not affect the columns that appear in the bill editor . The columns that appear in the bill editor are controlled by Home > Project Settings > Fabricator > Bill of Material Layout . |
| ' Merge ': | ' Merge ' sets mult cutting information to compile into the " Remarks " column, and a " Mult Cutting # " column does not appear on the physical bill of material. The column does, however, appear in the bill editor so that users can manually edit the mult cutting number. |
User Routing Settings: routing configuration #1
Bill of Material Layout: " Mult Cutting # "
Edit Bill: " Mult Cutting # "
Labor Code: Any user-entered string .
| Where " Labor Code " info comes from: The bill data shown in this column may be a definition from routing configuration #2 that was applied to a member or material. Or it may be that a user has manually typed in information to the " Labor Code " column in the bill editor . |
| BOM: | A ' number ' to " Plot Order " sets a " Labor Code " column to appear in the bill of material. |
| Reports: | This does not affect the Plot Report . The layout for bill reports is controlled by Home > Project Settings > Fabricator > Sheets and Reports > Bill of Material Layout and cannot be overridden on this window. |
| Edit Bill: | This does not affect the columns that appear in the bill editor . The columns that appear in the bill editor are controlled by Bill of Material Layout . |
| ' Merge ': | ' Merge ' sets labor code information to compile into the " Remarks " column, and a " Labor Code " column does not appear on the physical bill of material. The column does, however, appear in the bill editor so that users can manually edit the labor code. |
User Routing Settings: routing configuration #2
Bill of Material Layout: " Labor Code "
Edit Bill: " Labor Code "
Job Cost Code: Any user-entered string -- for example, to designate the cost (usually per pound or kilogram) of a member or material.
| Where " Job Cost Code " info comes from: The bill data shown in this column may be a definition from routing configuration #3 that was applied to a member or material. Or it may be that a user has manually typed in information to the " Job Cost Code " column in the bill editor . |
| BOM: | A ' number ' to " Plot Order " sets a " Job Cost Code " column on the physical bill of material that you double-clicked to open this window. |
| Reports: | This does not affect the Plot Report . The layout for bill reports is controlled by Home > Project Settings > Fabricator > Sheets and Reports > Bill of Material Layout and cannot be overridden on this window. |
| Edit Bill: | This does not affect the columns that appear in the bill editor . The columns that appear in the bill editor are controlled by Bill of Material Layout . |
| ' Merge ': | ' Merge ' sets job cost code information to compile into the " Remarks " column, and a " Job Cost Code " column does not appear on the physical bill of material. The column does, however, appear in the bill editor so that users can manually edit a job cost code. |
User Routing Settings: routing configuration #3
Bill of Material Layout: " Job Cost Code "
Edit Bill: " Job Cost Code "
Sequence: The sequence name or sequence number of the member.
| Tip: | It's generally a good idea to set an order here if you have divided the model into sequences and " Break major marks apart " is set to something other than ' Sequence '. |
| BOM: | A ' number ' to " Plot Order " sets a " Sequence " column to appear in the physical bill of material that you double-clicked to open this window. |
| Reports: | This does not affect the Plot Report . The layout for bill reports is controlled by Home > Project Settings > Fabricator > Sheets and Reports > Bill of Material Layout and cannot be overridden on this window. |
| Edit Bill: | This does not affect the columns that appear in the bill editor . The columns that appear in the bill editor are controlled by Bill of Material Layout . |
Bill of Material Layout: " Sequence "
Edit Bill: " Sequence "
Sequence Quantity: The quantity (a whole number) of identical members that have the same sequences.
| Example: | Six columns are identical, except that half are assigned a sequence of 1 and half are assigned a sequence of 2. These columns will be listed in two different places on the bill of material, and the sequence quantity for each will be 3. |
| BOM: | A ' number ' to " Plot Order " sets a " Sequence Quantity " column on the physical bill of material that you double-clicked to open this window. |
| Reports: | This does not affect the Plot Report . The layout for bill reports is controlled by Home > Project Settings > Fabricator > Sheets and Reports > Bill of Material Layout and cannot be overridden on this window. |
| Edit Bill: | This does not affect the columns that appear in the bill editor . The columns that appear in the bill editor are controlled by Bill of Material Layout in setup. |
Bill of Material Layout: " Sequence Quantity "
Edit Bill: " Sequence Quantity "
Advance Mill #: The page-line (or ABM system ID ) that is assigned to the piece of material listed on this line in the physical bill of material that you are editing.
| Please note: The " Advance Mill # " cannot be merged into the " Remarks " column when the " Sequence " and " Sequence Quantity " fields are active. |
| Example: | The main material of a member is listed on page 100, line 55 of the ABM Report . '100-55' is automatically compiled into the second line of the member bill of material, on which the member main material is described. |
| BOM: | A ' number ' to " Plot Order " sets an " Advance Mill # " column on the physical bill of material that you double-clicked to open this window. |
| Reports: | This does not affect the Plot Report . The layout for bill reports is controlled by Home > Project Settings > Fabricator > Sheets and Reports > Bill of Material Layout and cannot be overridden on this window. |
| Edit Bill: | This does not affect the columns that appear in the bill editor . The columns that appear in the bill editor are controlled by Bill of Material Layout . |
| ' Merge ': | ' Merge ' sets ABM page-line data to compile into the " Remarks " column, and an " Advance Mill # " column does not appear on the physical bill of material. The column does, however, appear in the bill editor so that users can manually edit the advance mill number. |
Bill of Material Layout: " Advance Mill # "
Edit Bill: " Advance Mill # "
Unit Surface Area: The surface area (" Surface area ") of the material. The reported surface area will be in square feet or square meters (depending on the primary dimension " Units "). Member Detailing takes into account cuts made into the material when calculating the area. The total surface area of the member will be reported on line one of the plotted bill.
| BOM: | A ' number ' to " Plot Order " puts a " Unit Surface Area " column on the physical bill of material that you double-clicked to open this window |
| Reports: | This does not affect the Plot Report . The layout for bill reports is controlled by Home > Project Settings > Fabricator > Sheets and Reports > Bill of Material Layout and cannot be overridden on this window. |
| Edit Bill: | This does not affect the columns that appear in the bill editor . The columns that appear in the bill editor are controlled by Bill of Material Layout . |
| ' Merge ': | ' Merge ' sets mult cutting information to compile into the " Remarks " column, and the " Unit Surface Area " column does not appear on the physical bill. |
Bill of Material Layout: " Unit Surface Area "
Bill of Material > Edit Bill: " Unit Surface Area "
Total Surface Area: For a member (bill line 1), this is the combined surface areas of the submaterials required to fabricate all shipping members that are assigned the same major mark. For a submaterial, this is the combined surface areas of the total quantity of materials referenced in a particular line in the bill of material. The surface area will be expressed in square feet or square meters (depending on the primary dimension " Units ").
| BOM: | A ' number ' to " Plot Order " puts a " Total Surface Area " column on the physical bill of material that you double-clicked to open this window. |
| Reports: | This does not affect the Plot Report . The layout for bill reports is controlled by Home > Project Settings > Fabricator > Sheets and Reports > Bill of Material Layout and cannot be overridden on this window. |
| Edit Bill: | This does not affect the columns that appear in the bill editor . The columns that appear in the bill editor are controlled by Bill of Material Layout . |
| ' Merge ': | ' Merge ' sets total surface area information to compile into the " Remarks " column, and the " Total Surface Area " column does not appear on the physical bill. |
Bill of Material Layout: " Total Surface Area "
Edit Bill: " Total Surface Area "
Bolt Finish: The galvanizing finish of the bolt.
| Where " Bolt finish " comes from: When a bolt has a galvanized finish (Mechanically galvanized or Hot dipped galvanized). This is setup in Galvanizing Settings. |
| BOM: | A ' number ' to " Plot Order " sets a " Bolt Finish "column to appear in subsequently Placed bills of material. |
| Reports: | A ' number ' to " Report 1 Order " and/or " Report 2 Order " and/or " Report 3 Order " sets the left-to-right order of the " Bolt Finish " column on the associated report(s). |
| Edit Bill: | A ' number ' to " Plot order " or " Report 1 Order " or " Report 2 Order " or " Report 3 Order " makes a " Bolt Finish " column appear in the bill editor for all details. |
Setup Override: " Galvanizing Settings " and " Bolt Edit "
Surface Finish: The surface finish abbreviation on the material.
|
Where " Surface Finish " info comes from: A finish from the material's Surface Finish inside of the material edit window. In the Surface Finish setup window, add to BOM must be checked for it to show. |
| BOM: | A ' number ' to " Plot Order " sets a " Surface Finish " column on subsequently Placed bills of material. |
| Reports: | A ' number ' to " Report 1 Order " and/or " Report 2 Order " and/or " Report 3 Order " sets the left-to-right order of the " Surface Finish " column on the associated report(s). |
| Edit Bill: | A ' number ' or ' Merge ' to " Plot order " or " Report 1 Order " or " Report 2 Order " or " Report 3 Order " makes a " Surface Finish "column appear in the bill editor for all details. |
| ' Merge ': | ' Merge ' sets surface finish information to compile into the " Remarks " column, and no " Surface Finish " column appears in the physical bill or printed report. The column does, however, appear in the bill editor so that users can manually edit the job cost code. |
Home > Project Settings > Job> Surface Finish
Custom Property: Any member custom property whose schema entry is set to " ![]() Add to BOM " on the Add/Edit Schema Entry window may be shown here, on this window.
Add to BOM " on the Add/Edit Schema Entry window may be shown here, on this window.
|
| Where XXX is a user-entered column name that identifies the custom property to be compiled to the bill: | |
| BOM: | A ' number ' to " Plot Order " sets a " XXX " column to appear on the physical bill of material that you double-clicked to open this window. |
| Reports: | This does not affect the Plot Report . The layout for bill reports is controlled by Home > Project Settings > Fabricator > Sheets and Reports > Bill of Material Layout and cannot be overridden on this window. |
| Edit Bill: | This does not affect the columns that appear in the bill editor . The columns that appear in the bill editor are controlled by Bill of Material Layout . |
| ' Merge ': | ' Merge ' sets custom property information to compile into the " Remarks " column, and the " XXX " column does not appear in the physical bill. |
Bill of Material Layout: " Custom Property "
Edit Bill: " Custom Property "
page 1 | contents | double-click a bill | bill of material | top
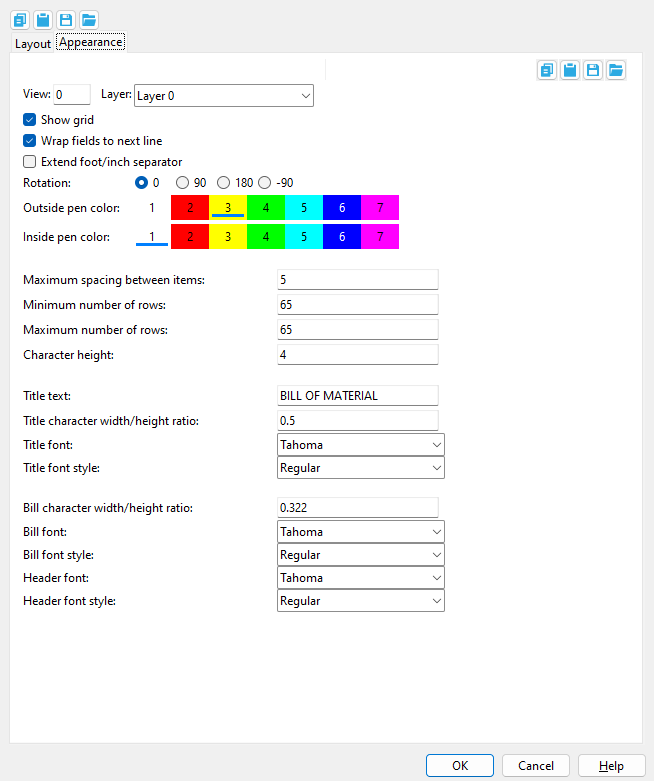
| Layout | Appearance |
|
|
|
|
|
If this box is checked (
If the box is not checked (
Home > Project Settings > Fabricator > Detailing > Drawing Presentaton > "Bill of Material" tab: " Show grid "
Wrap fields to next line: ![]() or
or ![]() . This applies to the bill of material that you are editing when, in the Bill Editor , more characters have been entered to a cell than that cell has room for.
. This applies to the bill of material that you are editing when, in the Bill Editor , more characters have been entered to a cell than that cell has room for.
|
||||
| In this example, too much text (shown in green ) was added to the " Remarks " column for a particular piece of material. |
If this box is checked (
If the box is not checked (
Home > Project Settings > Fabricator > Detailing > Drawing Presentaton > "Bill of Material" tab: " Wrap fields to next line "
Extend foot/inch separator: ![]() or
or ![]() . This applies when a " Length " column is included in the bill of material and the primary dimension " Units " is set to ' I mperial (feet-in frac) '.
. This applies when a " Length " column is included in the bill of material and the primary dimension " Units " is set to ' I mperial (feet-in frac) '.
|
||||
| To see the difference, compare the second row of the " Length " column. |
If this box is checked (
If the box is not checked (
Rotation: 0º or 90º or 180º or -90º . Rotation is counterclockwise around the insertion point that was used when this bill of material (the one you are editing) was created using Place Bill . For a bill of material with 0 degree rotation, that rotation point would be the upper, right corner of the bill.
| 0º | 90º | 180º | -90º |
|

|
|
|
Home > Project Settings > Fabricator > Detailing > Drawing Presentaton > "Bill of Material" tab: " Rotation "
Outside pen color: 1 or 2 or 3 or 4 or 5 or 6 or 7 .
|
|
| The selected button sets the pen number and on-screen display color of the bill of material's perimeter. Line Weights sets the thickness of lines drawn with the pen number. |
|
The " Outside pen color " sets the color and line thickness of the bill's perimeter. In this example, the color is yellow (pen number ' 3 '). |
Home > Project Settings > Fabricator > Detailing > Drawing Presentaton > "Bill of Material" tab: " Outside pen color "
Inside pen color: 1 or 2 or 3 or 4 or 5 or 6 or 7 .
|
|
| The selected button sets the pen number and on-screen display color of the bill of material's interior grid of lines. Line Weights sets the thickness of lines drawn for each of the seven pen numbers. |
|
|
The " Inside pen color " sets the color and the line thickness for the bill's inner grid. In this example, the color is white (pen ' 1 '). |
Home > Project Settings > Fabricator > Detailing > Drawing Presentaton > "Bill of Material" tab: " Inside pen color "
Maximum spacing between items: A number of blank rows . This spacing applies when bill data for more than one member is included in a bill of material that you are editing. If there isn't enough room to apply the maximum number of blank rows, the number of blank rows may be reduced to as few as one row.
|
s = spacing. In this example, the spacing is two rows. The two rows separate the bill data for member B_11 from the bill data for member B_12 . |
Home > Project Settings > Fabricator > Detailing > Drawing Presentaton > "Bill of Material" tab: " Maximum spacing between items "
Minimum number of rows: The number of rows that will be shown in the bill of material you are editing when it has no bill data compiled into it. When you Objects > Sheet Item > Add and thus increase the amount of bill data compiled into the bill, the number of lines will increase beyond this minimum if and only if doing so is required to accommodate the added data and only if the " Maximum number of rows " is set to a larger number than the minimum.
|
|
In this example, the headers take up 2 rows, the bill data takes up 5 rows, and the " Minimum number of rows " is ' 10 '. This leaves 3 blank rows. |
Home > Project Settings > Fabricator > Detailing > Drawing Presentaton > "Bill of Material" tab: " Minimum number of rows "
Maximum number of rows: The number of rows that the bill of material you are editing is allowed to dynamically expand to in order to accommodate new information that is added when you Objects > Sheet Item > Add .
|
|
In this example, the bill data spills out past the bottom edge of the bill. To fix this problem, just increase the " Maximum number of rows ." |
Home > Project Settings > Fabricator > Detailing > Drawing Presentaton > "Bill of Material" tab: " Maximum number of rows "
Character height: The height ( in millimeters ) of header and bill data text in the bill of material that you are editing.
|

Font dependencies: This applies to whatever font is selected as the " Bill font ," regardless of whether that font is a TrueType font or the ' SDS2 ' font.
Home > Project Settings > Fabricator > Detailing > Drawing Presentaton > "Bill of Material" tab: " Bill items character height "
Bill of material attached to view: A number designating the view that this bill of material is attached to. This applies mainly to member details since it is member details that may have multiple views. If the bill of material you are editing is on a sheet outline -- the drawing type a BOM is usually placed on -- you can safely disregard this option.
Layer: The drawing layer (any layer given a " Name ") that the bill of material you are editing is placed onto when you press " OK " to close this window. If that layer happens to be hidden (not marked " Show "), the label disappears after the first Redraw .
![]()
Title text: The characters in the title of the bill of material that you are editing. Up to 61 characters may be entered.

|
The " Title text " in this example is " LISTADO DE MATERIAL ." If you enter a title such as this on a sheet outline , then all bills of material on sheets that are subsequently created from that sheet outline will have that same title. |
Tip: Keep your title short. If you enter too many characters, your title will run outside the bounds of the bill.
Home > Project Settings > Fabricator > Detailing > Drawing Presentaton > "Bill of Material" tab: " Title text "
Title character width/height ratio: The width/height of the characters that make up the title text in the bill of material that you are editing.
|
Font dependencies: This applies to whatever font is selected as the " Title font ," regardless of whether that font is a TrueType font or the ' SDS2 ' font. For a TrueType font, a ratio of ' 0.6 ' renders that font at its native width. A ratio larger than ' 0.6 ' stretches the font. A ratio less than ' 0.6 ' compacts the font. For the ' SDS2 ' font, ' 0.4 ' is the default choice.
Home > Project Settings > Fabricator > Detailing > Drawing Presentaton > "Bill of Material" tab: " Title character width/height ratio "
Title font: Any font that is listed can be selected. The font that is selected applies to the title text, not to the header text or bill data text.
|
|
The " Title font " applies to the bill title ( BILL OF MATERIAL ). |
Be sure to also choose the " Title font style " that you want.
Home > Project Settings > Fabricator > Detailing > Drawing Presentaton > "Bill of Material" tab: " Title font "
Title font style: The style (' Bold ' or ' Bold Italic ' or ' Italic ' or ' Regular ') of the selected " Title font ." Different fonts may have different styles available to them.
Available font styles are listed alphabetically in the font style list box , and the first style that is listed when you change to a different " Title font " is automatically selected as the style for that font. You may, instead of using the automatically selected font style, prefer to choose ' Regular ', which is generally the most popular style for a particular font. ' Regular ' is the only choice that is available for the ' SDS2 ' font.
Home > Project Settings > Fabricator > Detailing > Drawing Presentaton > "Bill of Material" tab: " Title font style "
Bill character width/height ratio: The width/height of the characters that make up header and bill data text in the bill of material that you are editing.
|
Font dependencies: This applies to whatever font is selected as the " Bill font ," regardless of whether that font is a TrueType font or the ' SDS2 ' font. For a TrueType font, a ratio of ' 0.6 ' renders that font at its native width. A ratio larger than ' 0.6 ' stretches the font. A ratio less than ' 0.6 ' compacts the font. For the ' SDS2 ' font, use the ratio that you think looks best -- ' 0.4 ' is the default.
Home > Project Settings > Fabricator > Detailing > Drawing Presentaton: You can set the default character width/height ratio for bill text using " Bill items width/height ratio " in the " Bill of Material " tab. That option applies to title text as well as header text and bill data text. It applies when a new bill of material is added using Objects > Bill of Material > Place Bill .
Bill font: Any font that is listed can be selected as the font for bill data text.
|
The " Bill font " applies to bill data text that compiled into the bill ( green in this example). |
Be sure to also choose the " Bill font style " that you want.
Bill data is compiled into a bill via operations such as or Detail Sheet Autoload or Objects > Sheet Items > Add to a sheet with a bill.
Home > Project Settings > Fabricator > Detailing > Drawing Presentaton > "Fonts" tab: " Bill of material font " sets the default font that is applied to bill data.
Bill font style: The style (' Bold ' or ' Bold Italic ' or ' Italic ' or ' Regular ') of the selected " Bill font ." Different fonts may have different styles available to them.
Available font styles are listed alphabetically in the font style list box , and the first style that is listed when you change to a different " Bill font " is automatically selected as the style for that font. You may, instead of using the automatically selected font style, prefer to choose ' Regular ', which is generally the most popular style for a particular font. ' Regular ' is the only choice that is available for the ' SDS2 ' font.
Home > Project Settings > Fabricator > Detailing > Drawing Presentaton > "Fonts" tab: " Bill of material font style " sets the default font style that will be applied to bill data when it is compiled into a bill via operations such as or Detail Sheet Autoload or Objects > Sheet Items > Add to a sheet with a bill.
Header font: Any font that is listed can be selected as he header font. The font that is selected applies to header text.
|
|
Headers in this example of a bill of material are displayed in the color red ( LINE # , PC MARK , Description , etc.) |
Be sure to also choose the " Header font style " that you want.
Bill of material headers are named by users in Home > Project Settings > Fabricator > Bill of Material Layout when users make entries to the " Header line 1 " and " Header line 2 " columns on that setup window or to the corresponding entry fields on this window. The " Header font " is applied to headers when a bill of material is created in the Drawing Editor using Objects > Bill of Material > Place Bill . Typically, bills of material are placed on sheet outlines.
Home > Project Settings > Fabricator > Detailing > Drawing Presentaton > "Bill of Material" tab: " Header font " sets the font that is used, by default, when a bill of material is placed using Objects > Bill of Material > Place Bill .
Header font style: The style (' Bold ' or ' Bold Italic ' or ' Italic ' or ' Regular ') of the selected " Header font ." Different fonts may have different styles available to them.
Home > Project Settings > Fabricator > Detailing > Drawing Presentaton > "Bill of Material" tab: " Header font style " sets the font style that is used, by default, when a bill of material is placed using Objects > Bill of Material > Place Bill .
page 1 | contents | double-click a bill | bill of material | top