SDS2 and Tekla PowerFab Data Transfer Best Practices
Introduction
The goal of this document is to explain the import and export process of the SDS2 XML file between SDS2 and Tekla PowerFab and provide tips for improving your interface and achieving your desired goals.
This document is written for SDS2 2021 and below. Any options that apply to later releases will be indicated with the version number.
Tekla PowerFab was previously known as Tekla EPM, and prior to that it was known as Fabsuite. This document will focus on Tekla PowerFab. Testing for this document was performed using SDS2 2021 and Tekla PowerFab 2021i SP1.
Why XML instead of KISS
-
The KISS file type is no longer being developed. This means you will not be getting any improvements or additions to the format.
-
You get a better link to Trimble Connect due to the GUIDs in the XML.
-
XML files provides more data, allowing shop status and custom properties to be transferred between Tekla PowerFab and SDS2.
-
XML files include both the model and the bill of material data, which Tekla PowerFab can compare for consistency. If the bill of material is different from the model, the different bill of material data will be used. See the “Before you begin” section for more on this.
-
Have a single package structure to import makes the workflow simpler.
-
The exported file structure from SDS2 also includes the CNC and drawing files. This is more efficient than requiring a second import of just drawings or CNC files.
-
The CNC files are compared to the XML data in order to flag discrepancies. In addition, the CNC files allow you to see and report non-rectangular/square plates, which can make a significant difference when it comes to shipping.
-
Export XML from SDS2 for Production Control Module
Before you begin
Before you transfer any data between SDS2 and Tekla PowerFab, there are some important items to note.
As noted in the introduction, the SDS2 XML file contains data from both the model and bill of material. The following notes explain how Tekla PowerFab uses and controls this data:
-
Tekla PowerFab compares the model data and the bill of material, but only if the bill of material data for the member exists in the XML.
-
Members that are not detailed will not have a bill of material in the data structure, so only the model data will be used in Tekla PowerFab.
-
-
When the comparison is performed, the bill of material data will take precedence over the model data.
-
See the following examples for further explanation:
-
If the member data exists from the model but does not exist in the bill of material, that data will be removed from Tekla PowerFab.
-
If a line in the bill of material is added or modified, that data will be added or modified in Tekla PowerFab.
-
Any items added to the bill of material, such as a buy-out, will be assigned a GUID.
-
Concerning quantities, the bill of material value that is utilized is the unit quantity which is then multiplied by the total quantity of the members (Assemblies). If you change only the “Total quantity” in the SDS2 bill of material, you will not get the correct value since this value is not used.
-
Note that the “Member description” line is not read in Tekla PowerFab, so any remarks added to the “Member description” line in the bill of material will not be imported.
-
Additionally, please note that both CNC and IFC are global settings in SDS2 and must be set before you export. See the “Additional Files” sections for more information.
Export tool locations
The SDS2 data transfer tool can be found in multiple places within the interface. In SDS2 2021, the window for the data transfer settings has different names, depending on where it is launched from. The locations and window names are noted below.
-
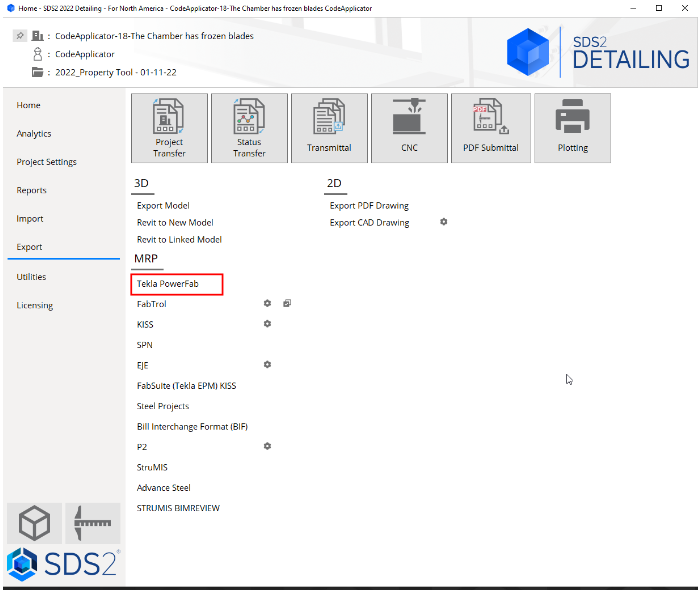
SDS2 Home Screen > Export > Tekla PowerFab
On the Export tab of the SDS2 Home Screen, select “Tekla PowerFab” under the “MRP” section.
-
Window name: Tekla PowerFab
-
-
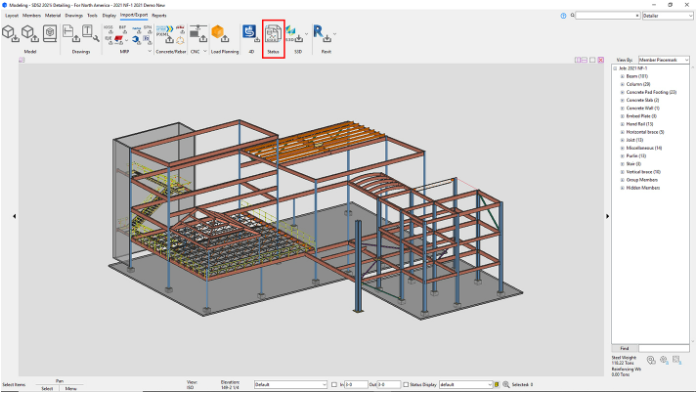
Modeling > Import/Export > “Status”
In the SDS2 Modeling interface, navigate to the “Import/Export” ribbon and select click the “Status” button to open the SDS2 Data Transfer window
-
Window name: SDS2 Data Transfer
-
Additional options coming in 2022
- SDS2 Home Screen > Exports > Transmittal icon
On the Export tab of the SDS2 Home Screen, click on the “Transmittal” icon. Under “MRP/MIS items,” find the “Export Type” setting and select “Full Status Transfer.”
-
Note: In SDS2 2021, the “Tekla PowerFab” option in this window only exports a KISS file. This will be fixed in SDS2 2022.
-
Window name: Full Status Transfer
-
-
In SDS2 2022 there will be a dedicated Tekla PowerFab Toolbox item.
SDS2 Data Transfer settings
In this section we will break down the options available in the SDS2 Data Transfer window, giving recommendations and describing the various results and their implications.
Import and Export
Select "Export"
Transfer Type
-
Full - Choose Data: This is the recommended option and will allow you to choose the data to be exported.
-
Full - All Data: This option is not recommended since it will not give you control over the items to be exported.
-
Status only: This does not apply to the XML export to Tekla PowerFab but does apply to the import into SDS2 of status information only.
Data Source
Members
-
When this is launched from the Modeling interface, you will be able to pre/post select from the model which members you want to send.
-
When this export source is used and the tool is launched from any other location in SDS2, a list of members will be generated for selection.
-
When exporting from the model, do not select the “All” check box in the Data source prompt. This will include existing members as well as concrete walls.
-
Exporting from the model gives you the advantage of being able to see the selected members in model space.
-
Use your “Status Display” to isolate the members to be submitted and to remove any existing, concrete or “boneyard” members.
-
You can use the “Hide” option to filter items such as sequence or member type.
-
If you use the “Save Selection” from the model, you can load the saved selection into this list of members.
—TIPS—
When selecting from Modeling:
When selecting from Home Screen:
Sheets
This option is valuable for document control personnel working off of a sheet list. Unlike the “Members” option, “Sheets” will function the same regardless of the launch location.
There are not any “Hide” options currently on this list.
-
If you choose “Sheets” as your data source and are using the Transmittal tool found in the Utilities tab of the Home Screen, you can save the selection of sheet numbers from the Transmittal’s list selection and then load the results into the Full Transfer sheets list.
-
Because members in Tekla PowerFab are not automatically deleted on import of the XML file, it is common practice to send only the members or sheets required for each submittal.
-
Some clients have suggested to send any revised members as a separate XML containing only the revised member and then use the Add & Replace option in Tekla PowerFab.
-
-
You will want to come up with an agreed upon method to inform the fabricator which sheets/members are to be deleted.
—TIPS—
Include Bill of Material
This option must be selected to import a file into Tekla PowerFab, even if you have not generated a detail with a Bill of Material. This will create the necessary components in the XML file.
Drawings
Select all of the following options: “Include Drawing Files,” “Gather sheets” and “Erection sheets.” If you do check these options and no drawings have been created yet, the system will simply not produce them.
For “Format,” selecting “PDF” will assure you get the widely accepted PDF format.
During the export process, you will be prompted to select the erection sheets you wish to send.
-
Concerning the member shipping mark and the sheet name. In the Drawings folder, both a Detail Drawing, which is only the assembly with no bill of material or title block, and Detail Sheet Drawing, the assembly on the sheet, will be created. If the name of the sheet is identical to the member’s shipping mark, Tekla PowerFab's Drawing log will open the individual Detail Drawing and not the Detail Sheet. To instead open the Detail Sheet, you can opt to exclude member Detail Drawings from the import. This option is located in Tekla PowerFab under Maintenance > Integration Settings > SDS2. Uncheck the option for “Detail Drawings.”
-
If you have unchecked “Include drawing files” but “Erection sheets” is still checked, you will still be prompted to select erection sheets during the export. In order to uncheck “Erection sheets” and “Gather sheets” in this section you have to check “Include drawing files” to activate the setting, uncheck “Erection sheets,” and then uncheck “Include drawing files” again.
—TIPS—
Additional Files - Include CNC
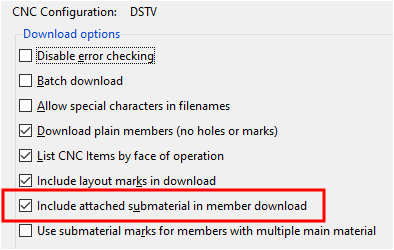
In SDS2, CNC is a global setting. In SDS2 2021 and below, be sure to set your CNC configuration before beginning the export process.
Deciding whether to select “Member main material” or “Submaterial” will depend on your main material piece marking options. Please see the notes below for further information.
"Member main material" option
-
When this option is selected, only CNC for the main material will be exported, unless you select the “Include attached submaterial in member download” option in the SDS2 CNC settings.
-
The CNC file and material name for the main material will be assigned the shipping mark of the member.
-
This option should be used if only “Use member mark for member main material in shop bill” is selected in SDS2 Home Screen > Project Settings > Member and Material Piece marking.
-
This will ensure that shipping marks for the main material in the Tekla PowerFab bill of material match the CNC file name.
-
Depending on the settings used in SDS2, this can cause the CNC file to not match the main material piece mark. See Tips below.
-
"Submaterial" option
-
This will create a separate CNC file for all the materials on the member, including the main material.
-
The CNC file name and material name will match the model and bill of material.
-
Recommended: If the user selects the option to “Use member mark for member main material in model,” the main material will be the shipping mark. This option will ensure that there are no discrepancies between the model, bill of material and CNC names.
-
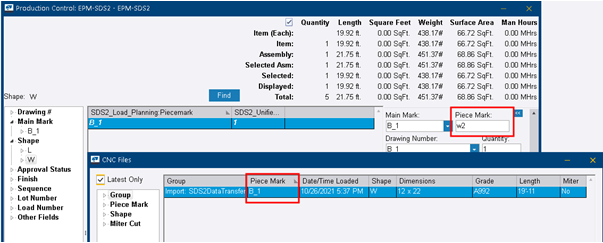
If the “Use member mark for member main material in shop bill” option is selected, and is the only option checked, your main material for the member in the model will remain a submaterial mark and will not have the member’s shipping mark. For example, the main material will be “w2” instead of ‘B_1.” This may cause discrepancies between the CNC and material list.
—TIPS—
SDS2 has many different methods to set naming conventions for main material piece marks in the model and bill of material.
Additional Files - Include IFC
Like the CNC, IFC is a global setting in SDS2. In SDS2 2021 and below, be sure your IFC settings are correct before beginning the export process. The IFC file, either a IFC2x3 or a EM11, can be used for Tekla PowerFab Estimating and Trimble Connect.
Important notes:
-
EM11 is the preferred format, as it was designed specifically for fabricators.
-
In SDS2 2021, the cope count information has been added to both the EM11 and IFC2x3.
-
Since this file is used for estimation, it is recommended that you select “Holes,” “Bolts” and “Welds.”
-
In SDS2 2021 and below, EM11 does not have “Member Custom Properties” in the file.
-
Active member properties will only be exported in the model so long as the property has a value.
-
SDS2 does not create an IFC4 format.
Print Report
This option will only become enabled when "Import" is selected.
Zip XML File
In SDS2 2021 and below, never check this box. This will only zip the XML file and will create a GZ file extension for the XML. This will not correctly import into Tekla PowerFab.
—TIP—
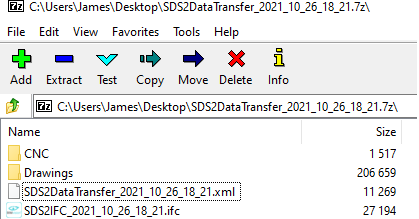
After the file is exported, create a zip or 7zip file from the xml and add in the IFC, Drawings and CNC folders into the zip. Do not make any changes with the folder or file structure.
Status
The “Status” section is important if you want to send data back from Tekla PowerFab into SDS2. There are many options available, but some of them are better not to select because there are no available fields to map them to.
Notes:
-
Status fields are hard-coded fields in SDS2 and will be included with all exports.
-
The section for “Custom Properties” (Properties or User defined attributes) varies depending on what is active on the project.
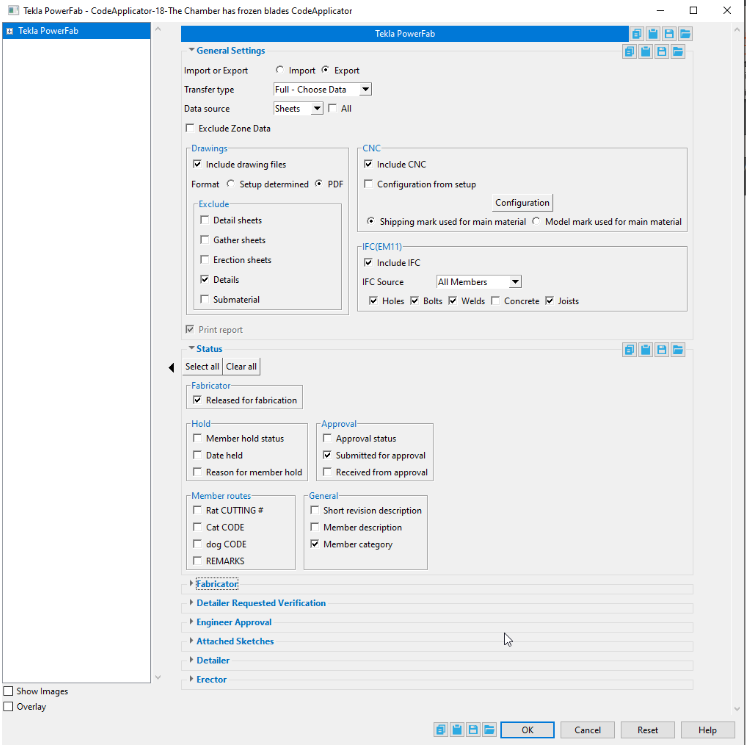
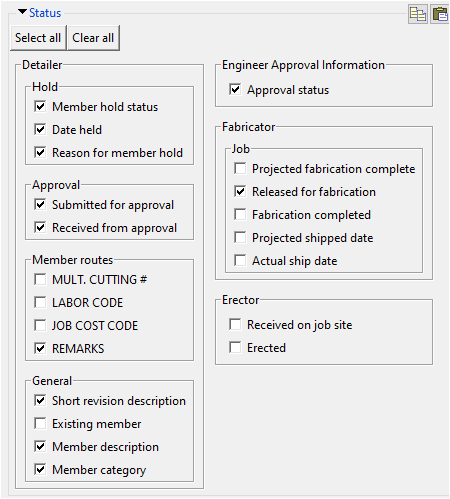
Below is an image of the suggested “Status” options in SDS2. If other options are selected, you will need to find a location to map them to in Tekla PowerFab.
-
Member routes. In SDS2 you can modify the names for the routes and choose which to add to the bill of material. By default, SDS2 has the labels as seen above, but they may be named differently. This is set up in the bill of material layout in Project Settings.
-
For example, some users will change one of the four routes to “Finish.” In that case, you could map the routing “Finish” to the Tekla PowerFab “Finish” field.
-
—TIP—
Properties
Member “Custom Properties” will only be available if they are active in the SDS2 project. These properties can then be mapped to different fields in Tekla PowerFab.
If you used either SDS2 “Legacy Custom Properties” or the “Modular Custom Properties,” you will likely see sections with “Engineer Approval” and “Detailer” properties.
If they are available or active, you will want to select the following:
-
“Engineer Approval”: Select all options except “2D Drawing Commented” and “Department”
-
“Detailer”: Select all options except “Architecturally Exposed Structural Steel” and “Beam Penetration.”
Finishing the Export
Once you click "OK" to complete the export the following will occur:
-
If exporting from model, select the members you want to export if you have not already done so. Then right-click and select “OK” or press the “Enter” key to proceed.
-
You will be prompted for a location to save the files.
—TIP—
Create a folder in the destination folder before exporting. Using the "New Folder" can be a bit tricky.
-
Once you click “OK” to complete the destination, you will be prompted to approve use the selected directory. Click “Yes.”
Note: If you used selection from the model, your model did not disappear. Change the model to solids and reopen the view to see your model again.
Inside Tekla PowerFab Tips
Here are a few tips to help you when importing into Tekla PowerFab using an SDS2 XML file.
-
Zones are hard coded in Tekla PowerFab to go into lots. If you want to set your own lots and do not want to have the zone value go into lots during import, deselect “Use Lot Numbers” from Production Control Job Edit > Input Settings.
-
In SDS2 2022 you will be able to exclude zones from export.
-
-
You can use the table located in Maintenance > Integration Settings > SDS2 to create the mapping of SDS2 fields to Tekla PowerFab settings. Alternately, on import, from the “Import Field Map” table you can create a new SDS2 mapping or save to an existing mapping filed using the “Edit” option.
-
For concrete you can add shapes as CO (comment) on import.
-
Be sure to turn on the ABM number in SDS2 so it will come across in the XML.
-
On import into Tekla PowerFab, even if you have selected all the member “Custom Properties” (user attributes) to be available in the export from SDS2, only properties that have values populated will be available in the “Import Field Map” table.
-
If the members being imported are revised and if they are piece tracked, then it is imperative to look at the “Import log” to see the changes made because the member will not be updated in Tekla PowerFab.
-
Remove the tracking before importing if you want revised members to be updated.
-
-
When exporting, have your ABM number exported and mapped to the Tekla PowerFab field of your choice.
-
A commonly used field would be the Reference #.
-