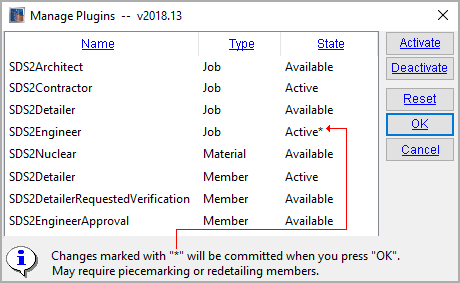
The Activate Custom Properties window ( Job Settings )
|
Home > Project Settings > Job > Activate Custom Properties is available only if the " Flavor " that was selected at the time your current Job was created was a modular flavor. |
- To open the Activate Custom Properties window
- Tutorial
- Columns on the Activate Custom Properties window
- Buttons on the Activate Custom Properties window
Also see :
|
- Flavor (a modular flavor makes this window available)
- plugins/SDS2/Properties/SDS2Properties (populates " Name " column on this window) (
 )
)
- Creating your own plugin (advanced) (
 )
)
- Edit Schema (window that schema entries to ' Active ' plugins are shown on)
- Edit Properties (window that custom properties associated with ' Active ' plugins are shown on)
page 1 | contents | home > project settings > job > custom properties > | classic | top
To open Activate Custom Properties :
Method 1 : Home > Project Settings > Job > Custom Properties > Activate Custom Properties .
Methods 2, 3 & 4 : In Modeling or the Drawing Editor , choose Settings > Job Settings > Activate Custom Properties (classic), or use a keyboard shortcut , or click the icon.
Password protection: If a password has been set using the Change Setup Password utility, you can open this window only if you first enter that exact password.
Warning: Activate Custom Properties is available only if the " Flavor " that was selected at the time your current Job was created was a modular flavor. If the flavor selected at that time was a legacy flavor, you can't open this window.
page 1 | contents | home > project settings > job > custom properties > | classic | top
Stages 1 through 4 explain how to add sets of modular custom properties to a new Project:
Stage 1 : On the Create New Project window, select ' Modular ' as the " Flavor ."

|
The Create New Project window opens when you Home > press the "jobname" to change the active Job > press the " New... " button on the Job selection dialog that opens. |
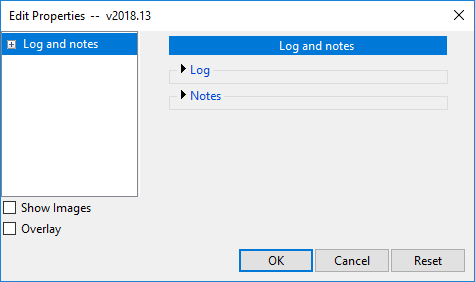
Stage 2 : In Modeling , add a beam ( Add Beam ), then edit that beam and press the " Properties " button to view its properties. On the Edit Properties window, you will find leaves for "
Log " and "
Notes " only.
|
A representation of the Edit Properties window. |
Note 1: If, in stage 1, you mistakenly selected a legacy " Flavor ," the window opened by pressing " Properties " is named Custom Properties , not Edit Properties . You won't be able to do stage 3 since Activate Custom Properties is only available as a setup option when your current Job uses modular custom properties.
Note 2: If, in stage 1, you selected an " Other modular flavor " that was created using the Copy Job Flavor to Global Flavor utility, you will probably find leaves in addition to the leaves for "
Log " and "
Notes ." In Stage 3, you will discover that these additional leaves correspond to plugins that are already set to ' Active '.
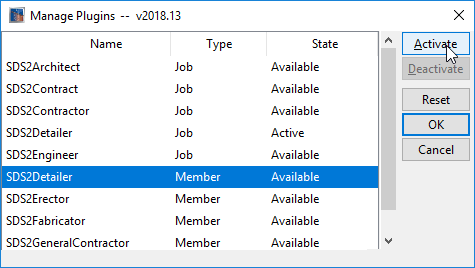
Stage 3 : Home > Project Settings > Job > Custom Properties > Activate Custom Properties to open Activate Custom Properties . Select the plugin whose " Name " is " SDS2Detailer " and whose " Type " is ' Member ' as the plugin, press the " Activate " button, then press the " OK " button.
|
A representation of Activate Custom Properties . When you press " Activate " for a selected plugin, the " Status " of the plugin becomes ' Active * ' (with an asterisk). Pressing " OK " changes its " Status " to ' Active ' (no asterisk). |
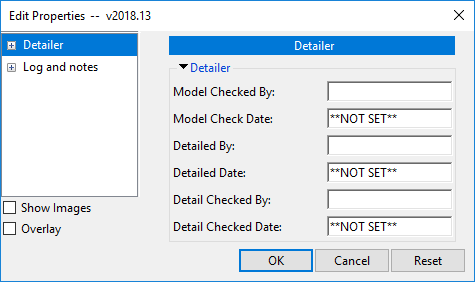
Stage 4 : Back in Modeling , double-click the beam you added in stage 2. Press the " Properties " button to view its properties. You will find a new leaf and section header named "
Detailer " on the Edit Properties window.
|
A representation of what the Edit Properties window looks like with the " Detailer " leaf opened. |
Stages 5 and 6 add " User Namespace " properties. The use of Activate Custom Properties (stages 3 & 4) is not needed. The only requirement is that you, in stage 1, selected a modular flavor.
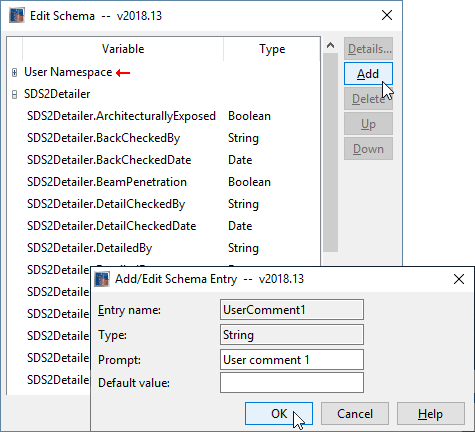
Stage 5 : While viewing the properties of the beam, you realize that you want to make a personal comment about the beam. You decide to create your own property. Home > Project Settings > Job Custom Properties > Member Custom Properties. This opens the Edit Schema window, on which you press the " Add " button. You then enter an " Entry name " and " Type " and " Prompt " and press " OK " on the Add/Edit Schema Entry window.
Representations of the Edit Schema and Add/Edit Schema Entry windows. When a new schema entry is added using these windows, it is placed in the " User Namespace " set of schema entries.
Stage 6 : Back in Modeling , double-click the beam you added in stage 2. Press the " Properties " button to view its properties. You will find a new leaf and section header named "
User Namespace " on Edit Properties window. The new property with the " Prompt " name ' User comment 1 ' is shown under the "
User Namespace " leaf. You can now type the personal comment you wanted to make into the new custom property entry field you just created.
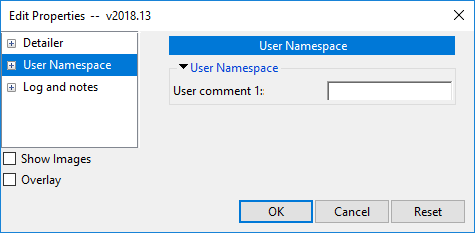
A representation of the Edit Properties window.
page 1 | contents | home > project settings > job > custom properties > | classic | top
Columns on Activate Custom Properties :
Name: The plugin name . The plugin name is read-only information. You cannot change it on this window.
The source of the plugin names that appear in the " Name " column is the plugins/SDS2/Properties/SDS2Properties folder (
). That folder can be found in the data directory that is used by your current version of SDS2 Detailing (v2018 or newer).
Plugins can contain multiple custom properties, each of which belongs to a particular " Type " of schema.
When the " State " of a plugin is made ' Active ', it then belongs to the job schema or member schema or material schema or bolt schema or hole schema or weld schema that is associated with your current Job. The plugin " Name " is then listed -- on the Edit Schema window ( Home > Project Settings > Job ) -- as the name of a set of plugin schema entries . A plugin that is made ' Active ' also propagates to the Edit Properties window, in the form of user-editable custom property fields. See the " Tutorial " on this page
Type: Job or Member or Material or etc . This is the schema type of the plugin. The schema type of a plugin is read-only information. You cannot change it on this window.
' Job ' indicates that the plugin contains job custom properties, which propagate to the Edit Properties window as described here .
' Member ' indicates that the plugin contains member custom properties, which propagate to the Edit Properties window as described here .
' Material ' indicates that the plugin contains material custom properties, which propagate to the Edit Properties window as described here .
' Bolt ' ' Hole ' and ' Weld ' plugins can also, potentially, be shown on this window. However, none of the plugins that SDS2 provides are bolt, hole or weld plugins. Instructions for creating your own plugin are provided in the video for plugins/SDS2/examples/ModularCustomPropertyExamples (
).
State: Active or Active* or Available or Available* .
' Active ' (w/o an asterisk) means that the plugin is currently being used in your current Job and that a "
Leaf " whose name matches the active plugin's " Name " appears on the Edit Properties window for members or materials or etc. (as the case may be). Each active plugin's " Name " is also listed on the Edit Schema window ( iob Setup ) as the name of a set of plugin schema entries .
' Active* ' (with an asterisk) means the plugin is tentatively active. When you press " OK ," this window closes and the " State " of the plugin is changed from to ' Active ' (w/o an asterisk).
' Available ' (w/o an asterisk) means that the plugin is available to be used in your current Job but is currently deactivated.
' Available* ' (with an asterisk) means that the plugin has been selected to be deactivated in your current Job. When you press " OK ," this window closes and the " State " of the plugin is changed to ' Available ' (w/o an asterisk)
page 1 | contents | home > project settings > job > custom properties > | classic | top
Buttons on Activate Custom Properties :
1 . Select a plugin whose " State " is ' Available '.
2 . Press the " Activate " button.
3 . The plugin's " State " is changed to tentatively active; that is, active with an asterisk ( Active* ).
4 . When you press " OK " to close this window, plugins that are tentatively active ( Active* ) are made active ( Active ). This means that the custom properties and schema entries associated with those plugins now reside on type -appropriate versions of the Edit Properties and Edit Schema windows.
Note: When " Activate " is pressed for a plugin whose " State " is tentatively available; that is, available with an asterisk ( Available *), the state changes back to active -- no asterisk ( Active ) -- which was its state when this window was first opened.
1 . Select a plugin whose " State " is ' Active '.
2 . Press the " Deactivate " button.
3 . The plugin's " State " is changed to tentatively available; that is., available with an asterisk ( Available* ).
4 . When you press " OK " to close this window, plugins that are tentatively available ( Available* ) are set to a " State " of ' Available '. The custom properties associated with schema entries contained in plugins in the ' Available ' state do not reside in your current Job.
Note: When " Deactivate " is pressed for a plugin whose " State " is tentatively active; that is, active with an asterisk ( Active * ), the state changes back to available -- no asterisk ( Available ) -- which was its state when this window was first opened.
Warning: Deactivating a plugin for which users in your current Project have entered custom property information results in all of those entries being lost. You can activate that plugin again, but to restore the entries that have been lost, users will have to manually or parametrically make entries to those properties on the Edit Properties window. Also lost, but more easily recovered, will be any changes that were made to individual schema entries on the Add/Edit Schema Entry window.
1 . Press the " Reset " button.
2 . This window ( Activate Custom Properties ) stays open. The " State " of plugins that are tentatively active ' Active* ' (active with an asterisk) are changed to ' Available '. The " State " of plugins that are tentatively ' Available *' (available with an asterisk) are changed to ' Active '. In other words, the " Reset " button reverts this window back to the state it was in when you first opened it.
1 . Use the " Activate " and/or " Deactivate " buttons to change the " State " of plugins. The plugins whose " State " you change will be marked with an asterisk.
2 . Press the " OK " button.
3 ( If applicable ): If any plugins were deactivated (' Available *') when you pressed " OK " in step 2, a yes-no dialog opens.

Data stored in custom properties in deactivated modules may not be recoverable. Continue?


Data is stored in custom properties if users in your current Project have made entries to those properties on the Edit Properties window.
For example, the SDS2 Detailer plugin for members creates a custom property whose prompt name is " Input By :" If users in your current Job made entries to that property for members B_1 and C_2, and etc., those entries would be lost if the SDS2 Detailer plugin were marked available with an asterisk ( Available* ) at the time you pressed " Yes " on this dialog. 3a : Press the ' Yes " button to continue.
Note: Pressing " No " on this yes-no dialog gives you the same result as you would have gotten if you pressed " Cancel " instead of " OK " to close the Activate Custom Properties window. In other words, the window closes without committing the " State " changes that you have specified on it. State changes are marked with an * (an asterisk).
4 . This window ( Activate Custom Properties ) closes. The " State " of plugins that are tentatively ' Active* ' (active with an asterisk) are changed to ' Active '. The " State " of plugins that are tentatively ' Available *' (available with an asterisk) are changed to ' Available '. Custom properties and schema entries associated with plugins whose state has changed are added or removed on type -appropriate versions of the Edit Properties and Edit Schema windows.
1 . Press the " Cancel " button.
2 . This window ( Activate Custom Properties ) closes. The " State " of plugins that are tentatively active ' Active* ' (active with an asterisk) are changed back to ' Available '. The " State " of plugins that are tentatively ' Available *' (available with an asterisk) are changed back to ' Active '. In other words, the " Cancel " button closes this window without committing the " State " changes that you have specified on it.
page 1 | contents | home > project settings > job > custom properties > | classic | top