Python 3 Upgrade
This transition impacts our own code, but also impacts code written by 3rd parties. It is likely that any piece of Python written to run in SDS2 will need at least some attention. This document should serve as a guide and a trouble shooting reference for managing this transition.
- Recommended Approach
- reindent.py
- 2to3
- Plugin File
- Additional Changes
- Detailing Templates Conversion
-
Get your automated testing in order, and your version control in order.
-
Run reindent.py on your code and commit.
-
Run 2to3 on your code and commit.
-
Run your tests
-
Fix any issues that show up. If you need more help with the Python 2 to 3, contact SDS2 developer support.
Inside both Python 2 and Python 3 installs there is a script called reindent.py. This tool removes mixed white space (cases where a line is indented with both tabs and spaces, it switches to spaces). It will also make white space changes like these all-in-one batch, with no functional changes mixed in. Python 3 doesn’t allow mixing any longer. By default, this is in the C:\Program Files\Python310\Tools\scripts.
To run this tool:
-
Open the command prompt.
-
Change into the Python scripts directory. By default, this is in the
C:\Program Files\Python310\Tools\scripts.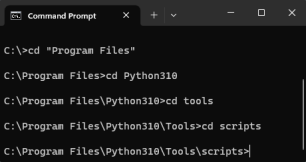
-
Once you are in that directory, type reindent.py "path to the file you want to update"
Example:
C:\Program Files\Python310\Tools\scripts>reindent.py "C:\ProgramData\SDS2_2022\macro\examples\Beam_Angle_Fill.py"
Inside of the Python 3 installation is a program called 2to3. This tool reads Python 2.x source code and applies a series of fixers to transform it into valid Python 3.x code. By default, this is in the C:\Program Files\Python310\Tools\scripts.
To run this tool:
-
Open the command prompt.
-
Change into the Python scripts directory. By default, this is in the
C:\Program Files\Python310\Tools\scripts.
-
Once you are in that directory, type 2to3.py "path to the file you want to update"
Example:
C:\Program Files\Python310\Tools\scripts>2to3.py ‑nw "C:\ProgramData\SDS2_2022\macro\examples\Beam_Angle_Fill.py"
Tag PLUGIN file Python3
SDS2 will no longer import plugins that do not have a PLUGIN file. If the PLUGIN file is missing a PYTHON3 tag/key in the global section it will not be imported.
To fix this, edit the PLUGIN file of your plugin, and make the first line of the file "PYTHON3" (quotes removed). If you like you can assign it to anything you like (PYTHON3=yesplease) or just have the word on its own. This tells SDS2 that this plugin is ready for Python 3.
If a plugin exists in both the job and the data directory, we follow the existing convention that the job overrides the data directory. But, if the job version isn’t tagged PYTHON3, we will fall back to the one in the data directory if it is.
If your plugin file has “CUSTOM_MEMBER”, that needs to be changed to “[Member]” and you should consider filling in the extra details on that like you normally would. This was the original format for the PLUGIN file, but it is no longer supported.
macrolib.pickle
macrolib.pickle has been removed, there was an old old copy of pickle.py from an older version of Python 2. This has been removed. Import pickle normally, from python, instead of using this.
UUID in SDS2
In some cases, SDS2 would return UUIDs as a 16-byte str object that isn’t guaranteed to print as valid ASCII, or Latin1, or UTF-8 text. Python 3 doesn’t allow this, str is always encoded and a new object, bytes, exists for this kind of data. We will not use bytes for UUID. Instead, we are using the text representation which is always valid ASCII: 123e4567-e89b-12d3-a456-426614174000.
This includes solids_creator_uuid on material objects. There was a solids_creator_uuid_str, now solids_creator_uuid and solids_creator_uuid_str return the same thing. Best practice is to use the version without _str.
Storage
Data passed to Storage.Write and returned from Storage.Read should be a bytes object now. This had already been used to store unencoded byte streams in the past, and to best allow this to continue we’re switching this from str to bytes. You can still store your text but you need to encode it:
bytes(yourstrobject, ‘utf-8’) # you can choose any encoding you like, doesn’t need to be utf-8, but make sure you use the same one to decode
And decode it:
str(yourbytesobjectinutf8, ‘utf-8’) # the encoding has to match on both sides
Model.None
We can no longer name this enumeration value “None.” This is part of the enum for “flange_welds” on model.member. So it is now “model.NoWeldPattern.”
Watch for uses of model.None. If you had “from model import *” then “None” was the normal python None, python wouldn’t allow from import * to override None.
String module
Much of this module has been moved out and is now methods on a str object. (Examples: expandtabs, find, rfind, join, strip, split.)
We found that 2to3 didn’t seem to reliably convert this, it’s simple to replace by hand. For example, string.split seems to just be:
def split(s, *args, **kw): return s.split(*args, **kw)
Tkinter.Tk(place=)
Although it was likely not used, we've removed this modification that had been made.
We’ve also changed the behavior of default tkinter.Tk(). It starts out unmapped, and users must map it (ideally once you’ve built your screen, so it nicely pops up all ready to go and doesn’t flash).
We recommend using the built-in dialog API, but if you are using tkinter to create a window:
yourwindow.tk.call("place_window", ".", “-grab”, “stateful”, "-stateful", "middle_screen"
Exceptions in dialog/tkinter callbacks
Uncaught exceptions inside of dialog rules, or any tkinter callback, no longer simply print to the console and move on. These are now elevated to warnings or errors.
Uuid.Uuid.bytes
This is now of type bytes not str. Otherwise, it’s the same raw 16 bytes of data.
Pickle
If you are manually pickling SDS2 components or members:
1. Make sure you read and write your pickles to files with ‘b’ (‘rb’, ‘wb’) to avoid the need for encodings.
2. Your Python 2 pickles are encoded as ‘bytes’. So, pickle.loads(your pickle, encoding=’bytes’). If you get this wrong, you may find that it sometimes works and other times SDS2 crashes.
3. Pickle streams are bytes objects, never str.
Hashable types and __eq__
All objects default to be hashable, based on reference identity. In Python 2, if you define __eq__, they continue to be hashable based on reference identity. In Python 3, they become unhashable until you define __hash__.
https://docs.python.org/3/reference/datamodel.html#object.__hash__
__cmp__
If you implemented __cmp__ before, but not __gt__ and __lt__, you should implement __gt__ and __lt__.
Dialogs, Rules, and Name Sorting
This is only an issue if you’re using screen only properties to load multiple versions of a property on your object (or something similar to that).
We ran into this with our caged ladder which has a field “ladder_type”. This field has a different set of options depending on if it’s attached to a beam or not. So we have .screen_only = True properties “ladder_type1” and “ladder_type2”. One is for when it’s attached to a beam, and one for when it’s not. (One has more options than the other).
When the screen is loaded ladder_type1 and ladder_type2 are set from ladder_type. Then the reverse happens, but it’s a no op.
In the transition to Python 3 our luck faded, and ladder_type started getting set from ladder_type1 (which just defaulted to the first item).
To help fix this we’ve eliminated the luck in terms of what order rules are executed when the dialog is loaded. It is now in sorting order for the field names. So “ladder_type1” sorts after “ladder_type”.
Additionally, we recommend prefixing screen_only properties with ~. This character is illegal for property names, so it shouts “screen_only” in your code. It will sort to the end, so its rules will for sure run after all those for fields that are loaded from the object being edited. Since screen_only properties only exist in dictionaries (they’re never properties on an object) it’s safe to put a tilde in there. This is only a recommendation, you really just need to be careful about the field names to make sure screen_only names would get their rules run after others, so they don’t overwrite user data with defaults.
Processable proxies and dict key sorting
Sorting of dict keys changes between Python 2 and Python 3. In Python 2 keys are sorted in a predictable, but difficult to explain in words, method related to their hashes. In Python 3.10 the keys are sorted to the order they’re added in. (In Python 3 prior to 3.6 the sorting was volatile from one run to the next, and seemed random.)
Combine this with processable members and components where materials are added with a dictionary of attribute names and values and then the attribute names are applied. They have to be applied in some order, but some attributes really modify the same data (for example, on a rectangular plate, pt1 and pt2 together define the length, but so does length and so does work_pt_dist).
If your values all agree this will not matter and everything will be fine. If they do not, and the order you set them is different from the Python 2 key order, then you will see differences. For example, maybe your pt1.Distance(pt2) is 12 inches. But length, due to a bug, is calculated to 3 inches. If length is set first, before pt2, then you’re fine and you get 12 inches. If it’s set second, then you get a 3 inch long plate (this is an actual example we came across in our own plugins).
Example code:
        rect_pl_atts = {
            'Member': support_mem,
            'pt1': point,
            'pt2': point + pourstop.supportPLWidth * -y,
            'grade': pourstop.supportGrade,
            'origin': 'Center',
            'BottomOperationTypeRightEnd': 'Clip' if do_clip_br else "None",
            'BottomLengthRight': clip_width if do_clip_br else 0.,
            'BottomClipRight': clip_depth if do_clip_br else 0.,
            'BottomOperationTypeLeftEnd': 'Clip' if clip_left else "None",
            'BottomLengthLeft': max(
                min_clip,
                left_clip_dim
            ) if do_clip_br else 0.,
            'BottomClipLeft': max(
                min_clip,
                left_clip_dim
            ) if do_clip_br else 0.,
            'TopOperationTypeLeftEnd': "Cope" if do_cope_tl else "None",
            'TopLengthLeft': cope_length,
            'TopCopeLeft': cope_depth,
            'length': point.Distance(point + pourstop.supportPLClipWidth * -y),
            'work_pt_dist': point.Distance(
                point + pourstop.supportPLClipWidth * -y
            ),
            'mtrl_type': "Plate",
            'mtrl_usage': "BentPL support PL",
            'finish': pourstop.supportFinish,
            'color': validColTup(pourstop.supportColor),
            'thick': pourstop.supportPLThk,
            'width': mtrl_depth
        }

        rect_proxy = RectPlate(**rect_pl_atts)
        pourstop.RegisterDesignProxy(rect_proxy)
In Python 2, this sets RectPlate properties in this order:
- origin
- work_pt_dist
- TopCopeLeft
- finish
- BottomLengthRight
- BottomOperationTypeRightEnd
- BottomLengthLeft
- grade
- mtrl_type
- pt1
- Member
- mtrl_usage
- BottomOperationTypeLeftEnd
- width
- length
- TopLengthLeft
- TopOperationTypeLeftEnd
- BottomClipRight
- thick
- Pt2 (length becomes 12” here)
- color
In Python 3 you get the same order as dict creation:
- Member
- pt1
- pt2
- grade
- origin
- BottomOperationTypeRightEnd
- BottomLengthRight
- BottomClipRight
- BottomOperationTypeLeftEnd
- BottomLengthLeft
- TopOperationTypeLeftEnd
- TopLengthLeft
- TopCopeLeft
- Length (length becomes 3” here)
- work_pt_dist
- mtrl_type
- mtrl_usage
- finish
- color
- thick
- width
Bankers rounding
In Python 3 the built-in round method has changed from the more common ‘5 always rounds up’ algorithm and now uses something called “bankers rounding.” The algorithm is to round ‘5’ to get the closest even value (for the next decimal place).
So 2.5 rounds to 2. 3.5 rounds to 4. This is one algorithm to make 0.5 round up half the time and down the other half, to be more fair. In Python 2 0.5 always rounded up.
Starting in SDS2 2023, all Python code has been converted from Python 2.7 to Python 3.10. Any code written in Python 2.7, including Detailing Templates, will not run.
If a job is converted from an older version of SDS2 to SDS2 2023, you must update the Detailing Templates in the converted job to detail Members, Group Members or Submaterials with Detailing Templates.
If you have not made any modifications to your Detailing Templates, update them by copying the templates:
-
Change into the SDS2 project.
-
At Home > Utilities > Utilities Functions > Copy >, click Copy Detailing Templates. The Copy Templates Utility window will open.
-
In the Copy Templates Utility window:
-
In the Copy From section, select the Template Folder radio button and browse to C:\ProgramData\SDS2_2023\detailing\Default\US (or the corresponding location in your data directory, if you didn't install into the default locations).
-
In the Copy To section, under Template name conflict handling select the Erase existing files from the destination source radio button.
-
Click OK.
-
If you have had Detailing Templates Customization done by SDS2, the templates have been converted and a new installer will be sent to you. Follow the directions in the email with the link to download your Detailing Templates to install and copy the Detailing Templates into your converted job.
If you have modified Detailing Templates on your own, please contact the Support Department at SDS2-Support@allplan.com.

