 Member Move/Stretch ( Modeling )
Tool summary :
- Moves members that you select in their entirety. Stretches members whose ends you select.
- A member's end is identified with a cube (
 ). When only one end of a member is selected, the member is stretched, skewed or compacted. When both ends are selected (or the entire member is selected), the entire member is moved. A special case: See " Sloped column ." Also: A group member does not have an end -- only its submembers do.
- In an elevation view, you can use Move/Stretch Member to raise or lower the elevation of an entire floor. In a plan view, you can use Move/Stretch Member to move a wall. If you properly set depth checking and use DXDY , you can also raise or lower the elevation of a floor in a plan view.
- Do yourself a favor and check out the Move/Stretch Include Material tool. It is very similar to this tool and, for many situations, superior to this tool. If you are stretching one end of a member and want graphical material attached to that end to be moved along with the end, then use that tool. If you want the material to not move with the member end, then use this tool.
- See the and quick instructions and detailed instructions .
Also see :
VIDEO 
Two horizontal braces are preselected, then the narrator does a right-click and chooses " Move/Stretch Members " on the context menu . The members are virtually moved two feet to the left (' -2-0 ') using DxDy . Since right-click ( No ) is the choice made in the confirmation step, the members are never actually moved. (Recorded in SDS2 Detailing , v7.2.)
VIDEO One end of a horizontal brace is stretched 2-0 feet to the left by entering a negative value of ' -2-0 ' to the " X " field for DxDy . The operation is cancelled, then the entire member is moved to illustrate the point that when both the member and its end are selected the entire member is moved. (Recorded in SDS2 Detailing , v7.2.)
VIDEO Depth checking affects a selection by area box for Move/Stretch in an elevation view with the ' Member Ends ' selection filter. The ' Default ' selection filter is then used, giving different results than when the ' Member Ends ' filter was used. (Recorded in SDS2 Detailing , v7.2.)
- Modeling (where Move/Stretch Members is a tool)
- Automatically process after modeling operation ( User and Site Options > Modeling > )
- Move/Stretch Include Material (an alternative to Move/Stretch )
- Reference model member (can be moved with Move/Stretch )
- Point selection by area box ( User and Site Options > General > )
- Depth checking (set limits prior to Move/Stretch )
- Sloped column (affects Move/Stretch )
- Member ends (selecting one or both ends sets what the operation does)
- Member Ends (selection filter helps you to select a member's end without also selecting the member)
- Masked members (cannot be moved using this tool)
- Edit Member (to change member elevation and length)
- DXDY (sometimes useful with Move/Stretch )
- INCM (sometimes useful with Move/Stretch )
- Member Copy (alternative to Move/Stretch -- just delete the original members)
page 1 | contents | model > member > | model -- member | member tools | top
Quick instructions (also see the detailed instructions ) :
In this example, Move/Stretch Members "moves" a line of columns and a beam and "stretches" two beams that frame to the flanges of those columns. Depth checking was turned off, thus ensuring that both ends of columns were selected -- if only the tops of the columns were selected, the columns would be skewed instead of moved. Since " Point selection by area box " was set to ' Directional ', the area box shown in step 1 had to be drawn from left to right in order to select member ends. The ' Default ' selection filter was used.
|
1 . In Select Items mode, select the members and member ends that you want to stretch and move. In this example, an area box is used to select two columns, a beam, and the ends of two beams. |
|
|
2 . Invoke Move/Stretch Members . |
|
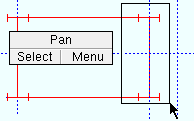
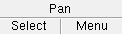
3 . Move/Stretch Members highlights the members and member ends ( |

|
4 . Position the mouse pointer ( |
|
5 . Left-click ( Yes ) to accept the move that is shown. Right-click ( No ) ends the operation. |
page 1 | contents | model > member > | model -- member | member tools | top
Detailed instructions (also see the quick instructions ) :
Move/Stretch Member can be used in Modeling to move one or both ends of a member or a group of members to new positions in the 3D Model. A group member does not have an end -- only its submembers do. When you move one end of a member, you effectively stretch, skew or compact that member. When you move both ends, you move the entire member without changing its length. The following instructions assume that you are using a 3-button mouse. You must do either step 1f (preselection) or step 3 (in-tool selection) to perform this operation.
1 . Before using this tool:
1a (recommended) : Do a Change All to Stick to display in stick form all members that are in the view in which you want to perform the Move/Stretch Member operation.
1b : Turn depth checking off or on to suit your purposes. Turn it off, for example, if you are in a plan view and want to move (rather than stretch) columns. Turn depth checking on if you want to select only those ends of members that are inside the depth checking limits.
1c : Set the selection filter for ' Member Ends ' if, for example, you only want to select one end of members and thus perform a stretch operation (selecting both ends moves the member in its entirety). Set the selection filter for ' Members ' if, for example, you want to move members to new locations. If you want to move some members and stretch others, its probably easiest to not set any filters.
1d (optional) : On Column Edit windows of columns you want to make sloping (or keep perfectly vertical), you can check (or uncheck) the box for " Sloped column ."
1e (optional) : Set " Automatically process after modeling operation " to ' Process and create solids ' (or, possibly, ' Use Site Default ') if you want the members operated on to automatically undergo Process and Create Solids in step 8.
Select Items bindings (step 1f) 1f (optional) : In Select Items mode with an appropriate selection filter selected, Select or Select+ (or draw an area box ) to select the member(s) and/or member end (s) that you want to relocate. Use Select- if you want to deselect members or member ends. Tip 1 : Member ends are 1 foot from the work points ( exact points ) of members. Tip 2 : Selection by area box functions differently depending on whether you draw the area box from left to right or right to left.
2 . Invoke Move/Stretch Member using one (1) of the following methods:
Method 1 : Click the Move/Stretch Member icon, which is pictured above. The icon can be taken from the group named ' Model - Member ' and placed on a toolbar (classic) or the ribbon (lightning).
Method 2 : If " Modeling layout style " is ' Classic ', you can use the menu system to choose Model > Member > Move/Stretch .
Method 3, 4 or 5 : Move/Stretch can also be configured to be invoked using a keyboard shortcut , the context menu , or a mode . For the lightning interface, this configuration is done using Customize Interface . The default keyboard shortcut for Plan View is v .
Method 6 : If you preselected members (in step 1f), you can right-click and choose " Move/Stretch Members " on the context menu .
3 . Skip this step if you already selected member(s) or member end(s) in step 1f.
|
|
|
Select Item(s) bindings |
3a (if you didn't do 1f) : Move/Stretch Members activates Select Item(s) mouse bindings, and the status line prompts you to select one or more members and/or member ends. Press the Enter key or right-click ( Menu ) and choose " OK " on the context menu when you are done selecting.
4 . Skip this step if " Z filtering " is off or if User and Site Options > Modeling > " ![]() Prompt to temporarily turn off Z-filtering before some tools " is turned off.
Prompt to temporarily turn off Z-filtering before some tools " is turned off.
4a (If " Z filtering " is on and has a distance entered) : A yes-no dialog opens. On it is the message: " Temporarily turn off Z filtering? " Press the " Yes " button if you do not want " Z filtering " to apply to this operation. " Z filtering " will be turned back on in step 8 . Press the " No " button if you want the distance entered to " Z filtering " to apply to members moved during this operation.
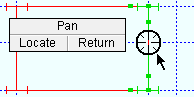
5 . Locate- Pan -Return mouse bindings become active along with various Locate options. The status line prompts, "Locate a reference point:"
|
|
|
bindings |
Alternative 1 : Select the Locate icon you want (if its not pressed already), then place your mouse pointer (
) so that the point location target (
) snaps to where you want the reference point, then left-click ( Locate ). Go to step 6.
Alternative 2 : Pight-click ( Return ) to end the Move/Stretch Members operation and keep everything as it was before step 1. Do not continue.
6 . The status line prompts, "Locate second point:"
|
|
|
bindings |
6a : Place the mouse pointer (
Tip: If you are in a plan view and want to move the member(s) to a higher or lower elevation, use DXDY . Also, DXDY is useful if you haven't laid out construction lines.
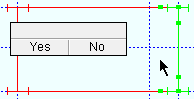
7 . Move/Stretch Members checks for members in the area moved into and does not move any member that would overlap a member that is already in place. Yes - No mouse bindings become active and the status line prompts, "Confirm move."
|
|
|
bindings |
Alternative 1 : Left-click ( Yes ) to confirm that the member(s) new location is correct. Go to step 8.
Alternative 2 : Right-click ( No ) to end the Move/Stretch Members operation and keep everything as it was before step 1. Do not continue.
8 . The same mouse bindings that were active before you invoked this tool are once again active. Please note the following:
page 1 | contents | model > member > | model -- member | member tools | top