 Member Erase and related tools ( Modeling )
Tool summary :
Also see :
- Modeling (where Member Erase is a tool)
- Depth checking (before using Member Erase )
- Automatically process after modeling operation ( User and Site Options > Modeling > )
- Point selection by area box (affects Member Erase )
- Masked members (cannot be erased using Member Erase )
- Model completed (can prevent a member from being erased)
- Erase Member by Piecemark (to erase one member at a time)
- Erase Member by Number (to erase one member at a time)
- Delete (another way to erase members)
- Member Undelete (resurrects selected members that have been erased)
- Visual Undelete (another way to bring back an erased members)
- Quick Undelete (undoes Erase Member )
page 1 | contents | model > member > | model -- member | member tools
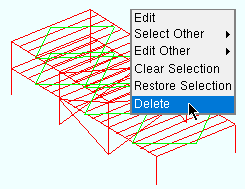
Method 1: " Delete " on the context menu.
|
Select or Select+ one or more members, then right-click and choose " Delete " on the context menu . In this example, horizontal braces are selected. |
| Note: If there is no " Delete " on your context menu, you can use the Delete tool. Or you can add it to the menu using Context Menu Editor . | |
|
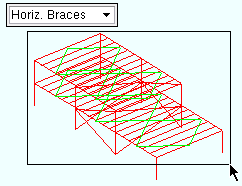
1 . In Select Items mode, hold down the left mouse button ( Select ) and draw an area box around the members you want to erase. In this example, the selection filter is set to ' Horiz. Braces '. |

|
2 . Invoke Member Erase . |
- To invoke Member Erase : You can click the icon. Or choose Model > Member > Erase (classic). Or use a keyboard shortcut. If User and Site Options > General > " Modeling layout style " is ' Lightning ', Customize Interface lets you select Member Erase from the group named ' Model -- Member ' in the Ribbon Editor or Keyboard Shortcut Editor or Context Menu Editor .
- You can skip step 1 (preselection). If you skip step 1, Member Erase prompts you to use Select Item(s) bindings to select the members you want to erase. You can also select the member(s) by drawing an area box or using the Model Tree . Press the Enter key or right-click ( Menu ) and choose " OK " on the menu when you are done selecting the member(s).


Select Item(s) bindings
- After doing the above steps, Yes - No mouse bindings become active, and the status line prompts, " Erase these members? " You can either left-click ( Yes ) to erase the members you selected. Or you can right-click ( No ) to cancel operation without erasing any members.
- If User and Site Options > Modeling > " Automatically process after modeling operation " is set to ' Process and create solids ', all members connecting to the erased member will automatically undergo Process and Create Solids , and you can, if you so choose, display those members in a solid form at this time.
- If User and Site Options > Modeling > " Automatically process after modeling operation " is set to ' Process ' or ' Do nothing ', you will have to Process > Process and Create Solids before you will be able to display the affected members in a solid form.
- To delete/erase members, they must be visible. This means that you must Open ( Ctrl + o ) a view in which the members you want to delete/erase can be displayed. In the Display Options window, the display of " Member lines " needs to be on (
 ) if you want the members to be visible when displayed in stick form .
- The " Primary selection color " in both of the above examples is green .
- The member number [num] of a member that you erase will not be used again by another member until you use the Release Deleted Members utility. Until you Release Deleted Members , you can recover the member using Member Undelete or Visual Undelete . After Release Deleted Members , the member number [num] may be reassigned to a new member as it is Added .
page 1 | contents | model > member > | model -- member | member tools | top