 Export Model - Exporting a U3D file
| Alternative way to create a U3D: You can create a U3D embedded in a PDF document using Create RFI . The embedded U3D automatically includes several views . |
1 . Before exporting:
1a (tip) : Decide in advance which members you want to include in the U3D file. Open ( Ctrl + o ) views in Modeling to help you decide. Typically you will want members that connect together.
1b : Make sure that all members you want included in the file have undergone Process and Create Solids and have been thoroughly reviewed .
1c (optional) : You may also want to set up an appropriate output configuration User and Site Options > Output > " Export Model ." Output may be set to a specific file folder (directory) or the report viewer (your computer screen).

Select Items bindings (step 1d) 1d (optional) : In Modeling with an appropriate selection filter selected, you can hold down the Shift key and Select+ the members that you want to output to the U3D file . If you do not select members at this time, you will be prompted to select members in step 2 .
Note: The units of the U3D file created using this procedure will be inches if your primary dimension " Units " are ' Imperial (ft-in fractions) ' or ' Imperial (in-fractions) '. The units of the U3D file are mm if your primary dimension " Units " are ' Metric (millimeters) '.
Also see: Transmittal of "Model Formats" such as U3D ( Home )
2 . Open the Export Model window using one (1) of the following methods:
Method 1 : Home > Export > 3D > Export Model .
Method 2 : If " Modeling layout style " or " Drawing Editor layout style " is ' Classic ', you can use the menu system to choose Interface > Export Model .
Method 3, 4 or 5 : Click the icon pictured above , or use a keyboard shortcut . If you are in Modeling and have added Export Model to the context menu , you can right-click and choose Export Model on the context menu.
After method 2, 3, 4 or 5 in Modeling , if you did not do step 1d, Select Item(s) mouse bindings will become available, and you will be prompted to select members.
bindings in Modeling if you didn't do step 1d If you decline to select members -- for example, by pressing Enter or Esc without selecting members -- you end this operation.
3 . On the Export Model window (this window), do the following:
3a : Select ' U3D ' as the " Export file format ."
3b : Confirm that the " Destination " is where you want the file to be sent. ' Directory ' outputs the file to a file folder. Export Model gives the U3D file a name with a .u3d extension. ' Screen ' outputs the file to the report viewer , from which you can optionally write to disk.
3c ( optional ): If you want to change the output destination, press the " Change... " button and make appropriate selections on the Output Configuration Setup window.
4 . While still on the Export Model window, press the " Properties " button next to " Export file format " to open the U3D Properties window. On that window are the following options:
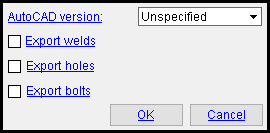
|
The U3D Properties window. |
AutoCAD version: Unspecified (sets version to minimum) or R10 or R11/R12 or R13 or R14 or 2000 - 2002 or 2004 - 2006 or 2007 - 2009 or 2010 or 2013 . This is the version of the U3D file that is to be exported using Export Model . Note: After version R14, AutoDesk began to name their versions after the years in which they were released.
Export bolts:
or
. If this box is checked (
Export holes:
Export welds:
Alternative 1 : Press " OK " at the bottom of the U3D Properties window if you want your changes applied to the U3D file that you are exporting.
Alternative 2 : Press the " Cancel " button if you do not want any changes made to this window applied to the U3D file.
5 . The Export Model window is again active.
5a : Press the " OK " button. Go to step 6 if you are performing this export from Home or in the Drawing Editor . Skip step 6 if you are in Modeling .
6 . (if applicable) : If you are performing this export from Home or in the Drawing Editor , a selection dialog opens. On it is a selection list of members in your current Job. By default, each member is listed by its member number [in brackets] and piecemark .
|
Note: If you are in Modeling , you do not get a selection dialog like this one -- you must instead select members as described in step 1d or step 2 . |
6a : Select the members that you want included in the U3D file. Typically you will want to select members that connect together. Press " OK " to continue on to the next step (" Cancel " at this point ends the export operation).
7 . A U3D file is written to the " Destination " set in step 3. A notification window opens. On it is the message, " Finished exporting file for Export Model ." Press the " OK " button at the bottom of the notification window.
Possibility 1 : If you performed this operation from Home or in the Drawing Editor , the members that you selected in step 6 will be exported to the U3D file.
Possibility 2 : If you performed this operation in Modeling , the members that you selected in step 1d or step 2 will be exported to the U3D file.
page 1 | contents | export model | top