 Add Curved Grid, 3 Points ( Modeling > press g p )
Tool summary :
Also see :
|
- Curved grid lines (topic)
- Grid line/bubble pen color ( Home > Project Settings > Fabricator > Detailing > Drawing Presentation > the " Pens " tab > )
- Rename Project Items ( Utility Functions -- curved grid lines are stored under '
 Erection views ')
- Delete View (to delete a curved grid line)
- Delete Project Items ( Utility Functions -- curved grid lines are stored under ' Erection views ')
- Grid Lines selection filter (for editing and deleting grid lines)
- Add Curved Grid, Radius (another way to add a curved grid line)
- Add Grid Line (to add a straight grid line and an erection view)
- Center of curved grid lines ( Modeling > View > Display Options > )
- Scale erection view bubbles ( Modeling > View > Display Options > )
page 1 | contents | file> views/grids > | curved grid lines | e views
Step-by-step instructions :
Add Curved Grid, 3 Points is used to create curved grid lines . The following instructions assume that you are using a 3-button mouse, that User and Site Options > General > " Point location target " is set to ' Fancy ', and that you use mouse bindings similar to those shown in these illustrations.

|
1 . Invoke Add Curved Grid, 3 Points . |

|
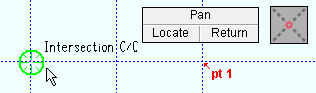
2 . Place the mouse pointer ( |
|
3 . The status line prompts, " Locate second point. " Left-click ( Locate ) at a point counterclockwise from the first point. |
|
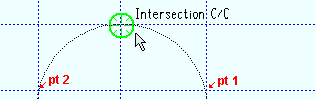
4 . The status line prompts, " Locate third point. " Left-click ( Locate ) a point on the temporary construction circle that is drawn between the two previously located points. |

|
5 . On the New Erection View window, enter a " View name ." The " Erection view type " is automatically selected as ' |
|
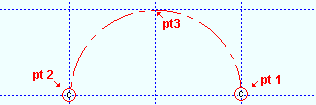
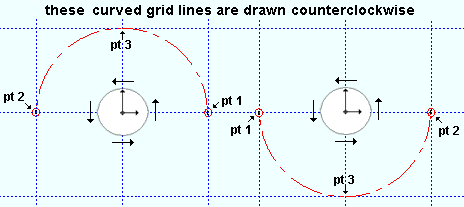
6 . In this example, the curved grid line is drawn beginning at point 1 through point 3 to point 2. See note 4 . Add more curved grid lines, or right-click ( Return ) if you are done. |
Note 1: To invoke Add Curved Grid, 3 Points , you can:
Method 1 : Click the Add Curved Grid, 3 Points icon. The icon can be taken from the group named ' File -- View/Grids ' and placed on a toolbar (classic) or the ribbon (lightning).
Method 2 : If " Modeling layout style " is ' Classic ', you can use the menu system to choose File > Views/Grids > Add Curved Grid, 3 Points .
Method 3, 4 or 5 : Add Curved Grid, 3 Points can also be configured to be invoked using a keyboard shortcut , the context menu , or a mode . For the lightning interface, this configuration is done using Customize Interface . The default keyboard shortcut for Add Curved Grid, 3 Points is g p -- where "p" stands for "points".
Note 2: Right-click ( Return ) in steps 2, 3 or 6 ends the operation.

bindings , steps 2, 3, 6 Note 3: If in step 4, you typed in the name of a view that already has been created, you get a yes-no warning with the message, "_ already exists. Replace? " Press " Yes " to replace the view that already has that name with the view you are saving. Press " No " to cancel this operation without adding a new grid line.
Note 4: In both examples shown below and also in the example above , Add Curved Grid, 3 Points draws the curved grid line beginning at point 1 (step 2) counterclockwise through point 3 (step 4) and terminating at point 2 (step 3). A curved grid line will always have points 1 and 2 as its end points, but it is possible to create curved grid lines with a clockwise rotation from points 1 to 2. The curved grid line will always be drawn in a counterclockwise rotation from point 1 toward point 3. It is possible that point 3 will not be on the grid line, but will only serve to set the directional orientation from point 1.
page 1 | contents | file > views/grids > | curved grid lines | e views | top