 Check Bolt ( Modeling )
Tool summary :
- Backs the selected bolt out from its hole and redraws it so that you can visually check its length, number of washers, etc.
Step-by-step instructions :
You must be in Modeling and do either step 1c (preselection) or step 3 (in-tool selection) to perform this operation. The following instructions assume that you are using a 3-button mouse.
1 . Before using this tool:
1a : Materials that are bolted must be displayed in one of the three solid forms for the bolts to be visible. Also, the box for " Bolts " must be checked on the Display Options window.
1b : You may should be in a view where the bolt, when backed out, will be shown lengthwise (so you can see the bolt head, nuts, washers and length of the bolt).

Select Items bindings (step 1c) 1c (optional) : In Select Items mode with an appropriate selection filter selected, left-click ( Select ) the one (1) bolt that you want to check.
2 . Invoke Check Bolt using one (1) of the following methods:
Method 1 : Click the Check Bolt icon, which is pictured above. The icon can be taken from the group named ' Model -- Bolt ' and placed on a toolbar (classic) or the ribbon (lightning).
Method 2 : If " Modeling layout style " is ' Classic ', you can use the menu system to choose Model > Bolt > Check .
Method 3, 4 or 5 : Check Bolt can also be configured to be invoked using a keyboard shortcut , the context menu , or a mode . For the lightning interface, this configuration is done using Customize Interface .
Method 6 : With Bolt Mode mouse bindings active, hold down the Ctrl or Shift key and left-click ( Check ).
3 . Skip this step if you already selected the bolt you want in step 1c or using method 5.
|
|
|
Select One Item bindings |
3a (if you didn't preselect) : The program prompts you to left-click ( Select ) the bolt you want to check. This prompting also takes place when more than one bolt is selected or if, for example, a material is selected.
4 . The view redraws to show the bolt backed out of the connection and the washers and nut separated (an exploded view). A Done mouse binding becomes active.
|
|
|
binding |
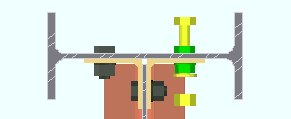
4a : Left-click ( Done ) to have the bolt go back to looking as it normally does in a view.
page 1 | contents | model > bolt > | model -- bolt | 3D bolts | top