 Context Menu Editor ( Modeling & Drawing Editor , ' Classic ' or ' Lighting ')
Also see (lightning) :
- Customize Interface ( Context Menu Editor is opened from)
- Shortcut menu configuration ( Context Menu Editor can edit one such file at a time)
- Role configuration file (may contain multiple roles)
- Role switcher (each role has an associated keyboard configuration file)
- A role (may be assigned 1 context menu configuration, but other roles can have the same menu config)
- Lightning role configuration (role configuration file loaded when, for example, Modeling is launched)
- Note: A single context menu file can be used across multiple roles in multiple role configurations.
Also see (classic) :
- Toolbar configuration file (context menu settings reside in)
- Modeling default ( User and Site Options > Toolbars > SDS2 station > " Modeling " > loaded at startup)
- Drawing Editor default ( User and Site Options > Toolbars > " Drawing Editor " > loaded at startup)
- Load Configuration ( Settings > )
- Delete Toolbar Configuration ( Home > Utilities > Utility Functions > )
Also see (lightning & classic) :
- Context menu ( Modeling )
- Context menu ( Drawing Editor )
page 1 | customize interface > shortcut menu configuration > edit | settings > | top
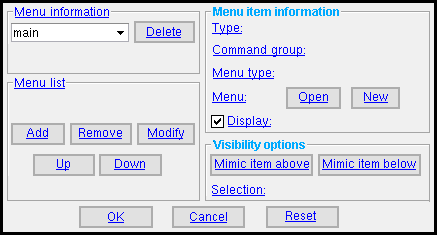
------ Menu information ------
Select the menu that you want to configure: main ( Modeling ) or model_tree ( Modeling ) or main ( Drawing Editor ) or special (a cascade menu in the Drawing Editor ) or any_custom_cascade_menu .
' main ' ( Modeling ) is the context menu you get when you right-click ( Menu ) in the drawing area in Modeling .
' model_tree ' ( Modeling ) is the context menu you get when you right-click ( Menu ) in the Model Tree .
' main ' ( Drawing Editor ) is the context menu you get when you right-click ( Menu ) in the drawing area in the Drawing Editor .
' special ' ( Drawing Editor ) is a cascade menu found in the default ' main ' context menu in the Drawing Editor .
' any_custom_cascade_menu ' may be any name, and you may have multiple cascade menus with different names. You get a cascade menu by pressing the " New " button next to " Menu " after selecting ' Custom ' as the " Menu type ."
Note: When you select a menu here, the " Menu list " updates to show the items (commands, cascade menus, separators) that are currently placed on that menu.
![]() erases the selected menu . You cannot delete the ' main ' or ' model_tree ' menus. You can, however, delete cascade menus that you have added. When you do so, its listing is deleted from the " Menu list " for any other menus that incorporate that cascade menu.
erases the selected menu . You cannot delete the ' main ' or ' model_tree ' menus. You can, however, delete cascade menus that you have added. When you do so, its listing is deleted from the " Menu list " for any other menus that incorporate that cascade menu.
page 1 | customize interface > shortcut menu configuration > edit | settings > | top
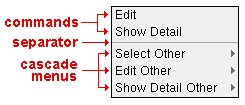
| Items that may be listed here are commands, cascade menus or separators. If under " Menu information " you selected a cascade menu that has not yet been configured, then no items are shown here, and you will need to " Add " items to the cascade menu. |
The " Menu list " shows the items that are available on whatever context menu or cascade menu is selected under " Menu information ."
To add an item under another item, select the item you want the new item to be under, then press " Add ."
To modify an item, select the item, then press " Modify ."
To remove an item, select the item, then press " Remove ."
To move an item, select the item, then press " Up " or " Down ."
page 1 | customize interface > shortcut menu configuration > edit | settings > | top
------ Menu item information ------
| To enable these settings, you need to select an item on the " Menu list " then press " Add " or " Remove ." |
Type: Command or Cascade Menu or Separator .

' Command ' is for invoking a tool by selecting a command on whatever context menu is selected under " Menu information ."
' Cascade Menu ' is for opening a cascade menu from the context menu.
' Separator ' is a dividing line (----) on the context menu.
Command group: Applies when ' Command ' is the " Type . "
1 . Select a command group.


command group
2 . On the command list, select the command that you want added to the " Menu list ."


command list
| Command groups in Modeling : File | File - Views/Grids | Edit | Edit - Search | View | View - Solids Mode | View - Tiles | Navigate | Navigate - Navigation Mode | Navigate - Surface Mode | Model | Model - Construction Lines | Model - Construction Circles | Model - Member | Model - Group Member | Model - Material | Model - Hole | Model - Bolt | Model - Weld | Model - Reference Drawing | Model - Parametric | Model - Cranes | Model - Concrete | Locate | Process | Reports | Reports - SDS2 User | Reports -- Viewer | Interface | Settings | Settings - Job Settings | Settings - Fabricator Settings | Settings - Concrete Settings | Miscellaneous | Selection | Model Tree Only | |
| Erection View Detailing : File | View - Tiles | Navigate | Navigate - Navigation Mode | Navigate - Surface Mode | Settings | User Modes | Selection | Solids | |
| The "Model Tree Only" command group | |
| Edit This | Edit the item that is hovered with the mouse pointer ( |
| Select | selects the item that is hovered. |
| Expand All | expands the Model Tree . |
| Collapse All | collapses the Model Tree . |
page 1 | customize interface > shortcut menu configuration > edit | settings > | top
------ Visibility options ------
![]() and
and ![]() apply the visibility " Selection " setting of the item above or below the currently selected item on the " Menu list " to that currently selected item. It does not matter if the item is a command or cascade menu or separator.
apply the visibility " Selection " setting of the item above or below the currently selected item on the " Menu list " to that currently selected item. It does not matter if the item is a command or cascade menu or separator.
Selection: Default or Always or Any or None or An Object Type or By Expression or Custom .
| Option | The item selected on the " Menu list " is visible |
| ' Default ' | ... when the selected object is an object that can be selected using the ' Default ' selection filter ( Modeling ) or ' Default ' selection filter ( Drawing Editor ). |
| ' Always ' | ... whenever the context menu is open. |
| ' Any ' | ... whenever any object is selected. |
| ' None ' | ... whenever no object is selected. |
| ' An Object Type ' | ... whenever any object of the one selected type is selected. This applies even if objects of other types are selected. |
| ' Custom ' | ... whenever any item of any one or more selected type is selected. ' Custom ' lets you select more than one object type. |
|
You can select any one of these object types directly on the " Selection " menu ( |
| Selectable object types or Custom object types in Modeling : Group Member , Members , Members in Groups, Member Ends , Material, Welds , Holes , Bolts , Beams , Columns , Vert Braces , Horiz Braces , Joists , Girts (Legacy) , Purlins , Misc. , Stairs , Cons. Lines , Cons. Circles . |
| Selectable object types or Custom object types in the Drawing Editor : Arcs , Arc dimensions , Bevels , Bolts (2D only), Circles , Clouds , Cons. Circles , Cons. Lines , Dimensions , End Points , Holes (2D only), Labels , Lines , Members , Sheet Items , Pointers , Polygons , Polygon Sides , Sheet Lines , Welds . |
Menu type: Custom or Select Other or Review Other ( Review/Edit Other in the Drawing Editor ) or Show detail Other .
' Custom ' lets you define your own cascade menu. Press the " New " button to give the menu a name and add that name to the currently shown " Menu list ." Press " Open " to load the new cascade menu into the " Menu list " so that you can " Add " commands to it.
' Select Other ' is a built-in cascade menu (not user-configurable) that lists items under the mouse pointer (
) in the model. As you highlight an item on the list, that item highlights in the model. Choosing an item on the list selects it in the model. There is a same-named and functionally equivalent cascade menu in the Drawing Editor . In Modeling , ' All pcmk ' (for example, ' All B_31 ') is available as an item on the cascade menu for selecting all members with that piecemark.
VIDEO 
Right-click is used to open the context menu and choose " S elect Other " and " R eview Other ." In SDS2 Detailing, " Review Other ... " is " Edit Other ... " (Recorded in SDS2 Detailing , v7.2.) ' Review Other ' is the same as " Select Other ," except that choosing an item opens the edit window for that item. For labels in the Drawing Editor , a listing is provided for editing all labels with the same text. In Modeling only: ' All pcmk ' (for example, ' All B_31 ') is available as an item on the cascade menu for editing all members with that piecemark.
VIDEO 
Same video as is shown above, for " S elect Other ." ' Show Detail Other ' is the same as " Select Other " except that choosing an item starts up the Drawing Editor and shows the detail of the selected member or material. See Show detail .
Note: For " Select Other " or " Edit other " or " Show detail Other ," the functionality of the cascade menu is built in, and you can't change this functionality. The only thing you can do is uncheck " Display " and change the menu label that appears on the menu.
Menu: Press ![]() or select one of the menus previously defined (see menu information ).
or select one of the menus previously defined (see menu information ).
- makes the custom " Menu " that is selected also selected under " Menu information " so that you can use " Add " " Remove " " Modify " " Up " " Down " to make changes to that menu.
Display: ![]() or
or ![]() . This applies, for example, when you have selected an item other than a separator in the " Menu list " and pressed " Modify ." It lets you rename the item that is selected.
. This applies, for example, when you have selected an item other than a separator in the " Menu list " and pressed " Modify ." It lets you rename the item that is selected.
If this box is checked (
), the item is give the name that is currently shown on the " Menu list ."
If the box is not checked (
), you can rename the item that is currently selected on the " Menu list ." Tip: When renaming an item, you can put an _ (underscore) in front of a letter to underline the letter in the context menu. For example, typing " E_xample " here results in " E x ample " on the actual context menu. When the context menu is open, pressing the key corresponding to that letter invokes the command.
Displayed in: Details and/or Job standard details and/or Global standards and/or Submaterial and/or Erection views and/or Detail sheets and/or Gather sheets and/or Erection sheets and/or Sheet outlines .
The item that is currently selected on the " Menu list " will be visible on the context menu when that context menu is used in a drawing of a type whose box is checked (
) here.
This, of course, only applies to the Drawing Editor since you can only be in a drawing when you are in the Drawing Editor .
page 1 | customize interface > shortcut menu configuration > edit | settings > | top
Buttons for editing the context menu :
" Add" inserts a command or cascade menu or separator on the " Menu list . " After you press " OK ," the menu selected under " Menu information " will show the new command or cascade menu or separator you added.
1 . Optionally select on the " Menu list " the item (command or cascade menu or separator) under which you want the new item to be located, then press the " Add " button.
2 . Select a " Type " (' Command ' or ' Cascade Menu ' or ' Separator ')
Possibility 1 : If you selected ' Command ', select a " Command group " and a command from the list , then go to step 3.
Possibility 2 : If you selected ' Cascade Menu ', choose ' Custom ' as the " Menu type ." Press the " New " button to give the menu a name and add that name to the currently shown " Menu list ." Press " Open " to load the new cascade menu into the " Menu list " so that you can " Add " commands to it. For other things you can do if you selected ' Cascade Menu ', see " Menu type ."
Possibility 3 : If you selected ' Separator ', go to step 3.
3 . The item (command or cascade menu or separator) is added to the " Menu list " under the area you selected in step 1. If you made no selection in step 1, the new item is placed at the bottom of the " Menu list ."
"Remove" deletes the item that is currently selected from the " Menu list ."
"Modify" is the same as " Add " except that this alters the currently selected item on the " Menu list ." If all you want to do is rename an item, see " Display ."
"Up" moves the currently selected item up on the " Menu list ."
"Down" moves the currently selected item down on the " Menu list ."
page 1 | customize interface > shortcut menu configuration > edit | settings > | top
![]() To close this window :
To close this window :


"OK" (or the Enter key)
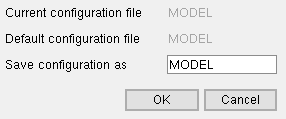
For ' Classic ' , when you press " OK " to close the Context Menu Editor, the Save Configuration File dialog opens, giving you the option to save your changes or not. Also, you can type a new file name. If you choose to not save (" Cancel "), any new entry you made here, in the Context Menu Editor , will be available for your use only during your current Modeling or Drawing Editor session.

" Default ... " is the file selected under User and Site Options > Toolbars > Modeling . " Current ... " and " Default ... " are different when Load Configuration was used. For ' Lightning ' , pressing " OK " opens a yes-no dialog if you have made changes to this window. Press " Yes " to save your changes. The Customize Interface window reactivates. Any changes you made in the Context Menu Editor are written to the " Shortcut menu configuration " file that is entered on the Customize Interface window. Please be aware that that same file may be used across different roles .
Shortcut menu configuration:
my_personal_menu 

"Cancel" closes this window without saving any changes.
"Reset" undoes changes made to this window since you first opened it. The window remains open.
page 1 | customize interface > shortcut menu configuration > edit | settings > | top
