 Cloud Add ( Drawing Editor )
Tool summary :
Also see :
- Clouds (topic)
- Edit Palette (sets linetype and pen for to-be-added clouds)
- Comment layer (layer type a cloud must be added to if you are not in a crane placement drawing)
page 1 | contents | objects > clouds > | objects -- clouds | xxx add | clouds
 Example 1 : Click and drag to draw a rectangular cloud
|

|
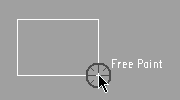
1 . Click and drag, moving your mouse pointer ( |

|
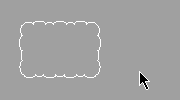
2 . When you release the left mouse button, the rectangular cloud is drawn. |
page 1 | contents | objects > clouds > | objects -- clouds | xxx add | clouds | top
 Example 2 : Drawing clouds by locating points
|
|
page 1 | contents | objects > clouds > | objects -- clouds | xxx add | clouds | top
 Step-by-step instructions (for adding a cloud by locating ponts) :
The following instructions assume that you are using a 3-button mouse.
1 . Before using this tool:
1a (optional) : On the layer selection tool , select the comment layer that you want to add the cloud to. You cannot add objects to non-comment layers in SDS2 Site Planning. This step is optional because a comment layer will be created for you, if needed.
1b (optional) : Set the printing pen number (on-screen display color) and/or line type (dash pattern) for the to-be-added cloud using the Edit Palette . Otherwise, the cloud inherits the thickness and dash pattern of the last-added or last-edited cloud.
1c (optional) : To set the defaults for the to-be-added cloud(s) to be those of an existing cloud that is on a comment layer, double-click the existing cloud then press " OK " on its edit window.
2 . Invoke Cloud Add using one (1) of the following methods:
Method 1 : Click the Cloud Add icon. The icon can be taken from the group named ' Objects -- Clouds ' and placed on a toolbar (classic) or the ribbon (lightning).
Method 2 : If " Drawing Editor layout style " is ' Classic ', you can use the menu system to choose Objects > Clouds > Add .
Method 3, 4 or 5 : Cloud Add can also be invoked using a keyboard shortcut , the context menu , or a mode . For the ' Lightning ' layout style, configuration of the interface is done using Customize Interface .
3 . Locate - Remove - Return mouse bindings become active along with various Locate options.
|
|
|
bindings |
Alternative 1 : With FRPT the selected Locate option, click and drag, moving from left to right, to draw a rectangular cloud as shown in example 1 . Go to step 4.
Alternative 2 : ). The program places an X where you locate the point. Locate Locate ) snaps to where you want one of the perimeter points of the cloud, then left-click (
( point location target ) so that the
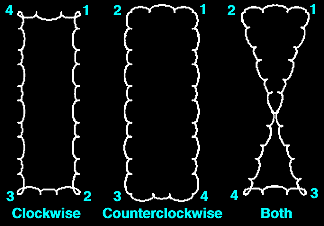
that you want (if it's not pressed already), then place the mouse pointer ( Locate icon Select the at least two additional points (moving counterclockwise as shown in example 2 to define the perimeter of the cloud). If you lay out too many points, you can middle-click ( Remove ) to delete the last one. Right-click ( Return ) when you are done defining points. Go to step 4.
4 . The cloud is drawn on screen, and Locate - Remove - Return mouse bindings become active. Do one (1) of the following:
|
|
|
bindings |
Alternative 1 : Optionally change the line type and pen number (step 1), and repeat step 3 to draw additional clouds.
Alternative 2 : If you are done adding clouds, right-click ( Return ). Go to step 5.
5 . The mouse bindings that were active when you invoked Cloud Add become active again.
Note: Any clouds added using this procedure can be instantly removed (one at a time, in reverse-order of their addition) by using Undo .
page 1 | contents | objects > clouds > | objects -- clouds | xxx add | clouds | top
