 Label Combo ( Drawing Editor )
Tool summary :
Also see :
- Drawing Editor (where Label Combo is a tool)
- Labels (topic)
- Comment layer (layer type you can add a label to)
- Pointers (topic)
- Labels font (setup)
- Labels font style (setup)
- Labels character height (setup)
- Labels width/height ratio (setup)
- Crane placement drawings (drawing type on which you can add objects to non-comment layers)
page 1 | contents | objects > labels > | objects -- labels | xxx add | labels
 Step-by-step instructions :
The following instructions assume that you are using a 3-button mouse, that User and Site Options > General > " Point location target " is set to ' Fancy ' ( ![]() ), and that you use mouse bindings similar to those shown in these illustrations. Right-click ( Return ) when you are done.
), and that you use mouse bindings similar to those shown in these illustrations. Right-click ( Return ) when you are done.

1 . Invoke Label Combo . 
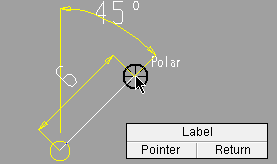
2 . Position the mouse pointer ( ) so the target (
) is where you want the pointer's head, then left-click ( Pointer ).

3 . Middle-click ( Label ) places the label insertion point where the target ( ) is at.

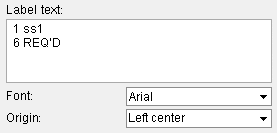
4 . On the Edit Label window, enter the settings that you want applied to the label, then press " OK ." Note that the " Origin " in this example is set to ' Left center ' and that an extra space was added before each line of " Label text :" 
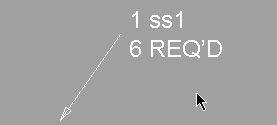
5 . The label and pointer are added to the drawing. Repeat these steps to add another label combo, or right-click ( Return ) to end the operation. Note 1: To invoke Label Combo :
Method 1 : Click the Label Combo icon. The icon can be taken from the group named ' Objects -- Labels ' and placed on a toolbar (classic) or the ribbon (lightning).
Method 2 : If " Drawing Editor layout style " is ' Classic ', you can use the menu system to choose Objects > Labels > Label Combo .
Method 3, 4 or 5 : Label Combo can also be invoked using a keyboard shortcut , the context menu , or a mode . For the ' Lightning ' layout style, configuration of the interface is done using Customize Interface .
Note 2: An arrowhead is placed at the point location target (
) the first time that you left-click ( Pointer ). Each additional left-click adds a new line segment to the leader line.
|
|
The mouse bindings that you get in step 2. |
|
Label with a segmented leader line, created using left-click ( Pointer ) twice, middle-click ( Label ) once. |
Note 3: In step 3, doing a right-click ( Return ) instead of a middle-click ( Label ) would end the Label Combo operation but retain any leader lines that you already laid out, thus giving a pointer and lines without a label.

The mouse bindings that you get in step 3.
< Leader line, no label, created using left-click ( Pointer ) four times, right-click ( Return ) once. Note 4: Two different methods can be used to create a label with multiple heads.

A label attached to a multi-headed pointer.

Hold down the Shift key to get a ( New Head ) mouse binding. Method 1 : If all you want is two pointer heads, then after closing the Edit Label window ( step 4 ), you can add a second head and line to the label, then right-click ( Return ).
Method 2 : You can add a second leader line before opening the Edit Label window by holding down the Shift key to get a ( New Head ) mouse binding. Left-click (( New Head )) designates that the point of the arrowhead be placed at the location of the target (
).
Want a little extra space between your pointer and the label? Make the first character you enter on the Edit Label window a blank space.
Tip 1: When you are done, you can remove each of the label combos you have added (one at a time) using Undo .
Tip 2: As shown here , you can drag a label and stretch the pointer that is attached to it. To detach the pointer from the label, hold down the Shift key and drag the label.
Tip 3: Hold down the Shift key and drag the middle of a pointer to change its curvature .
page 1 | contents | objects > labels > | objects -- labels | xxx add | labels | top

