 Line Add ( Drawing Editor )
Tool summary :
Also see :
- Lines (topic)
- Edit Palette (sets printer pen number and line type)
- Comment layer (layer type you can add lines to)
- Use this point as new base position (useful DXDY option)
- Break material lines at label interference (setup)
- Undo (removes each line segment that is added)
page 1 | contents | objects > lines > | objects -- lines | xxx add | lines | top
Examples and a video (also see the step-by-step instructions ):
|
|
Line Add bindings |
| ( click here for a video ) |
|
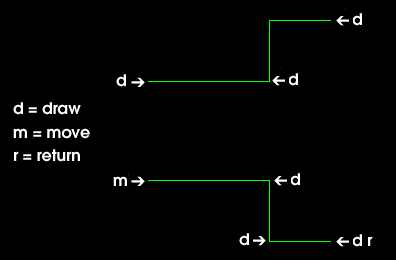
These lines were added during the same operation using Draw (left-click), Move (middle-click) and Return (right-click). The VIDEO shows a similar pattern. |
Another example:
|
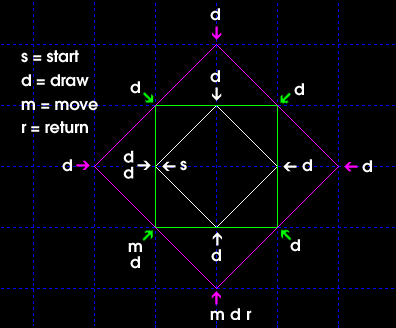
The letter s indicates the first d point. The colors (thicknesses) of the lines were changed during the operation using the Edit Palette . |
contents | objects > lines > | objects -- lines | xxx add | lines | top
Step-by-step instructions (also see the example ):
The following instructions assume that you are using a 3-button mouse.
1 . Before using this tool:
1a : On the layer selection tool , select the comment layer that you want to add the line(s) to. You cannot add objects to non-comment layers in Site Planning . This step is optional because a comment layer will be created for you, if needed.
1b (optional) : Use the Edit Palette to set the pen number (display color) and line type for the next to-be-added line(s). You can keep the Edit Palette open so that you can change the pen number of subsequent to-be-added line during the Line Add operation.
2 . Invoke Line Add using any one (1) of the following methods:
Method 1 : Click the Line Add icon. The icon can be taken from the group named ' Objects -- Lines ' and placed on a toolbar (classic) or the ribbon (lightning).
Method 2 : If " Drawing Editor layout style " is ' Classic ', you can use the menu system to choose Objects > Lines > Add .
Method 3, 4 or 5 : Line Add can also be invoked using a keyboard shortcut , the context menu , or a mode . For the ' Lightning ' layout style, configuration of the interface is done using Customize Interface .
3 . Draw - Move - Return mouse bindings become active along with various Locate options. The status line prompts you to " Add Line - Select First Point ."
|
|
|
mouse bindings |
3a : Select the Locate icon that you want (if it's not pressed already).
3b : Place the mouse pointer (
) and left-click ( Draw ) to locate the first point of the first line segment. That point will be located where the point location target (
) is at.
4 . Draw - Move - Return mouse bindings continue to be active.
|
|
|
mouse bindings |
4a : Select the Locate icon that you want (if it's not pressed already), then left-click ( Draw ) to draw the first line segment. Note: the first point of this first line segment was located in step 3b.
4b (optional) : Place the mouse pointer (
) and either left-click ( Draw ) or middle-click ( Move ). Left-click ( Draw ) draws the end point of a line segment. Middle-click ( Move ) locates the starting point of a new line segment at wherever the point location target (
) is at. Move the mouse pointer (
) and left-click ( Draw ) or middle-click ( Move ) as many times as you like to draw as many lines as you want.
4d : When you are done drawing lines, right-click ( Return ). Go to step 5.
5 . The mouse bindings that were active when you invoked Line Add become active again.
Note: Any line segments added using this procedure can be instantly removed (one at a time, in reverse-order of their addition) by using Undo .
contents | objects > lines > | objects -- lines | xxx add | lines | top

