The Member Descriptions window ( Fabricator Settings )
| Options on this window are read-only . They tell you how this window has been set up for this Fabricator in a full-featured SDS2 program . |
Also see :
- Drawing Data window (affected by this window)
- Line 1 on member BOM (affected by this window)
- Member description - status (affected by this window)
- Submaterial Piecemarking Prefixes (similar options)
page 1 | contents | home > project settings > fabricator > piecemarking > | classic
Method 1 : Home > Project Settings > Fabricator > Piecemarking > Member Descriptions .
Methods 2, 3 & 4 : In Modeling or the Drawing Editor , choose Settings > Fabricator Settings > Member Descriptions (classic), or use a keyboard shortcut , or click the icon.
page 1 | contents | home > project settings > fabricator > piecemarking > | classic | top
| Default Descriptions | Piecemark Prefixes |
------ Major member types ------
(Beam, Column, etc.)The entry fields under this tab are particularly useful for users in non-English-speaking countries who want to use non-English terms for major member types. Users of a full-featured SDS2 program can enter a specific member type to be identified on the callouts on member details , in the " Material description " on the Drawing Data window, and on the " Description " in line 1 on the member's bill of material. Descriptions can be up to 22 characters.
| The Default Description entered here : |
|
|
| " Description " in the bill editor : |
|
| Description in the detail callout : |
|
|
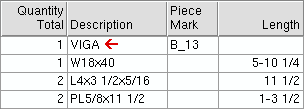
Example: Viga is the Spanish word for beam. To have each beam in a Job using your current Fabricator identified as a " VIGA ," the user of a full-featured SDS2 program would enter ' VIGA ' to the " Beam " field on this window before any beams have been added to the model. When the user auto details a group of selected beams, those beams will be identified on their details as vigas.
------ Miscellaneous members ------
|
Line 1 is the default description applied to miscellaneous members subsequently added in a full-featured SDS2 program using Add Miscellaneous Member . |
| Any descriptions listed here can be applied to a miscellaneous member as the " Member description " in Member Status Review . |
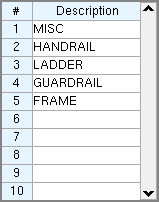
Example: ' MISC ' is entered to line 1, ' HANDRAIL ' to line 2. Later the " Member description " is changed from ' MISC ' (the default) to ' HANDRAIL '. After auto detailing that miscellaneous member in a full-featured SDS2 program , the member is identified on its detail and bill of material as a handrail.
Tracking the descriptions: Miscellaneous member descriptions appear in callouts on member details , in the " Material description " on the Drawing Data window, and in the line 1 " Description " on the member's bill of material.
page 1 | contents | home > project settings > fabricator > piecemarking > | classic | top
| Default Descriptions | Piecemark Prefixes |
------ System ------
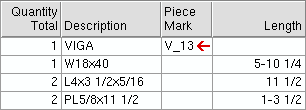
The options under this tab give the user of a full-featured SDS2 program control over how member piecemarks are named. For example, if the user wants beams to be piecemarked B_1, B_2, etc., the user would enter ' B_ ' to the " Beam " field. Piecemark Prefixes are applied in a full-featured SDS2 program to subsequently added members and to members whose piecemarks change.
| Piecemark prefix : |
|
|
| " Piece Mark " in the bill editor : |
|
| Piecemark in the detail callout : |
|
|
Also see: To set prefixes for submaterial piecemarks, see Submaterial Piecemarking Prefixes .
The options under this heading give the user of a full-featured SDS2 program control over how member piecemarks will be renamed if the option " Member type designation " is used to change the piecemarks of members during Detail Sheet Autoloading .
Example 1: You are in Detail Sheet Autoloading (in a full-featured SDS2 program ) and want to add six beam details from zone 1 to sheets and change their piecemark designations. You turn " Detail piecemark renaming " on. You assign " Zone " an order of ' 1 ', enter ' _ ' as the " User character ," assign " Member type designation " an order of ' 3 ', and assign " Placement order on sheet " an order of ' 4 '. You then select enough beam details (all in zone 1) to create two sheets, each with three details. Assuming that ' B ' is entered here (on this window) as the Sheet Autoload Piecemark Prefix for beams, the beams will be reassigned the following piecemarks: 1_B1 , 1_B2 , 1_B3 , 1_B4 , 1_B5 , 1_B6 .
Example 2: Same as example 1, except that ' V ' is entered here (on this window) as the Sheet Autoload Piecemark Prefix for beams. The beams will be reassigned the following piecemarks: 1_V1 , 1_V2 , 1_V3 , 1_V4 , 1_V5 , 1_V6 .
Example 3: Same as example 1, except that you select column details. Assuming that ' C ' is entered here (on this window) as the Sheet Autoload Piecemark Prefix for columns, the selected columns will be reassigned the following piecemarks: 1_C1 , 1_C2 , 1_C3 , 1_C4 , 1_C5 , 1_C6 .
page 1 | contents | home > project settings > fabricator > piecemarking > | classic | top