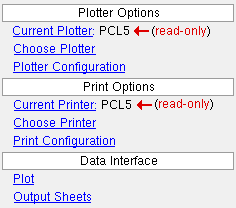
The Printing window (Linux only)
Options :
- To open this window (Linux only)
- Applications
Also see :
- Printing under Linux (step-by-step instructions)
- Printing your current drawing under Linux (step-by-step instructions)
This window appears for an SDS2 review station operating under Linux. Users of review station operating under Windows should see Printing under Windows operating systems .
The most common use of this window is for plotting sheets ( detail sheets , gather sheets or erection sheets ). To do this, choose a printer (" Choose Printer "), then customize your output (" Plotter Configuration "), then click " Plot " and select the sheets that you want to output. You can also use this window to print sheets to files (" Output Sheets "). The Print Options on this window set up File > Print in the Drawing Editor .
To open the window (Linux only):
Method 1 : Home > Export > Plotting
Methods 2, 3 & 4 : In the Drawing Editor or Modeling , choose Interface > Plotting , or click the Printing icon, or use a keyboard shortcut .
Tip: If you want to print your current drawing in the Drawing Editor , use method 2, 3 or 4 to open this window, do the setup you need under " Print Options ," then File > Print your current drawing.
main menu | interface menu | top
| Printer Options |
Current Printer: read-only . This tells you the name of the printer that will be printed to when you " Plot " under Linux. Also, this sets the file type (e.g. HP-GL or HP-GL/2) for sheet files output using " Output sheets ."
To change the current printer: Click " Choose Printer ."
1 . Click " Choose Printer " to open a list of available printers and plotters.
2 . On the list, double-click the printer that you want to print sheets to. ( Alternative : Select the printer you want, then press " OK ").
3 . The printer you selected will now be the " Current Printer " under this section ( Printer Options ) and also at the top of the Plotter Configuration window.
1 . Click " Plotter Configuration " to open the Plotter Configuration window.
2 . On that window, you can -- for example -- change the scaling or margins of a to-be-plotted sheet and confirm that the sheet will be printed the way you want it to be printed.
3 . After pressing " OK " or " Cancel " to close that window, you can press " Plot " or " Output Sheets " on this window to actually print or export print files.
main menu | interface menu | top
| Print Options |
Current Printer: read-only . This tells you the name of the printer that will be printed to when you File > Print your current drawing in the Drawing Editor under Linux.
To change the current printer : Click " Choose Printer ."
1 . Click " Choose Printer " to open a window with a list of available printers and plotters.
2 . On the list, double-click the printer that you want to output drawings to when you File > Print in the Drawing Editor .
3 . The selected printer or plotter will now be the " Current Printer " under this section ( Print Options ) and also on the Plotter Configuration window. To print at this point, see Print .
1 . Click " Print Configuration " to open the Plotter Configuration window.
2 . On that window, you can -- for example -- set whether File > Print outputs a drawing to a printer (' Use Printer ') or to a file (' Use User Options - Output - Printer ').
3 . After pressing " OK " to close that window, the settings on that window will be applied when you File > Print a drawing in the Drawing Editor .
main menu | interface menu | top
| Data Interface |
1 . Click " Plot " to output sheets to the " Current Printer " that is shown under " Printer Options ."
2 . Follow the instructions for "Printing under Linux" beginning with step 6 .
1 . Click " Output Sheets " to output sheet files to a particular file folder on, for example, your hard drive.
2 . A selection dialog opens after you click " Output Sheets ." By default, a selection list of detail sheets is shown.
2a ( optional ): Press the button under the " Destination " heading if you want these print files to be output to a location other than the folder that is set for User and Site Options > Output > " Printer ."
2b : Choose the type of sheets you want to print (" Detail Sheets " or " Gather Sheets " or " Erection Sheets ").
2c : Select the particular sheets you want to plot, then press the " OK " button.
3 . The Select Number of Copies to Plot dialog opens.
3a : Enter the " Number of copies " you want, then press the " OK " button.
Note: Entering a number of copies greater than 1 will neither increase the number of files nor their size; it will only increase the number of prints that will be output from each when the file(s) are eventually output to a printer.
4 . As each file is written to the designated file folder, it is named after the original sheet and given a ".plt" extension.