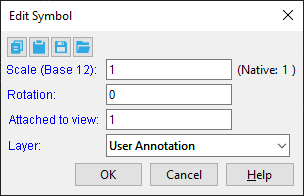
The Edit Symbol window

The Edit Symbol window opens when you edit symbols with different file names. For example, this window opens when you Edit All Symbols and your current drawing has two different symbols. If the two symbols were the same, the X Edit window -- not this window -- would open
Also see :
- Drawing Editor (where Edit Symbol is a window)
- X Edit (window for editing symbols with same name, where X is that name)
- Symbol Edit (opens this window when the symbols being edited have different file names)
- Symbol Edit All (opens this window when the symbols being edited have different file names)
- Undo (can undo Symbol Edit )
- Symbols (topic)
page 1 | contents | symbol edit | symbol edit all | symbols
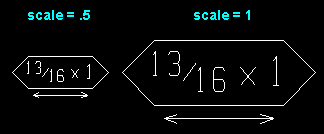
Scale: The scale of the symbols you are editing. When you first Add a symbol, its default " Scale " is the " Drawing scale " of the drawing that the symbol was created from.
|
When you change a symbol's " Scale ," the symbol's label is automatically scaled in proportion with other components of the symbol. |
(Native: xxx) tells you the " Drawing scale " of the parent drawing (e.g., job standard detail) that this symbol was created from (using Save As Symbol ).
Rotation: Any positive or negative (-) number of degrees.
|
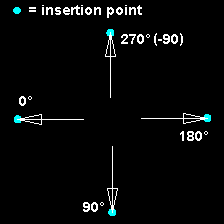
' 0 ' (zero) adds the linked copy of the symbol in the same orientation as the original symbol file it is linked to. A ' positive number ' rotates the symbol counterclockwise that number of degrees around its insertion point. A ' negative (-) number ' rotates the symbol clockwise that number of degrees. |
The insertion point: Before using Save as Symbol to save a drawing as a symbol, confirm that the drawing's reference point is where you want it. To do this on a standard detail, use Verify Reference Point . This reference point is the symbol's insertion point.
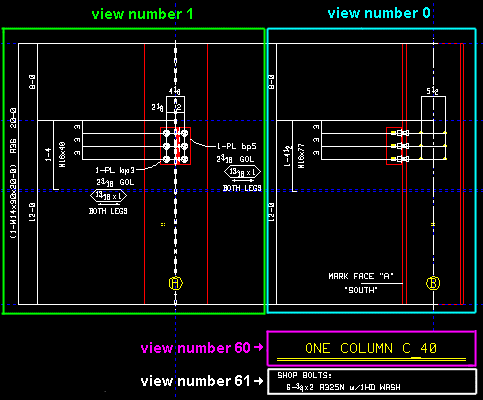
Attached to view: A number designating the view that this symbol is attached to. This applies mainly to member details , since member details are likely to show more views than submaterial details , the only other type of drawing on which you might find multiple views. For instance, a column detail may have a view of face A, face B and face C. It may also have various section views (Section A-A, Section B-B, Section C-C). All graphical objects that are in a particular view are assigned the same number.
Assigning the correct number to an object (line, weld symbol, label, etc.) provides maximum compatibility when the comment layer you add that object to is viewed or printed in a full-featured SDS2 program .

To show a view's number, you can add the X-Y-Z Display to your toolbar.

In the Drawing Editor , the X-Y-Z Display shows the view number that the point location target (
) is over.
Layer: The drawing layer (any layer given a " Name ") that the symbols you are editing will be drawn on after you press " OK " to close this window. If that layer happens to be hidden (not marked " Show "), the symbol will disappear after the first Redraw .
![]()
page 1 | contents | symbol edit | symbol edit all | symbols | top

