 Extend Member to Member Adjust Height ( Modeling )
Tool summary :
- Extends or shortens beam member lines to beams that you select in the 3D model. The end elevations of the extended beams are made to match the member to which they are extended.
- Extended members then undergo Process and Create Solids , which, if possible, attempts to design system connections for them.

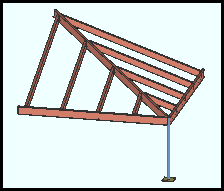
Before the tool is used, the selected roof beams meet at the ridge beam's X and Y -- but not its Z --location. After the tool is used, the selected beams' elevations (Z locations) have been adjusted. The beams now meet the ridge beam at the proper slope. - A typical use : A reference drawing of an engineer's structural framing plan can be added in Modeling and, when properly located and scaled, used as a guide to quickly place members. For clarity, lines that represent beams in such plans are usually shown with gaps between the beams and the lines of the girders to which the beams will be attached. Consequently, using such a plan to locate beams will leave the same gaps between these members. Use the Extend Member to Member Adjust Height tool to extend these beams so that connections between the members can be made. Because this tool can change member end elevations, you can use it, for example, to extend members to sloping ridge beams.
- The Extend Member to Member Adjust Height tool can be found in the " Command group " called ' Toolbox ' in Toolbar Configuration in Modeling (classic) or in the Ribbon Editor (lightning). It is available at no additional cost to SDS2 software users whose support accounts are current. For more information, contact your SDS2 sales representative.
- See the step-by-step instructions .
Also see :
| YouTube video: Member Line Extend .
(Recorded in SDS2 Detailing , v2020i) |
- MEMBER LINE EXTEND (a downloadable HOW/2 .pdf file)
- Extend Member to Member (a similar tool)
- Extend All to Column (extends members to columns)
- Extend All Selected (allows multiple selection of beams and columns)
page 1 | contents | member tools | toolbox | top
Step-by-step instructions to extend members :
The following instructions assume that you are using a 3-button mouse. You must do either step 2 (preselection) or step 4 (in-tool selection) to perform this operation.
1 . Before using this tool, ensure that the beams that you want to extend (or shorten) and extend to (or shorten to) are visible. For example, turn off depth checking if necessary.
2 (optional) . Preselect the beam that you want to other members to extend to or shorten to.
3 . Invoke Extend Member to Member Adjust Height using one (1) of the following methods:
Method 1 : Use a keyboard shortcut (if one has been set up).
Method 2 : Click the Extend Member to Member Adjust Height icon. The icon can be taken from the group named ' Toolbox ' and placed on a toolbar (classic) or the ribbon (lightning).
4 . Skip this step if you already selected beams(s) in step 2.
|
|
|
Select Item(s) bindings |
4a (if you didn't preselect) : Extend Member to Member Adjust Height activates Select Item(s) mouse bindings, and the status line prompts you to select one or more members to extend to (or shorten to). Optionally hold down Shift to select additional members. Press the Enter key or right-click ( Menu ) and choose " OK " on the context menu when you are done selecting.
5 . Select the members that you want to extend.
|
|
|
Select Item(s) bindings |
5a : Extend Member to Member activates Select Item(s) mouse bindings, and the status line prompts you to select one or more members to extend (or shorten). Optionally hold down Shift to select additional members. Press the Enter key or right-click ( Menu ) and choose " OK " on the context menu when you are done selecting.
6 . The Extend Adjust Height window opens.
6a (optional) : If you want the elevation of the ends of the beams that you extend to be offset from the member line of the member that you are extending to, enter a positive or negative distance (in the primary dimension " Units " or other units ) to " Offset from beam ."
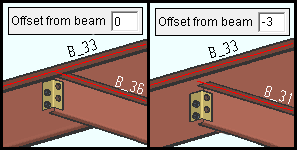
When the " Offset from Beam " is negative, the extended beam end elevation is lowered relative to the member that it is extended to. 6b : Press the " OK " button to apply the " Offset from beam " to the model.
6c : Press " Reset " to reset the " Offset from beam " field to ' 0 '.
6d : Press " Cancel " to exit the command. No members will be extended.
7 . A progress bar illustrates the progress as members are processed. The members you selected in step 5 will be extended or trimmed, if possible.
7a : When the progress bar reaches 100%, the progress bar window will close automatically if the box is checked (
) for " Close when done ." If the window does not close automatically, you can close it by checking that same box or by pressing the " OK " button.
8 . Once the members have been processed, a dialog will ask you whether you want to keep the changes.
8a : Press the " Yes " button to accept the changes.
8b : Press the " No " button to undo the changes, then repeat step 7.
Tip: When you extended a beam to a sloping beam, and when the box for " Hold rotations " is not checked, it is recommended that you review the beam's " Web rotation " afterward. Be sure to set this option correctly for both ends; otherwise the beam may become twisted.
page 1 | contents | member tools | toolbox | top