 DXDY (Dx/Dy Offset)
Tool summary :
- Can be used in Modeling or the Drawing Editor to locate a point that is a distance that you specify from a first point or a reference point.
- In Modeling , DXDY can be used to enter a " Z " offset distance as well as an " X " distance and " Y " distance. Since a " Z " distance beyond the limits of depth checking is allowed, DXDY can be used in a full-featured SDS/2 program to input the work points of beams or braces that slope out of your current view.
VIDEO 
Some tools shown in this video are not available in SDS2 Site Planning. For example, Copy Members . The point locator DxDy is used to enter a " Z " value of ' 3-0 ' to copy the new member to an elevation 3 feet higher than the original member. (Recorded in SDS2 Detailing , v7.2.)
- In the Drawing Editor , you can enter an " X " distance and " Y " distance, but not a " Z " distance. X and Y and Z are screen axes . Since you cannot move into or out of the plane of a 2D drawing, a "Z" coordinate distance is not an option in the Drawing Editor .
- Many tools require the entry of two points. After a first point has been located, entries made for DXDY are measured from that first located point.
- When DXDY is used to locate a first point , you are prompted to locate a reference point to dimension DXDY entries from.
- For an operation requiring the location of more than two points, the option " Use this point as new base position " can facilitate the location of each subsequent point with respect to the previous point. See this example .
- Offset Controls affect the functionality of DXDY .
More about this point locator :
- Quick instructions:
- Detailed instructions:
Also see :
- Screen axes ( DXDY functions with respect to)
- Construction line by designating two points
- Construction line by defining a point and an angle
- Offset Controls (affect DXDY )
- Depth checking (does not affect DXDY )
contents | locate > dxdy offset | top
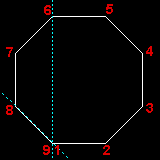
DXDY to draw an octagon :
| Note: " Use this point as new base position " must be checked ( |
| DXDY entries to create an octagon using Add Lines | |||
|
Point | X distance | Y distance |
| 2 | 2-9 15/16 | 0 | |
| 3 | 2-0 | 2-0 | |
| 4 | 0 | 2-9 15/16 | |
| 5 | -2-0 | 2-0 | |
| 6 | -2-9 15/16 | 0 | |
| 7 | -2-0 | -2-0 | |
| 8 | 0 | -2-9 15/16 | |
| 9 | 2-0 | -2-0 | |
Note 1: Point 1 was located using INCL .
Note 2: The box for " Use this point as new base position " was checked when point 2 was located. It remained checked (by default) for each subsequently added point.
Note 3: 2-9 15/16 is the square root of 2-0 squared plus 2-0 squared (per the Pythagorean theorem). Each side of the octagon is this length.
contents | locate > dxdy offset | top
DXDY to locate a second point:
1 . Begin this operation in Modeling or the Drawing Editor .
1a : Invoke Construction Line Add or Line Add or any similar tool that prompts you to locate two points.
2 . The status line prompts, " Locate a first point ."
2a : With one of the other Locate options selected ( Auto , EXPT , etc.), left-click ( Locate ) when the point location target (
) is where you want this first point. This first point will be used as the reference point for DXDY .
3 . The status line prompts, " Locate a second point ."
3a : Select the DXDY icon , then left-click ( Locate ).
4 . The DX/DY Offset window opens.
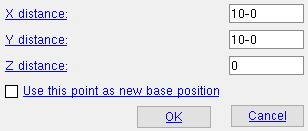 |
The distances you enter on this window establish point coordinates with respect to screen axes . |
X distance: A positive or negative (-) distance (in the primary dimension " Units " or other units ) from the point entered in step 2 of this procedure (or the reference point added in step 3 of the next procedure ). Entering a positive distance places the new point that distance directly to the right of the reference point. Entering a negative (-) distance places the new point that distance directly to the left of the reference point. Entering 0 (zero) places the new point at the X coordinate of the reference point.
Y distance: A positive or negative (-) distance (in the primary dimension " Units " or other units ) from the point entered in step 2 of this procedure (or the reference point added in step 3 of the next procedure ). Entering a positive Y distance places the new point that distance above the reference point. Entering a negative Y distance places the new point directly below the reference point. Entering 0 (zero) places the new point at the Y coordinate of the reference point.
Z distance: A positive or negative (-) distance (in the primary dimension " Units " or other units ) from the point entered in step 2 of this procedure (or the reference point added step 3 of the next procedure ). This prompt only appears if you are executing DXDY in Modeling . Entering a positive Z distance places the newly added point that distance toward you, out of the screen, from the reference point. Entering a negative Z distance places the newly added point that distance directly away from you, into the screen, from the reference point. Entering 0 (zero) places the new point at the Z coordinate of the reference point. You may enter a Z distance beyond the limits of depth checking , but the value you enter does not override Offset Controls .
Use this point as new base position:
or
. "This point" is the point you are currently defining. This option applies to operations such as Line Add . For a two-point operation, this option is irrelevant since there will be no additional points that will be located in that operation. If this box is checked (
Alternative 1 : Press the " OK " button to cause a new point to be located with respect to the reference point per the distances entered on this window.
-
Alternative 2 : Press the " Cancel " button to end the DXDY operation.
contents | locate > dxdy offset | top
DXDY to locate a first point :
1 . Begin this operation in Modeling or the Drawing Editor .
1a : Invoke Construction Line Add or Line Add or any similar tool that prompts you to locate a point.
2 . The status line prompts, " Locate a point ."
2a : Select the DXDY icon and left-click ( Locate ).
3 . The status line prompts, " Locate a reference point ."
3a : Select any Locate icon used for point location ( Auto , INCL , INCL , FRPT , etc.).
3b : Place the mouse pointer (
) so the point location target (
4 . The DX/DY Offset window opens.
4a : See step 4 of the previous procedure.