 Bimplus Upload
This tool must be downloaded from SDS2 Toolbox and installed in order to use it.
- General Settings
- Step-By-Step
- Related Tools
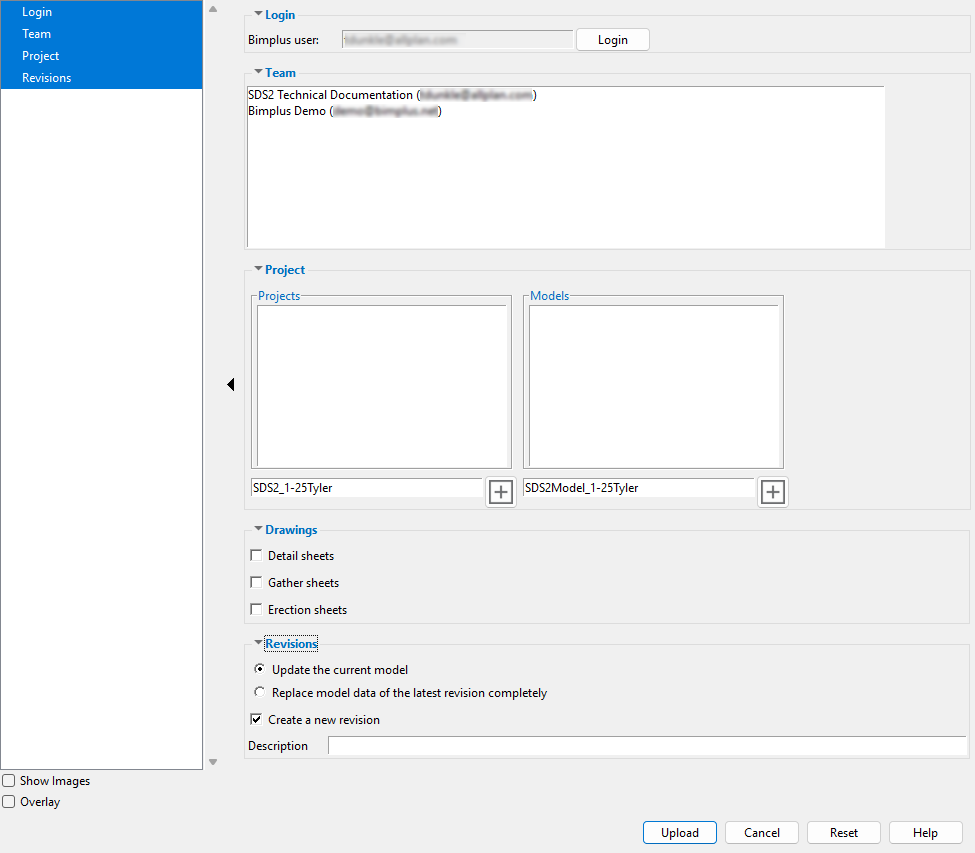
Login
Bimplus user : Automatically populates with the email address entered by the user after selecting the login button.
Login : Selecting this opens the Bimplus login page in your web browser. Once you login, you receive the following message, "Bimplus authentication complete. You can close this window and return to SDS2."
Team
Team : Lists all teams which you have been assigned within the Bimplus platform. Once a team is selected, if projects exist, the Projects are populated below.
Project
Projects : A listing of all of the projects uploaded to the Bimplus platform for the selected team (highlighted in blue).
Models : A listing of all the models that have been uploaded to the selected project. One project can have multiple models uploaded.
Project name : The name of either the selected project or new project. When this window is first opened, the name of the SDS2 project will be appended to "SDS2_". If you are adding this as a new project, the project name cannot match the name of one of the existing projects (projects with the same name will result in the name field showing red and the upload button will not work).
Model Name : The name of the model that is going to be uploaded. When this window is first opened, the name of the SDS2 project will be appended to "SDS2Model_" If you are adding this as a new model, the model name cannot match the name of one of the existing models (models with the same name will result in the name field showing red and the upload button will not work).
 : Allows you to type in the name of the project or model for a new upload. If you open this window and do not select a project or model, this does not need to be selected. If you select a project name, you must select this icon again to be able to type the new project or model name.
Drawings
If this box is checked ( ![]() ), the upload will include the detail sheets of the members that are selected and loaded on detail sheets already. If the selected members are not on a sheet, then no sheet will be uploaded for that member. Detail sheets are linked to the member object in Bimplus.
), the upload will include the detail sheets of the members that are selected and loaded on detail sheets already. If the selected members are not on a sheet, then no sheet will be uploaded for that member. Detail sheets are linked to the member object in Bimplus.
If this box is not checked ( ![]() ) the upload will not include any detail sheets.
) the upload will not include any detail sheets.
If this box is checked ( ![]() ), the upload will include the gather sheets of the materials that are on the selected members and are loaded on gather sheets already. If the materials on the selected members are not on a sheet, then no sheet will be uploaded for that material. Gather sheets are linked to the member object in Bimplus.
), the upload will include the gather sheets of the materials that are on the selected members and are loaded on gather sheets already. If the materials on the selected members are not on a sheet, then no sheet will be uploaded for that material. Gather sheets are linked to the member object in Bimplus.
If this box is not checked ( ![]() ) the upload will not include any gather sheets.
) the upload will not include any gather sheets.
If this box is checked ( ![]() ), when upload is selected you will be prompted to select which erection sheets you wish to include in the upload.
), when upload is selected you will be prompted to select which erection sheets you wish to include in the upload.
Note : If " cancel " is pressed or no sheets are selected and " OK " is pressed, the upload runs and no erection sheets are included.
If this box is not checked ( ![]() ) the upload will not include any erection sheets.
) the upload will not include any erection sheets.
Revisions
When uploading a model with the same name, whether the checkbox for " Create a new revision " is checked ( ![]() ) or unchecked (
) or unchecked ( ![]() ) only the selected members will be included in the upload. If you wish to add a member to the model, you must select all existing members of the model along with the new member you want to add.
) only the selected members will be included in the upload. If you wish to add a member to the model, you must select all existing members of the model along with the new member you want to add.
Update the current model or Replace model data of the latest revision completely :
Update the current model : This compares your new upload to the current model version and updates it with the new model changes. The revision comparison tool (inside of Bimplus) will list any changes that are seen.
Replace model data of the latest revision completely : This deletes your latest model version and replaces it with a new model. Doing this will remove any model data, links, or attachments in the Bimplus project. The revision comparison tool (inside of Bimplus) will show all members as deleted and re-added regardless if there were changes or not.
If this box is checked (
), the model will track the latest upload as a revision and allow you to give your upload a description.
If this box is not checked (
) the model will not track the latest upload as a revision and will not allow you to give your upload a description.
Description : Any text string that describes this revision and brought into Bimplus. This is only active when " Create a new revision " is selected.
Upload : This applies all the settings in the window and uploads the selected members as a model to the selected Bimplus project.
Cancel : Closes this window without saving any changes.
Reset : Undoes all changes made to this window since you first opened it. The window remains open.
Opening this Window
1 . Click the Bimplus Upload icon, which is pictured above. The icon can be found on the Toolbox page.
Alternative: Invoke Bimplus Upload using the Find Tool by searching the command name and clicking the icon, which is pictured above.
2 . Select the members you wish to upload to the Bimplus project. Right-click and select OK or Enter .
3 . The Bimplus Upload window opens. Click the Upload button to upload the current model to a new project after logging in. If this is not a new project there are some other steps needed to upload this model.
Uploading to a New Project
1 . Once the Bimplus Upload window is open, Select the " Login " button and your web browser will open with a screen for you to login on the Bimplus website.
Note : Once logged in you will recieve the following message, "Bimplus authentication complete. You can close this window and return to SDS2."
2 . Select the team that you want the project uploaded to.
3 . Select to active the new project name field.
4 . Type in the name of the project if you want it different then the default name (SDS2_ProjectName).
Note : If the project name field is red, that means the project already exists within the team and the upload button cannot be selected.
5 . Type in the name of the model if you want it different then the default name (SDS2Model_ProjectName).
6 . Click the " Upload " button. The new project will be created in Bimplus and the model will be uploaded to that project.
Uploading to an Existing Project
1 . Once the Bimplus Upload window is open, Select the " Login " button and your web browser will open with a screen for you to login on the Bimplus website.
Note : Once logged in you will recieve the following message, "Bimplus authentication complete. You can close this window and return to SDS2."
2 . Select the team that you want the project uploaded to.
3 . Select the name of the project you wish to upload to.
Note : If the project name field is red, you must select the project name again.
4 . If you are wanting to revise an existing model, select the model name. The optional revision checkbox and description become active.
Note : If you are revising an existing model, the new model will replace the existing model.
Alternative : If you are wanting to upload a new model select
5 . Click the " Upload " button. The model will be uploaded to the existing project in Bimplus.
-
Toolbox (links to other Toolbox items)
-
Bimplus documentation (external website)

