Items on the Ribbon interface (topics)
An axes box is a decoration that can be placed on the ribbon in Modeling to tell you the orientation of a view with respect to global coordinates . It can found in the " Command group " called ' Decorations ' in Toolbar Configuration .
| Plan View | Isometric | Elevation Views | |

|

|

|

|
Canam Tools are available to be used in Modeling when ' Canam ' is the " Joist manufacturer ."
|
|
|||||||
|
|
||||||
|
|
||||||
Using these tools can help to keep your model up to date with joist design changes from Canam.
Decorations are built-in features of the lightning interface.
| The ' Decorations ' command group | |

|
|
| Binding Reporters | tells which mouse button to press. |
| Status line | prompts you. |
| Selected count | tells the number of items selected. |
| X-Y-Z display | displays global coordinates. |
| Display job/fabricator | for displaying the Job / Fabricator . |
| Display current elevation | shows the view's elevation. |
| Display current view | shows the view's name. |
| Axis orientation | shows global axes. |
| Mode Stack Reporter | shows the mode stack. |
| Depth Check Controls | controls perspective of view. |
Depth check controls is a fixed item in the interface. The controls set the distance that you can see into or out of a particular view. " In " is the distance perpendicular to your computer screen from the work plane (" Relative Depth ") of your current view to the farthest visible point in your view. " Out " is the distance measured perpendicular to your computer screen from the work plane of your view to the nearest visible point in your view.
|
|
![]()
Using this decoration: If this decoration is checked (
), then depth checking is on, and you can change the depth of your current view by entering an appropriate distance " In "/" Out ." Inappropriate values such as negative numbers or the setting to zero of both " In " and " Out " are automatically changed. If the decoration is not checked (
), then depth checking is off.
To get to this decoration: You can place this decoration onto a toolbar in Modeling using Ribbon Editor . Or you can find depth check controls on the Display Options window.
Warning: Any change to the depth check setting of a view is lost when you exit the view unless you choose to Save the view.
Tip: A keyboard shortcut or mouse binding can be applied (in Modeling ) to " Toggle Depth Checking ." The tool can be found in the " Miscellaneous " group in Keyboard Shortcut Editor or Mode Configuration .
Setup of depth checking for auto detailing: Home > Project Settings > Fabricator > Member View Defaults and Home > Project Settings > Fabricator > Material View Defaults . The depth checking values applied to views in Fabricator Setup can be overridden for individual views in member isolation and material isolation's edit views mode.
Display current elevation is a fixed item in the interface.
|
|
|
displays the reference elevation of your current plan view . |
Special cases: When you are in an isometric view , the decoration displays 0 (zero). When you are in an elevation view , it displays the relative depth of the view.
Also see: Tools for changing a plan view's elevation are Plan View and Reference Elevation .
Display current view is a fixed item in the interface.
|
|
|
displays the name of your current view. |
Open View ( Ctrl + o ) changes your current view.
D isplay job/fabricator are toolbar decorations that can be added to a ribbon using Ribbon Editor . They tell you the names of the current Job and/or Fabricator.
|
|
|
two separate decorations |
| a single decoration |
|
|
Note: You cannot change Jobs/Fabricators using these decorations. To do that, press the "jobname" and/or "fabname" button at the upper, left corner of Home .
The documentation button gives you access to the manual that you are currently reading -- SDS2 Help -- using a web browser when User and Site Options > General > " Modeling layout style " or " Drawing Editor layout style " is set to ' Lightining '.
|
|
|
The documentation button opens SDS2 Help |
Also see: Help browser (chooses web browser that opens whenever you access SDS2 Help)
Drawer of add tools is an icon you can add to a toolbar using Ribbon Editor . It gives you a variety of add tools, but takes up the space of a single icon. Different versions of this icon are available in Modeling and the Drawing Editor . Click the black triangle (>) to select the add tool that you want.
| Drawer of member add tools in Modeling Command group = ' Model - Member ' |
|||
|
|
Beam | Column | Vert Brace |
| Horz Brace | Joist | Girt (legacy) | |
| Misc Member | Stair | ||
| Drawer of material add tools in Modeling " Command group " = ' Model - Material ' |
||||
|
|
Existing Mtrl | Rolled Section | Rectangular
Plate |
Round Pl |
| Bent Plate | Rolled Plate | Plate Layout | Bent Pl Layout | |
| Round Bar | Square Bar | Flat Bar | Grating | |
| Grating Tread | Deck | Clevis | Turnbuckle | |
| Shear Stud | Shell | Solid | Refer Mbr | |
| Profile Layt | Mtrl Bolt | Library Part | Shpd Rebar | |
| Rebar Layt | ||||
| Drawer of add tools in the Drawing Editor " Command group " = ' Objects ' |
|||
|
|
Add Arc | Add Bevel Symbol | Bolt Add |
| Add Circle | Cloud Add | Construction Circle Add | |
| Construction Line Add | Add Dimension | Hole Add | |
| Label Add | Layer Add | Add Line | |
| Pointer Add | Sheet Line Add | Weld Add | |
The find tool lets you find or activate a tool in Modeling or the Drawing Editor when User and Site Options > General > " Modeling layout style " or " Drawing Editor layout style " is set to ' Lightning '.
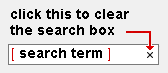
|
To find a tool, enter a search string that matches all or part of a command name.
|
The find tool matches the string that you enter to command names ( Modeling ) or command names ( Drawing Editor ) found in the Ribbon Editor , Keyboard Shortcut Editor , Context Menu Editor and Mode Configuration .
As you type, search results appear in the Command Search Results menu below the search box. For example, entering " zoo " will match Zoo m to Fit , Un zoo m , and other tools with those letters. Commands that partially match your string (e.g., Attachment Tool ) may also be listed.
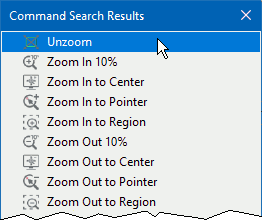
To activate a tool: Click the tool name on the Command Search Results menu that appears below the search box when you type in it.
To find a tool's icon on the ribbon ( new ) : Hover the tool's name in the Command Search Results menu. If its icon is on the ribbon page that is open, the icon -- or a drawer containing the icon -- will be highlighted on that page.

When Unzoom is hovered, its icon is highlighted on the open Layout page.

If a hovered name's icon is on an unopened page, the page's tab is highlighted instead. Here, Unzoom is hovered on the menu, but Tools is opened, so Layout (where Unzoom is found) is highlighted. If the hovered tool name is not on the ribbon, neither an icon nor a page will be highlighted.
Tip: While an unopened page's tab is highlighted by the find tool, you can click it to open the page and see the highlighted icon of the tool that was found.
Click here . This tool now has a help page of its own.
Icons can be added to the ribbon using the Ribbon Editor. Icons can be either written or pictorial.

To place icons on a ribbon, role switcher > ' Customize... ' > in Customize Interface, select a " Ribbon configuration " then press the " Edit " button > in the Ribbon Editor , select a " Page " and a " Section " and a " Menu item group " > select the icon you want and press "+" to add that icon to the selected section.
Ribbon configuration:
my_favorite_tools 

Note: User and Site Options > General > " Activate mode/location tools on " gives you the choices ' Pointer entry ' or ' Button press '.
Launcher icons can be used to run a parametric ( Modeling only) an Advanced Selection script ( Modeling only), or a Report Writer report ( Modeling or the Drawing Editor ).
Types of launchers: You can create text-only icons without having to use a non-SDS2 software program. Or you can create an icon using a .gif or .png or .jpg image from another program. Click here for instructions .
To add a launcher: Use the Launcher Manager found in Ribbon Editor to create an icon. The icon that you create will be placed in Ribbon Editor in the " Command group " called ' Parametric Launchers ' or ' Report Launchers ' or ' Selection Launchers '.
To use the launcher: In Modeling or the Drawing Editor , click on the icon, and whatever file you linked it to will be run automatically.
Preselection: You can preselect before hitting the icon if the parametric or the Report Writer report that you are launching allows it. For a Report Writer report, ' Member numbers ' needs to be the choice made to " Select " in order for preselection to work. For a parametric, if the script uses MultiMemberLocate("prompt string") , the user can preselect members, hit the custom icon, then press the Enter key (or right-click and choose " OK ") to apply the preselection.
To remove the launcher: In Toolbar Configuration , drag the icon off of your toobar, then save the toolbar configuration.
Lasso selection icons can be placed onto your toolbar in the Drawing Editor . The " Command group " for these icons in Toolbar Configuration is ' Selection '. You can use Mode Configuration to configure tools to use lasso selection.
|
|
Lasso Mode is an alternative to Select Items mode. Ctrl , Shift and Ctrl+Shift modifiers function in the same way. |
|
|
Lasso Selection clears the current selection list, then rebuilds it with those objects you select in the lasso. |
|
|
Lasso Selection Add adds to the current selection whatever objects you select. |
|
|
Lasso Deselect subtracts from the current selection whatever objects you select. |
|
|
Lasso Select Toggle inverts the selected / deselected state of objects. |
Unlike selecting by area box , lasso selection lets you draw a lasso of any shape to select objects.
User and Site Options > General > " Point selection by area box " affects lasso selection in the same way that it affects the drawing of an area box.
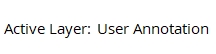
This displays the Active Layer, which is the layer that is currently selected on the Layer Panel. When you add new objects to a drawing, they are added to the Active Layer.
Locate icons (locators) are special types of icons that are used for locating points and drawing lines, erection views, construction lines, etc. They may show letters or be pictorial. The icons can be taken from the group named ' Locate ' and placed on a ribbon.
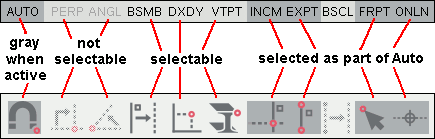
During certain operations, certain Locate icons are enabled (black lettering), while during other operations they are disabled (grayed out).
When a Locate icon is selected, it is indented and has a brighter background.
To select a Locate function, click its icon. Or you can use the Set Location Mode decoration or the Locate menu.
User and Site Options > General > " Activate mode/location tools on " gives you the choices ' Pointer entry ' or ' Button press '.
Model Tree is a fixed item on the interface.
|
Tip 1: Retractable toolbars let you temporarily hide the Model Tree , thus giving you more screen real estate.
Tip 2: The Model Tree has a context menu . Right-click to open it.
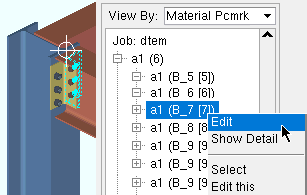
Example of using to context menu to edit a material: Select the material that you want, then right-click and choose " Edit ." In this example, you could double-click instead of opening the menu. Tip 3: Click a minus symbol [-] to hide indented items. Click a plus symbol [+] to show indented items. Indented items are subclasses of the class they are indented under.
Tip 4: The easiest way to select members is to set " View By " to ' Member Number '. That way the members are selectable at the main level. Or you can use " Find " to uncollapse the Model Tree where the searched-for member is located. Use Ctrl to select multiple members. For selecting members under a piecemark, set " View By " to ' Member Piecemark '.
Tip 5: Items are selectable only if they do not have a quantity listed next to them in parentheses (qty). For example, you can double-click a member with its member number [in brackets] next to it to open its edit window. To select multiple members in the Model Tree , hold down Ctrl to select them, then right-click ( Menu ) and choose " Edit " (or invoke Edit Member ) to edit multiple members .
| " View By " = ' Member Piecemark ' | |

|
One number in parentheses (qty) is the quantity in your current view. Two numbers in parentheses ( qty / qty ) are the "quantity in your current view" and the "quantity in the model." |
| " View By " = ' Member Piecemark ' | |
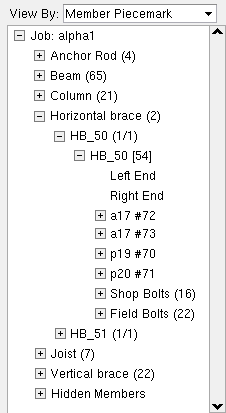
|
Members are identified by type (main level) piecemark (next level) and piecemark + member number (in brackets at the selection level). |
| Connection components are labeled Left End and Right End . | |
| Submaterials are identified by a submaterial \mark . Member main material is listed first, followed by submaterials that attach to the main material. Shop bolts and field bolts are listed last. | |
|
Custom components are listed after the member's submaterials, before its bolts. |
|
| Selection in the Model Tree is done at the lowest level -- where the quantity (qty) or (qty/qty) is not shown. A single item has a quantity of 1. | |
| Hidden Members are members that have been hidden using Hide Members ( |
|
|
Tip : Entering "hb_14" in this example would produce the same results. "Find" is case insensitive. |
Enter a member piecemark , submaterial mark or member number , then press " Find " to show (uncollapsed) the first occurrence of that mark in the Model Tree . |
does nothing if the item searched for is already shown and there are no other items of the same type at other locations. For example, if B_5 is already shown, uncollapsed, and you search for it, nothing will happen, unless there is another B_5 at a currently non-shown location in the Model Tree . B_5s may be scattered about at different locations when " View By " is set to ' Member number '. Pressing the
The selection filter affects selection in the Model Tree in the same ways it affects selection in the model.
When " Visible " Is checked (
Selecting a member or material or weld or hole in the model also selects it in the Model Tree .
You can select multiple materials, then right-click ( Menu ) and choose " Edit " (or invoke Edit Material ) to edit multiple materials . If the materials are of different types, the User Created Standard Part Material window opens.
|
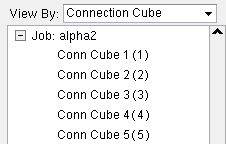
" View By " = ' Connection Cube '
|
|
|
Connection cubes are listed by " Nickname ." |
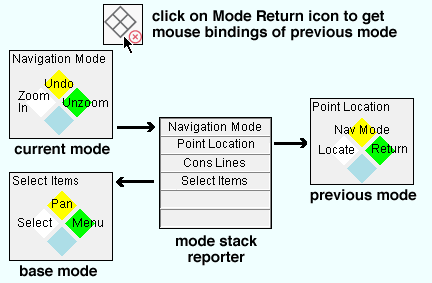
![]() Mode Return is a special icon that should be a part of every toolbar configuration if you use modes other than the default selection modes. The " Command group " this icon is found under in Toolbar Configuration is ' File '.
Mode Return is a special icon that should be a part of every toolbar configuration if you use modes other than the default selection modes. The " Command group " this icon is found under in Toolbar Configuration is ' File '.
Mode Return can sometimes also be used to cancel an operation or to bring back a previous set of mouse bindings.
If you click Mode Return enough times, you go back to the default mode -- Select Items in Modeling , Select Items in the Drawing Editor .
For more information, see Mode Return , mode stack reporter , Clear Mode Stack .
A mode stack reporter is a decoration that informs you what mouse binding group (or mode) is currently active, what mouse binding group the current mouse binding group was accessed from, what mode is the base mode, and which mode (or mouse bindings) are returned to when Mode Return is executed.
A mouse button binding reporter is a fixed item in the interface. A command diamond (not shown) displays mouse bindings for a 2-, 3- or 4-button mouse.
|
The mode shown in the following mouse binding reporters is Select Items mode in Modeling .
| Mouse bindings commonly shown in help: |
|
|
| Two-button mouse bindings: |
|
|
| Three-button mouse bindings: |
|
|
| Four-button mouse bindings: |
|
|
Hidden features: Different mouse bindings may be activated (shown on the mouse binding reporter) when you press the Ctrl , Alt or Shift key on your keyboard.
Related: Modes (general information about), Select Items Mode ( Modeling ), Select Items Mode ( Drawing Editor ), " Use left-handed mouse bindings representations " ( User and Site Options ) " Binding indicator layout " ( User and Site Options ), " Mouse buttons " ( User and Site Options ).
Offset Controls for point location. This tool is available in both the Drawing Editor and Modeling . Offset controls are shown on your ribbon automatically as needed. For example, when you Construction Line Add .
The controls can be used with the UCS on or off (see " Toggle UCS "). These instructions assume " Toggle UCS " is off.
|
|
In Modeling , you have the option to use two different coordinate systems, and you can enter a " Z+ " or " Z= " value.
| Modeling offsets ( global or UCS coordinates): |
|
|
| Modeling view offsets ( screen coordinates ): |
|
|
|
|
|
In the Drawing Editor , you work in 2D space, using screen coordinates . For this reason, there is no " Z " offset/coordinate option.
| Drawing Editor ( screen coordinates ): |
|
|
Note that " X " and " Y " and " Z " can be offsets or coordinates. Offsets are designated by a + sign. Coordinates are designated by an = sign.
means the entry is an offset.
means the entry is a coordinate.
turns to when clicked. (and vice-versa)

turns to 
when clicked.

turns to 
when clicked.
The XYX point locator
is an alternative toCoordinate feedback: Look at the X-Y-Z display when using Offset Controls . In a plan view in Modeling , the X, Y and Z coordinates are the same numerical value regardless of whether you are using global coordinates (
) or screen coordinates (
). However, this is true only if your view is a plan view. In elevation views, the coordinates are different.
Depth checking: You can use the Offset Controls to locate points that are outside of the Depth Checking limits of your view.
Reference elevation: In a plan view, when
Example 1: Want to know the location of the global 0, 0, 0 point? Toggle the Offset Controls to global coordinates mode (
) will snap to the 0, 0, 0 global coordinate, and the X-Y-Z display will read 0, 0, 0.
Example 2: You are in a plan view at 115-0 feet in Modeling .
Example 3: Same as example 2, except that you enter a
Example 4: You do everything the same as in example 2, except you enter ' -1-0 ' to
Example 5: You want to input a new beam precisely 10-0 ft above a beam that is currently input. Set
YouTube: Point Location / User Coordinate System, v7.3 (
)
Open Sheet can be found in Modeling in the command group called Model - Parametric in Ribbon Editor. The tool lets you open shop drawings, erection drawings, RFIs, sketches and addendum that have been output in the PDF format or other formats. It can also be used to find members that are linked to addendum, RFIs, Shop Drawings or Sketches that you select.
|
|
|
Open Sheet |
Disclaimer: The Open Sheet plugin can be found in the plugins/Distributed folder, which means that SDS2 did not develop the plugin. Distribution is provided in response to an expressed interest by users of SDS2 to have it be made freely available.
For this tool to be able to open files, those files need to have been placed in specific folders inside of the
macro folder in your current Job . RFIs need to be in the
| PDF Type | Folder inside of |
| Shop Drawing |
|
| Erection Drawing |
|
| RFI |
|
| Sketch |
|
| Addendum |
|
To use " Find ": You need to have first linked the members to detail sheets, RFIs, sketches or addendum using the Attachment Tool . Also, members must be within the depth checking limits of your current view before they can be found. 1) Click the " Open Sheet " icon. 2) Press the Esc key to decline to select members. 3) The Find and Open Tool window opens. Under the " Shop Drawing " or " RFI " or " Sketch " or " Addendum " tab, select one or more drawings. 4) Press the " Find " button. Result: Members linked to the selected drawings will be displayed in solid opaque form, while all other members in the view will be displayed in stick form. Also, Open Sheet will Zoom to Fit the solid opaque members.
If you press " Open " instead of " Find " (as described in the procedure outlined above), Open Sheet will open the files. You can open shop drawings (detail sheets), erection drawings (erection sheets), RFIs, Sketches or Addendum in this way. The procedure which follows is an alternative way to open detail sheets.
To open sheets by selecting members: You need to have first linked the members to the detail sheets (shop drawings) using the Attachment Tool . 1) Click the " Open Sheet " icon. 2) Select members in the model, then press Enter . Result: Open Sheet will launch the appropriate reader to open the detail sheet files that were linked (using the Attachment Tool ) to the members you selected. If, for example, the sheet files are PDF files, the program will launch your workstation's default PDF file viewer.
Related tools: Approval Sheet Sorting , Attachment Tool .
The role switcher lets you activate a different role for your current Modeling or Drawing Editor session. It can be found at the top of the Modeling or Drawing Editor window on the right-hand side when User and Site Options > " Modeling layout style " or " Drawing Editor layout style " is set to ' Lightning '. The roles that are listed on the role switcher are the roles that are associated with your current role configuration .
|
|
|
Choose a role. Or choose ' Configure ...' to open Customize Interface . |
When you choose ' Customize... ' to open the Customize Interface window, the " Current role configuration " reported on that window is the Home > Utilities > User and Site Options > General > " Lightning role configuration ," which is the role configuration for your current Modeling session. Customize Interface can be used, for example, to assign a " Ribbon configuration " and " Keyboard confiiguration " and " Shortcut menu configuration " to each role in the " Current role configuration " that is being edited on that window.
Rulers may be made to appear in Modeling , on the left-edge and upper-edge borders of plan views (views in an Y-Z plane) or around elevation views that are in an X-Y or X-Z plane.
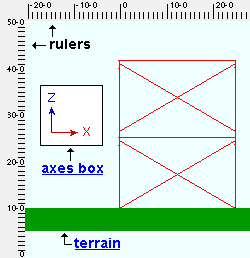 |
Rulers shown in an elevation view. The rulers display global coordinates , expressed in the primary dimension " Units ." Rulers do not appear around isometric views, or around elevation views that are not in an X-Z or Y-Z plane. |
Display Options: " Rulers " (to turn on/off while in Modeling )
Setup: User and Site Options > Modeling > " Rulers active " sets the default rulers display state -- on or off -- for each time Modeling is restarted.
Scroll bars are used to move the display of an erection view in Modeling , to move the display of a drawing in the Drawing Editor , to navigate on a window, or to show additional options on a menu.
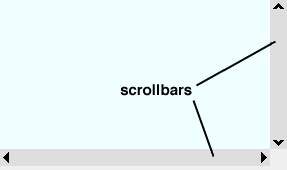
To turn on or off around erection views: (but not on selection dialogs and other windows) use the " Scroll bars " option in Display Options . User and Site Options > General > " Scroll bars active " sets the default that is applied each time Modeling or the Drawing Editor is restarted.
Selected count is a fixed item in the interface.
|
|
|
tells you the number of items that you have selected . |
Example 1: You are working in one part of the model, and you want to know if something is selected in a part of the model you can't see. Look at this decoration to see how many items are selected.
Example 2: You are using Select + to select multiple items so that you can Delete them or perform some other operation on them. This decoration tells you how many items you have selected.
Example 3: You select holes that are covered by bolts. The holes are not displayed in the " Primary selection color " because they are not visible. Nevertheless, you can tell how many are selected by looking at this decoration.
Selection filter is a fixed item in the interface. It does the same thing as Set Selection Filter in Modeling or Set Selection Filter in the Drawing Editor , with one important difference. Using Set Selection Filter , you can select more than one filter. Selection filter selects one filter at a time (unless you select ' Custom ').
|
|
|
Selection filter |
|
|
|
Set Selection Filter , Modeling |
|
|
|
Set Selection Filter , Drawing Editor |
Tip 1: Select ' Custom ' if you want more than one filter at a time. This opens the window for Set Selection Filter in Modeling or Set Selection Filter in the Drawing Editor .
Tip 2: Setting the selection filter is especially important when you select by area box .
Tip 3: In Modeling , you can select ' By Expression ', which lets you write your own "filter" to select items based on an advanced selection script. Also available is a selection ' By Status Display ' (
Please note: Filters for ' Polygons ' or ' Construction Lines ' or ' Construction Circles ' or ' Sheet Lines ' must be selected in order to for you to select material polygons, construction lines/circles or sheet lines. All other types of objects can be selected when ' Default ' or no filters are selected.
Also: The selection filter affects selection in the Model Tree in the same ways it affects selection in the model. Keyboard shortcuts can be applied to selection filters .
The Status Configuration list box is a fixed item in the interface.
|
|
|
the active status display file |
|
|
If you add the Status Configuration list box to a Modeling toolbar, you should also add the Status Display check box , and you should also consider adding the Status Display Legend icon
Only one status display file can be the active status display file . That file is the file that the Status Configuration list box shows as selected.
The Status Configuration list box's menu (
) lists the same status display files (configurations) that would also be shown on the Status Display window if you were to open that window. The " Load " option on the menu (
To list a different set of status display files on the list box menu (
For the selected file on the Status Configuration list box to actually display in your current view, the Status Display check box must be checked (
If, during a Modeling session, you open the Status Display window and reset the active status display file then press " OK ," the new file you made active will be the file that is selected on the Status Configuration list box. Similarly, changing the active status display file using the Status Configuration list box also changes the active file on the Status Display window. Status Configuration and the Status Display window are always in sync.
User and Site Options > Modeling > " Status display criteria " (
The Status Display check box is a fixed item in the interface. It lets you turn on/off status display while in Modeling , without your having to open the Status Display window ( ![]() ).
).
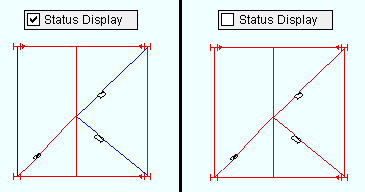
When the box is checked (
When the box is not checked (
During a Modeling session, if you open the Status Display window and then press " OK ," the Status Display check box will automatically be set to on (
Also see: The Status Configuration toolbar item sets the active status display file that this check box acts on.
The status line is a fixed item in the interface. The decoration displays system prompts and other information relevant to the operation being performed. For example, at the beginning of an operation it usually tells you what that operation is (as in the example below).
![]()
While you are performing an operation such as adding a member or material in Modeling or adding a graphic object in the Drawing Editor , the status line prompts you to perform specific tasks such as locating a point in order to complete the operation.

For second point location, so long as User and Site Options > General > "
In Select Items mode, the status line tells you the name of the icon your mouse pointer (
) is over.
The Show Sequence tool shows the sequence, member number and piecemark of the one selected member in the status line.
As is the case with other decorations , you can place a status line onto a toolbar using Ribbon Editor .
Click here for more information on Status Transfer .
Click here for more information on Full Transfer .
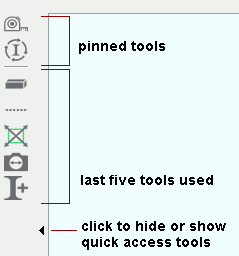
Quick access lets you activate a tool in Modeling when Site Options > General > Modeling layout style is set to ' Lightining '.
|
Quick access is found along the left side of the Modeling window. It presents tools that you used in the current session, and any tools that you choose to pin to it. |
Steel Weight and Reinforcing Weight can be found in the " Command group " called ' Decorations ' in Toolbar Configuration in Modeling .
|
|
|
|
|
|
The " Steel Weight " decoration reports the tonnage of all steel in the current model except rebar and welded wire fabric.
The " Reinforcing Weight " decoration reports the tonnage of rebar and welded wire fabric, which are used to reinforce concrete.
Tonnages are reported in US tons (2,000 lbs) when the primary dimension " Units " is set to one of the ' Imperial... " choices. Tonnages are reported in metric tons (1,000 kg) when the primary dimension " Units " is ' Metric '.
User mode icons can be found in the " Command group " called ' User Modes ' in Toolbar Configuration . You can use Mode Configuration to configure user modes to invoke commands or modes of your choice. You can also use a keyboard shortcut to invoke a user mode.
![]()
![]()
![]()
![]()
For example, if you frequently use Surface , Member and Material tools while in Modeling , you could configure the U1 icon to bring up mouse bindings for Surface Mode , Member Mode and Material Mode . You could then do an operation associated with these modes, then Mode Return back to the mouse bindings for Surface , Member and Material Mode .
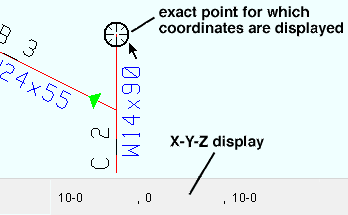
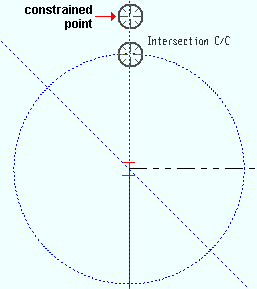
The X-Y-Z Display is available in both the Drawing Editor and Modeling . The display is automatically shown on your ribbon as needed. For example, when you Construction Line Add .
X-Y-Z Display provides feedback on the precise coordinates of the single point that the point location target (
|
The general case : One point location target is shown, over the point whose coordinates are reported in the X, Y, Z Display . |
|
Distance constraints : You can get two point location targets if you type in a distance when locating a second point. The distance/angle will be shown in brackets [ ] in the status line . The values shown in the X-Y-Z Display are for the constrained point. In this example, ANNO is turned off, so that no dimension is shown. |
|
|
In the Drawing Editor , the X-Y-Z Display shows the view number that the point location target ( |
Also: The X-Y-Z Display gives you the angle of a construction line or straight grid line or member workline or line if you select ANGL or BSGL or BSCL or BSMB or BSRL as the point locator.
The X-Y Dual Show/True Display can be found in the " Command group " called " Decorations " in Toolbar Configuration for the Drawing Editor . In functionality, it is similar to the " X-Y-Z Display ," except that it displays both the " Show " coordinates and the " True " coordinates of a drawing simultaneously. With the " X-Y-Z Display ," the " Show " coordinates are shown when the detail is Shortened , but the " True " coordinates are shown when the detail has been Unshortened . The " True " coordinates are the coordinates that are used for the mapping for annotation placement that takes place during auto detailing of drawings. Member details and submaterial details may be automatically shortenend after mapping has been done during auto detailing, with the result that the final drawing may have different " Show " coordinates and " True " coordinates.
On a member detail that is Shortened , the " Show " coordinates and the " True " coordinates are different.

Shortened space.
On a member detail that is Unshortened , the " Show " coordinates and the " True " coordinates are the same.

Tip: It is generally best practice to add drawing annotations ( Add Arc , Label Add , Add Dimension , etc.) while you are in Unhortened space, then Shorten your drawing again. This helps to ensure that the spacing between objects remains proportional and, for member details, helps Detail Members to later be able to correctly preserve ' User-created ' annotations.
The Z-filter toggle can be found in the " Command group " called " Miscellaneous " in Ribbon Editor for Modeling . This toggle can also be configured as a mouse binding or keyboard shortcut .
![]()
When this box is checked (
When the box is not checked (
In SDS2 software versions previous to v7.3xx, the Z filter could be set to different offset values. Now it always causes points to snap to the Reference Elevation of a plan view . Currently (v7.3xx and newer), you can get the same behavior that was available in previous versions by turning Z filter off and setting "Z=" in the Offset Controls to a specific global coordinate elevation.

