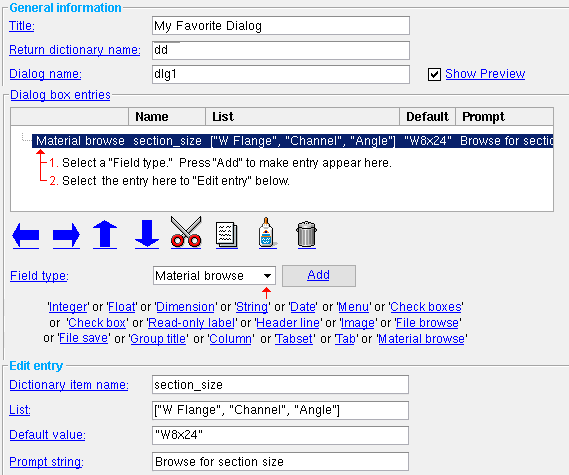
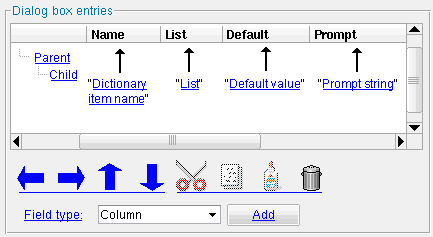
The Parametric Dialog Edit window
Also see :
Quick Notes- dialog (module that this editor is based on)
- Objects you can add to a dialog using a text editor
- Methods for disabling and validation of dialog fields (may be applied to most dialog fields)
- Using a text editor
Dialog0.Run()(alternative toDialog0.done())
1 . Begin by filling out the " General information " as shown in this example.

2 . After you check the box for " Show Preview ," a preview of the dialog box opens. Note that the title of this preview dialog box is the same as the " Title " entered above.

Preview3 . Enter a " Field type " of ' Integer ' then press the " Add " button.

4 . Use " Edit entry " options to adjust the definition of the newly added field. In this example, the " Prompt string " was changed (to "Count"). To get the dialog shown in step 5, the " Default value " also needs to be changed, from 1 to 3.
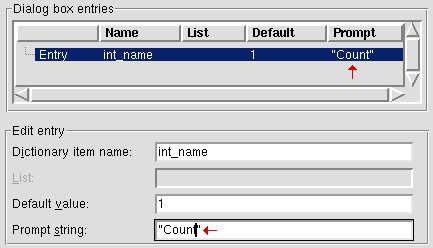
5 . As a result of your making the above changes, a new entry is made to the preview dialog box.

Preview6 . " Add " a ' Float ' entry and two ' Columns '. Use the " Edit entry " options so that the " Name " and " List " and " Prompt " values exactly match those shown below. Use the arrow buttons to separate the two entry fields under two different columns. Once you have done this, " Show Preview " will show a dialog that looks like the dialog shown in step 7.
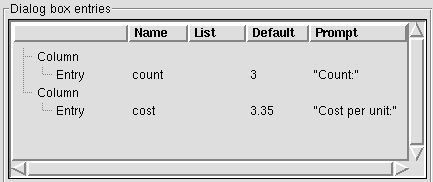
7 . As a result of doing steps 1 through 6, " Show Preview " will show a preview dialog box that looks like this:

Preview
Note: Example 2 shows how this dialog might be incorporated into a complete Python script that does the calculation described in the dialog's title.
------ General information ------
Title ( optional ): The header that you want to appear on the dialog box's title bar. You can leave this blank if you do not want a title. In the example below, "Total = Count * Cost per unit" is the title.
title ![]()

![]() title
title
Return dictionary name ( optional ): The name of the dictionary that is created using this window. You can use the dictionary name to return the entries that the user makes to a dialog -- but this is not the recommended method -- instead see the tip at the top of this help document. The entry of a dictionary name is not required.
If a dictionary name, such as dd, is entered, the last line of automatically recorded code in this dialog's code block will create a dictionary named dd. Click here for an example of a dictionary and the script that is used to create it.
dd = Dialog0.done() # creates a dictionary named ddIf no dictionary is entered , the last line of automatically recorded code will be:
Dialog0.done() # you may prefer Dialog0.Run()Tip: If you don't want a return dictionary, you may prefer to use Dialog0.Run() instead of Dialog0.done() . You need to add
Dialog0.Run()with a text editor .
Dialog name: The name of this dialog object. A dialog name is required. Also be aware that the " Dialog name " may be used to return the entries that the user makes to a dialog -- see the tip at the top of this help document.
Note: If a " Dialog name " is not entered, the default name
Dialog0will be used.Example 1: Click here for an integer entry example.
Dlg0is the " Dialog name ." The three " Dictionary item names " are"deg" "min" "sec".Dg0.deg,Dlg0.min,Dlg0.secreturn the values that the user enters to the dialog.Example 2: Click here for a float entry example.
Dlg0is the " Dialog name ." The " Dictionary item name " is "radians" in the script.Dg0.radiansreturns the value that the user enters to the dialog.
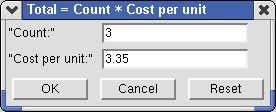
|
Preview of a dialog. |
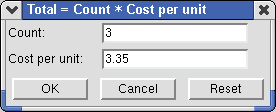
|
The actual dialog . Note the absence of quotation marks. |
------ Dialog box entries ------
What an entry does : Each listed entry generates a line of code in your Python script and a selection field or entry field or etc. that appears on the dialog (named " Title ") that is generated when this script is Run.
To add an entry to this list , enter a " Field type " then press the " Add " button. Or use " Copy " and " Paste ."
To edit an entry , select the entry you want to change then use the options under " Edit entry " to set the " Dictionary Item Name ," " Default value ," " Prompt string ," etc.
Also see: The entries the user makes to the dialog may be applied later in the code using the techniques described here . See the example to compare " Dialog box entries " with the actual parametric code and the actual dialog that is generated from those entries.
Establishing parent-child relationships :

"Left" "Right" "Up" "Down" "Left" and "Right" and "Up" and "Down" arrange the selected " Dialog box entry " so that it is placed under or above another entry or so that it is to the right or left of another entry. The up-down order of the " Dialog box entries " is their order on the actual dialog that opens when the Python script is Run . The left-right order sets the parent-child relationships. Following are some common patterns:


The parent of each entry is the dialog box itself.
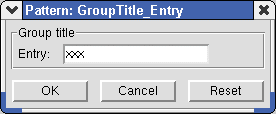

The dialog is the parent of the group title. The group title is the parent of the entry. Click here for more about the underlying code.


The dialog is the parent of the two columns. Each column is the parent of two different entries. Click here for more about the underlying code.
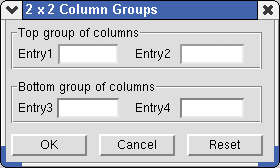

The dialog is the parent of the two group titles. The first group title is the parent of the two upper columns. The second group title is the parent of the two lower columns. Each column is the parent of an entry. Tip: Leave the " Prompt string " blank to create a group title that has no title or outline box.
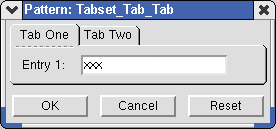

The dialog is the parent of the tabset. The tabset is the parent of the two tabs. Each tab is a parent of an entry. Click here for more about the underlying code.
Quick addition or removal of entries :
|
|
|||
| "Cut" | "Copy" | "Paste" | "Delete" |
"Cut" removes the selected entry (or entries) from the list so that you can " Paste " it (or them) elsewhere. The corresponding fields are removed from the dialog box preview .
"Copy" creates a copy of the selected entry (or entries) so that you can " Paste " it (or them) elsewhere on the list.
"Paste" places the most recently " Cut " or " Copied " entries above the selected entry on the list. Corresponding fields are placed in that same relative position on the dialog box preview .
"Delete" removes the selected entry (or entries) from the list. The dialog box preview is updated accordingly.
To add an entry to " Dialog box entries " :
![]()
Field type: Integer or Float or Dimension (displays according to the primary dimension " Units .") or String or Date or Menu or Check boxes or Check box or Read-only label or Header line or Image or File browse or File save or Group title or Column or Tabset or Tab or Material browse .
| 1 ) Select the " Field type " of the new entry that you want to add. 2 ) Press the " Add " button. 3 ) The new entry is placed in the " Dialog Box Entries " list after the entry that was previously selected on that list (or at the end of the list if no entry is selected). |
| Once an entry has been added to the " Dialog Box Entries ," you can select that entry to change its " Dictionary item name " or " List " or " Default value " or " Prompt string ." |

|
Use the arrow buttons to make particular columns the parent of particular entries. |

|
A Tabset must be selected when you add a Tab. Use the arrow buttons to make a particular tab the parent of particular entries. |
Dictionary item name: The variable name that is to be used (as described here ) to return the value that the parametric user enters to the field that is associated with the selected " Dialog box entry ." This does not apply when the selected entry is a ' Read Only Label ' or a ' Header Line ' since entries of this type are purely informational and do not return a value in the Python script.
Using this name to return a value : See the tip at the top of this help document.
Examples: Click here (the dictionary item names are
deg,min,sec), or here (the dictionary item name is radians ), or here (the dictionary item names arejob,fabricator,engineer,detailer,erector).
List: A list in the form [...,...,...] or a tuple in the form (...,...,...) . This applies when the selected entry on the " Dialog box entries " list is a line of code that can generate multiple selection options (' Menu ' or ' Check boxes ' or ' Material browse '). For other types of " Dialog box entries ," this field is disabled .
Making an entry to this field : Multiple items that are a part of the same list or tuple should be enclosed in brackets or parentheses, and each list item should be separated by a comma. If the list item is a variable previously defined in the code, it does not have to be in quotes. If the list item is a string, it should be in quotes. If you have previously defined a list or tuple in the code, you can type in the variable that calls that list or tuple.
Examples: Click here (menu), here (check boxes), or here (material browse).
Default value: A value whose type ( "string" or float or integer or etc.) depends on the field type. This sets the default that is automatically entered to the field that is associated with the selected " Dialog box entry ." Be sure to use correct syntax. For example, if the item is a value or a variable that returns a value, it does not have to be in quotes. If the item is a string, it must be in quotes.
For a " Dimension " entry field : The " Default value " must be in quotes if the dimension has dashes or spaces or fractions (
"1-3 1/5"). If the dimension is a float, quotes are not needed (15.5). Click here for information on thestyle=xxxargument that you can add with a text editor .For a ' Check boxes ' or ' Material browse ' : Enter in parentheses or brackets the list of items (with each item separated by a comma) that you want to be selected by default.
For a ' Menu ' : Enter one item that appears in the " List ." That one item will be selected, by default, on the menu.
For a ' Date ' : The default entry can be in the form
Mon dd yyyy( Jan 8 2010 ) or in the formmm dd yywith spaces or underscores or other characters as numerical spacers (11 11 11returns Nov 11 2011) or can be"**NOT SET**"or"today"(to return today's date)."0"(zero) returns**NOT SET**."now"is another way to return today's date.Examples: Click here (a float entry;
default=3.14159) or here (a integer entry;default =20) or here (a string entry;default="Building 506") or here (check boxes;default=[ ]) or here (menu;default="Beam").
Prompt string: The field label . You do not need to put the string in quotes. A " Prompt string " may be entered for any " Field type " that you can enter. On the list of " Dialog box entries ," these strings are shown under the " Prompt " column.
For ' Group title ' and ' Check boxes ', the entry you make here is the section header title. If you don't want a section header title, don't enter a " Prompt string ." Leaving the " Prompt string " blank also removes the section border lines.
Examples : Click here (an integer entry,
label="Degrees:") or here (a float entry;label="Enter radians:") or here (an string entry;label="Job:").
To close the Parametric Dialog Edit window :
"OK" completes the Add Dialog Box.
"Cancel" keeps everything as it was before you began the Add Dialog Box.
