The dialog module
| Quick Notes |
Much of the dialog module replaces deprecated code from the param module. Information that is truly new is marked .
|
On this page :
- Introduction
- Fields you can add to a dialog using the Parametric Dialog Edit window
- Fields and methods you can add to a dialog using a text editor
- Methods for disabling and validation of dialog fields
Also see :
- The built-in Python functions
dir()andhelp()(to get additional help)
PR 42181 For comboboxes on Python screens, the number pad/key pad enter key now behaves like the return key. (v2017)
PR 44894 In the Python API, users can browse a subset of the shape file. See
help(SelectionDialog.RunMaterialFileSelectionDialog)for more information. Thedialog .choose_file.ChooseMtrlcan support similar functionality via attributes for a list of shapes and browser title. (v2018)PR 46960 The Python
dialog.text.Textwidget will return an empty string if its initial value was empty. Previously, a newline character was returned due to the nature of the underlying control. The side effect of this is screens that utilize this widget such as custom properties will not introduce a change to the stored data by simply opening and closing the screen. As a specific example, custom properties that flag the member for detailing or piecemarks will not flag the member by simply opening and closing custom properties when the member's custom properties had not previously been visited. (v2020)
Introduction to the dialog module :
To import the Dialog class:
from dialog import DialogOther imports may also be necessary -- for example:
from dialog.dimension import DimensionEntry from dialog.dimension import DimensionStyled import TkinterDialog0 = Dialog("Title")
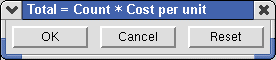
In the example above,"Total = Count * Cost per unit"is the title. The argument "Title" is optional.To run the dialog:
Dialog0.Run()or
Dialog0.done()
Fields you can add to a dialog using the Parametric Dialog Edit window :
Entry1 = IntEntry( parent , " Dictionary item name ", label=" Prompt string ", default=" Default value ") creates an IntEntry object and assigns it to the variable Entry1 , thus creating an integer entry field that allows the entry of positive or negative whole numbers. Users cannot enter fractions or decimal points or dimensions with dashes into such a field. The first argument, parent , identifies the column or frame or dialog in which this field is to be placed ( Dlg0 is the " Dialog name " in the following script). The " Dictionary item name " is "deg" or "min" or "sec" in the script. The " Prompt string " is the field's name on the dialog ( "Degrees:" "Minutes:" "Seconds:" ). The " Default value " should be an integer ( 20 and 20 and 0 in the example).
# Enter degrees, minutes, seconds, into a dialog, to get a result in decimal degrees.
from dialog import Dialog
from dialog.entry import IntEntry
# dialog opens
Dlg0 = Dialog( "Enter degrees, minutes, seconds" )
Entry1 = IntEntry( Dlg0, "deg", label="Degrees:", default=20 )
Entry2 = IntEntry( Dlg0, "min", label="Minutes:", default=20 )
Entry3 = IntEntry( Dlg0, "sec", label="Seconds:", default=0 )
# dialog closes after user presses "OK" or "Cancel"
if Dlg0.Run():        # user presses "OK"
   print("Degrees:", Dlg0.deg + Dlg0.min/60.0 + Dlg0.sec/3600.0)
else:                 # user presses "Cancel"
   print("You have canceled this operation.")
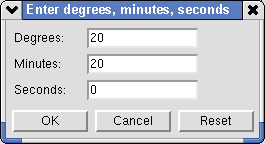
Dialog from the above script
To return the user-entered value, type the " Dialog name " (
Dlg0) followed by a period (.), followed by the " Dictionary item name " (in this example,Dg0.deg,Dlg0.min,Dlg0.sec). If you typeglobals().update(dictionary_name)after the dialog code, only the variable (" Dictionary item name ") is needed to return the user entry.
Entry1 = FloatEntry( parent , " Dictionary item name ", label=" Prompt string ", default=" Default value " ) creates a FloatEntry object and assigns it to the variable Entry1 , thus creating a floating point entry field that allows the entry of floating point numbers, which are numbers with decimal points in them. The first argument, parent , identifies where, on the dialog, this field is to be placed ( Dlg0 is the " Dialog name " in the following script). The " Dictionary item name " is "radians" in the script. The " Prompt string " that is the field's name on the dialog ( "Enter radians" ). default= assigns the " Default value " that is automatically entered when the dialog first opens -- this default value should be a floating point number ( 3.14159 in the example).
# Converts radians to degrees.
from dialog import Dialog
from dialog.entry import FloatEntry
Dlg0 = Dialog("Radians to Degrees")
Entry1 = FloatEntry(Dlg0, "radians", label="Enter radians", default=3.14159)
if Dlg0.Run():  # user presses "OK"
   degrees = Dlg0.radians * (180 / 3.14159)
   print("Number of radians =", Dlg0.radians)
   print("Number of degrees =", degrees)
else:                      # user presses "Cancel"
   pass
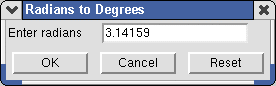
Dialog from the above script
To return the user-entered value, type the " Dialog name " (
Dlg0) followed by a period (.), followed by the variable (in this example,Dg0.radians).
Entry1 = DimensionEntry( parent , " Dictionary item name ", style= "style" , label=" Prompt string ", default=" Default value "). . The value assigned to default= may be a dimension string ( "1-2 1/2" ), a floating point number ( 12.5 ) or an integer ( 12 ).
A field created by selecting ' Dimension ' as the " Field type " on the Parametric Dialog Edit window omits the
style=xxxargument and, as a result, now displays values according to the primary dimension " Units ." This means that ifUnits("inch")orUnits("feet")are specified in the Python script, any dimensional values in that same script will be interpreted as being in inches, but when that script is run in a metric Job those values will be displayed as millimeters; for example, if the " Dimension precision " is 1, a value of1.0in the script will be displayed as25in the dimension field. This can be overridden by specifying a specific style for the dimension entry; for example,style="metric"will always display values in mm and might be used to maintain consistency whenUnits("metric")is specified as the startup code units.
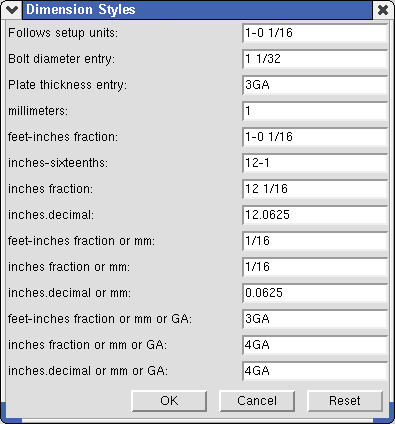
Here's a script for the dialog that is shown above.
# A dialog that uses all available dimension styles.
from dialog import Dialog
from dialog.dimension import DimensionEntry
from dialog.dimension import DimensionStyled

Dlg0 = Dialog( "Dimension Styles" )
Entry1 = DimensionEntry( Dlg0, 'dim1', style="dim",
            label="Follows setup units:", default=12.0 +
            1.0/32.0 )
Entry2 = DimensionEntry( Dlg0, 'dim2', style="dia",
            label="Bolt diameter entry:", default="1
            1/32 in" )
Entry3 = DimensionEntry( Dlg0, 'dim3', style="thick",
            label="Plate thickness entry:", default="3GA"
            )
Entry4 = DimensionEntry( Dlg0, 'dim4', style="metric",
            label="millimeters:", default="1mm"
            )
Entry5 = DimensionEntry( Dlg0, 'dim5', style="feet",
            label="feet-inches fraction:", default=12 +
            1.0/32.0 )
Entry6 = DimensionEntry( Dlg0, 'dim6', style="inch",
            label="inches-sixteenths:", default=12 + 1.0/32.0
            )
Entry7 = DimensionEntry( Dlg0, 'dim7', style="inch-fraction",
            label="inches fraction:", default=12 + 1.0/32.0
            )
Entry8 = DimensionEntry( Dlg0, 'dim8', style="inch-decimal",
            label="inches.decimal:", default=12 + 1.0/32.0
            )
Entry9 = DimensionEntry( Dlg0, 'dim9', style="feet2",
            label="feet-inches fraction or mm:", default=1.0/25.4
            )
Entry10 = DimensionEntry( Dlg0, 'dim10', style="inch-fraction2",
            label="inches fraction or mm:", default=1.0/25.4
            )
Entry11 = DimensionEntry( Dlg0, 'dim11', style="inch-decimal2",
            label="inches.decimal or mm:", default=1.0/25.4
            )
Entry12 = DimensionEntry( Dlg0, 'dim12', style="inch-decimal3",
            label="feet-inches fraction or mm or GA:", default=.2391
            )
Entry13 = DimensionEntry( Dlg0, 'dim13', style="inch-fraction3",
            label="inches fraction or mm or GA:", default=.2242
            )
Entry14 = DimensionEntry( Dlg0, 'dim14', style="inch-decimal3",
            label="inches.decimal or mm or GA:", default="4GA"
            )
Dlg0.Run()
Dialog from the above scriptA "Style" may be assigned using
style=. Ifstyle=xxxis omitted, the default style is 4 ("dim").
These styles depend on the primary dimension " Units ." Except for the 5 ("dia") style, display resolution depends on the " Dimension precision ." "dim" or 4 The dimension can be in the primary dimension " Units " or other units . "dia" or 5 Displays inches (to 1/32) or millimeters (to 1 mm) -- the normal display logic for bolt diameters. Display depends on the primary dimension " Units ." "thick" or 6 Works like " Material thickness " for a plate. Allows GA thicknesses.
These styles are independent of the primary dimension " Units ." "metric" or 0 mm only. "inch" or 2 inches-sixteenths only. "feet" or 1 ft-in fraction only. "feet2" or 7 ft-in fraction or mm . "feet3" or 9 ft-in fraction or mm or GA . "inch-fraction" or 3 inches fraction only. "inch-fraction2" or 8 inches fraction or mm . "inch-fraction3" or 10 inches fraction or mm or GA . "inch-decimal" or 12 inches.decimal only. "inch-decimal2" or 13 inches.decimal or mm . "inch-decimal3" or 14 inches.decimal or mm or GA .
Entry1 = StrEntry( parent , " Dictionary item name ", label=" Prompt string ", default=" Default value " ) creates a StrEntry object and assigns it to the variable Entry1 , thus creating a string entry field that allows the entry of text. The first argument, parent , identifies the column or frame or dialog in which this field is to be placed ( Dlg0 is the " Dialog name " in the following script). The " Dictionary item name " is "job", "fabricator", "engineer", "detailer" and "erector" in the script. label="string" is the " Prompt string " that is the field's name on the dialog ( "Job:", "Fabricator:", "Engineer:", "detailer:" "Approval:" ). default= assigns the " Default value " that is automatically entered when the dialog first opens -- this default value should be a " string " ( "Building 505" "Fab Inc." "Sparky Silvershoes" "Mandarin Orange" "Vlad the Impaler" ).
# Outputs entered project information as a dictionary.
from dialog import Dialog
from dialog.entry import StrEntry
from dialog.dimension import DimensionStyled
from dialog.dialog import ResponseNotOK
import Tkinter
# dialog opens
Dlg0 = Dialog( "Project Information" )
ntry1 = StrEntry( Dlg0, "job", label="Job:", default="Building 506" )
Entry2 = StrEntry( Dlg0, "fabricator", label="Fabrictor:", default="Fab, Inc." )
Entry3 = StrEntry( Dlg0, "engineer", label="Engineer:", default="Sparky Silvershoes" )
Entry4 = StrEntry( Dlg0, "detailer", label="detailer:", default="Mandarin Orange" )
Entry5 = StrEntry( Dlg0, "erector", label="Approval:", default="Vlad the Impaler" )

# dialog closes after user presses "OK" or "Cancel"
try:
    dd = Dlg0.done()       # creates a dictionary named dd
    print(dd)
except ResponseNotOK:
    print("You have canceled this operation.")
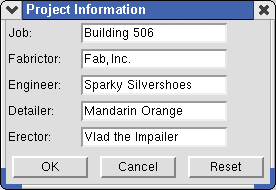
Dialog from the above script
To return the user-entered value, type the " Dialog name " (
Dlg0) followed by a period (.), followed by the variable (in this example,Dg0.job,Dg0.fabricator,Dg0.engineer,Dg0.detailer,Dg0.erector).
Entry1 = DateEntry( parent , " Dictionary item name ", label=" Prompt string ", default=" Default value " ) creates a DateEntry object and assigns it to the variable Entry1 , thus creating a string entry field that allows the entry of a date . To enter today's date, a user can double-click; to enter **NOT SET** , the user types in 0 then presses Tab to go on to the next field.The default value in the script can be in the form "Mon dd yyyy" ( Jan 8 2010 ) or in the form "mm dd yy" with spaces or underscores or other characters as numerical spacers ( 11 11 11 returns Nov 11 2011) or can be "**NOT SET**" or "today" (to return today's date). "0" (zero) returns **NOT SET** . "now" is another way to return today's date.
# Evaluates dates entered, reports whether or not completion is on time.
from dialog import Dialog
from dialog.date import DateEntry, Date
Dlg0 = Dialog( "Completion Date" )
Entry1 = DateEntry( Dlg0, 'date_1', label="Deadline:", default="**NOT SET**" )
Entry2 = DateEntry( Dlg0, "date_2", label="Completion date:", default="today" )
if Dlg0.Run():                          # user presses "OK"
    if Dlg0.date_1 != "**NOT SET**" and Dlg0.date_2 != "**NOT SET**":
        if int(Date(Dlg0.date_1)) >= int(Date(Dlg0.date_2)):
            print("Congratulations! You have completed the project on time.")
        else:
            print("Can't you get anything done on time?")
        else:
            print("Cannot compare date with **NOT SET**")
        else:                           # user presses "Cancel"
            print("You have canceled this operation.")

Dialog from the above script
Menu1 = Combobox( parent , " Dictionary item name ", " List ", label=" Prompt string ", default=" Default value " ) creates a Combobox object and assigns it to the variable Menu1 , thus creating a field with a selection menu ( ![]() ). The first argument,
). The first argument, parent , identifies the column or frame or dialog in which this field is to be placed ( Dlg0 is the " Dialog name " in the following script). The " Dictionary item name " is "my_favorite" in the script. options (" List ") may be a tuple ("Beam", "Column", "Brace") or a list [...] or an object that calls a previously defined tuple or a list (see the next example ). label= is the " Prompt string " that is the name of this field on the dialog ( "Select your favorite member type:" ). default= assigns the " Default value ", which must be one (one only) of the comma-separated items in the options list ( "Beam" in the script).
# Opens a dialog and prints the member type the user selects.
from dialog import Dialog
from dialog.combobox import Combobox
# dialog opens
Dlg0 = Dialog("My Favorite Member Type")
Menu1 = Combobox( Dlg0, "my_favorite", ("Beam", "Column", "HBrace", "VBrace"),
label="Select your favorite member type:", default="Beam" )
# dialog closes after user presses "OK" or "Cancel"
if Dlg0.Run():                            # user presses "OK"
    print("Your favorite member type is", Dlg0.my_favorite)
else:                                     # user presses "Cancel"
    pass
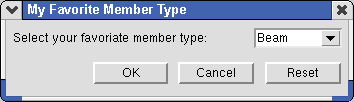
Dialog from the above script
# Script that generates the dialog that is shown above.
from dialog import Dialog
from dialog.combobox import Combobox
from dialog.dialog import ResponseNotOK
from job import Job
from fab import Fabricator
import Tkinter
# Warning: For this to run, a member category must be in line 1 in setup
# dialog opens
Dlg0 = Dialog( "Setup Lists In Menus" )
Menu1 = Combobox(Dlg0, "bolt_type", Job().bolt_sched(), label="Bolt type:", default="Item 1" )
Menu2 = Combobox(Dlg0, "bolt_dia", Job().avail_bolts(),
            label="Bolt diameter:", default="Item 1")
Menu3 = Combobox(Dlg0, "mem_seq", Job().sequences(),
            label="Sequence:", default="Item 1" )
Menu4 = Combobox(Dlg0, "mem_zone", Job().zones(),
            label="Zone:", default="Item 1" )
Menu5 = Combobox(Dlg0, "L_grade", Job().steel_grades("Angle").keys(),
            label="L grade:", default="Item 1" )
Menu6 = Combobox(Dlg0, "category", ( Fabricator().category_defs ),
            label="Category:", default="Item 1" )
dd = Dlg0.done()   # creates a dictionary named dd
# dialog end
# insert code to use choices made to dialog
# Note: "Item 1" is just a place holder in the above script. Replacing "Item 1" with an expression like Job().bolt_sched()[2] causes the third item in the list to be selected by default in the "Bolt type:" menu. "Item 1" was used because it is shorter.
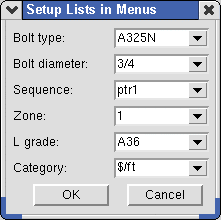
Dialog from the above script. It uses links to Setup to fill out options on the menus. Note the use of Job().bolt_sched() , Job().avail_bolts() , Job().sequences() and Fabricator().category_defs in the script.
Check_boxes1 = CheckButtons( parent , " Dictionary item name ", " List ", label=" Prompt string ", default=" Default value ") creates a CheckButtons object and assigns it to the variable Check_boxes1 , thus creating one or more check box options that can be checked ( ![]() ) or unchecked (
) or unchecked ( ![]() ). The first argument,
). The first argument, parent , identifies the column or frame or dialog in which this field is to be placed ( Dlg0 is the " Dialog name " in the following script). The " Dictionary item name " is "my_ favorite " in the script. " List " names the checkbuttons and can be a list [...] or a tuple (...) or an expression that returns a list or tuple. label= is the " Prompt string " that is the text of the header above the check boxes on the dialog ( "Select your favorite member types" ). default= assigns the " Default value ," which may be a tuple (...) or a list [...] that is a subset of the buttons and may be an empty set -- [ ] in the example. User entries will be output in the form of a tuple (...) or a list [...] , depending on the default that is entered.
# Opens a dialog and prints the member types the user selects.
from dialog import Dialog
from dialog.checkbox import CheckButtons
# dialog opens
Dlg0 = Dialog("My Favorite Member Types")
Check_boxes1 = CheckButtons(Dlg0, "my_favorite",
    ("Beam", "Column", "VBrace", "HBrace"),
    label="Select your favorite member types:", default=[] )
# dialog closes after user presses "OK" or "Cancel"
if Dlg0.Run():                                            # user presses "OK"
    print("Your favorite member types:", Dlg0.my_favorite)
else:                                                          # user presses "Cancel"
    print("You have canceled this operation.")
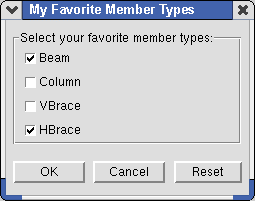
Dialog from the above script.
To return the user-entered values, type the " Dialog name " (
Dlg0) followed by a period (.), followed by the variable (in this example,Dg0.my_favorite). The user entries will be output in the form of a tuple(...)or a list[...], depending on the default that is entered.
Check_box1 = Checkbox( parent , " Dictionary item name ", label=" Prompt string ", default=" Default value ") creates a Checkbox object and assigns it to the variable Check_box1 , thus creating a single check box option that returns True for checked ( ![]() ) or False for unchecked (
) or False for unchecked ( ![]() ). The first argument,
). The first argument, parent , identifies the column or frame or dialog in which this field is to be placed ( Dlg0 is the " Dialog name " in the following script). The Dictionary item name is "prnt" in the script. Since default= is True in the following script, the box is checked by default; if it had been False , the box would be unchecked by default. Note: The CheckButtons() method can also be used to create a single check box, with or without an introductory group title, but that method returns None or a string , whereas this method returns True or False .
# Check box gives option to print whatever text the user enters.
from dialog import Dialog
from dialog.checkbox import Checkbox
from dialog.entry import StrEntry
from dialog.dialog import ResponseNotOK
Dlg0 = Dialog( "Print Text" )
Entry1 = StrEntry( Dlg0, 'str', label="Type in some text:",
    default="some text" )
Check_box2 = Checkbox( Dlg0, "prnt",
    label="Print the text I entered", default=True )
try:
    dd = Dlg0.done()
    if Dlg0.prnt is True:
        print(Dlg0.str)          # prints the text that has been entered
           else:
               print (Dlg0.prnt)  # prints False
except ResponseNotOK:
    print("You have canceled this operation.")
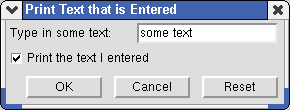
Dialog from the above script.
Entry1 = ReadOnlyEntry( parent , label=" Prompt string ", displayed_value=" Default value ") creates a ReadOnlyEntry object and assigns it to the variable Entry1 , thus creating a read-only field. The first argument, parent , identifies the column or frame or dialog in which this field is to be placed ( Dlg0 is the " Dialog name " in the following script). label= " Prompt string " is the name of the field on the dialog ( "Member type" " Workpoint to Workpoint " ). displayed_value= assigns the " Default value ", which can be a variable that returns a value ( mem1.Type and mem1.LeftEndLocation.Distance(mem1.RightEnd.Location) ).
# Dialog shows read-only info about member user selects.
from member import MemberLocate
from param import ClearSelection
from dialog import Dialog
from dialog.entry import ReadOnlyEntry
mem1 = MemberLocate("Select a member")
# Dialog begins
Dlg0 = Dialog("Member Information")
Entry1 = ReadOnlyEntry(Dlg0, label="Member type:", displayed_value=mem1.Type)
Entry2 = ReadOnlyEntry( Dlg0, label="Workpoint to Workpoint:", displayed_value = mem1.LeftEnd.Location.Distance( mem1.RightEnd.Location))
Dlg0.Run()
# Dialog ends
ClearSelection()
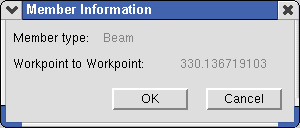
Dialog from the above script.
Header_line1 = Label( parent , "Header Line" ) creates a Label object and assigns it to the variable Header_line1 , thus placing a header line in whatever frame is defined. The first argument, parent , identifies the column or frame or dialog in which this field is to be placed ( Group_title1 in the following script). The second argument is the header line name ( "Header Line" ).
# Outputs a dialog with a group title and header line.
from dialog import Dialog
from dialog.frame import Frame
from dialog.label import Label
# dialog opens
Dlg0 = Dialog( "Group Title and Header Line" )
Group_title1 = Frame( Dlg0, "Group title" )
Header_line2 = Label( Group_title1, "Header Line" )
# dialog closes after user presses "OK" or "Cancel"
if Dlg0.Run():    # user presses "OK"
    print("This dialog is completely useless!")
else:             # user presses "Cancel"
    print("You have canceled this operation.")
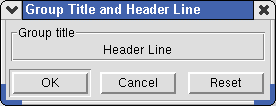
Dialog from the above script.
Image1 = Image( parent , "/path/image.gif") creates an Image object and assigns it to the variable Image1 , thus placing the .gif or .ppm or .pgm or .png or .jpg image whose path is defined in quotes. The first argument, parent , identifies the column or frame or dialog in which this field is to be placed ( Column6 in the following script). The second argument is the complete file path, including the file name.
# Outputs a two-column dialog with entry fields and an image.
from param import Units
from dialog import Dialog
from dialog.dimension import DimensionEntry
from dialog.frame import Column
from dialog.image import Image
Units("feet")
Dlg0 = Dialog("Image and Dimension Entry")
Column1 = Column(Dlg0)
Entry2 = DimensionEntry(Column1, "thick", label="Thickness", default="3/8")
Entry3 = DimensionEntry(Column1, "width", label="Plate width", default="10")
Entry4 = DimensionEntry(Column1, "len_lower", label="Plate length lower", default="6 1/4")
Entry5 = DimensionEntry(Column1, "len_upper", label="Plate length upper", default="6 1/4")
Column6 = Column(Dlg0)
Image7 = Image(Column6, "/users/dave/websplc1.gif")
if Dlg0.Run():
    pass                          # replace pass with code
else:
    pass                          # last line, the parametric stops running
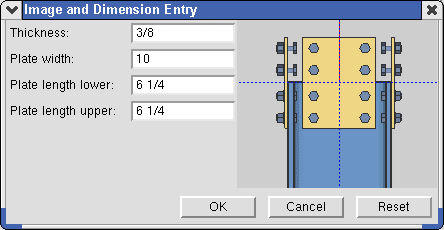
Dialog from the above script.
File_browse1 = ChooseFile( parent , " Dictionary item name ", label=" Prompt string ", save=False, default=" Default value ") creates a ChooseFile object and assigns it to the variable File_browse1 , thus creating a file path entry field with a " Browse " button. save=False makes the " Browse " button into a tool for returning a file path only, rather than writing to a file.
# Prints the file path to the file that the user selects.
from dialog import Dialog
from dialog.choose_file import ChooseFile
Dlg0 = Dialog('Print Selected File Path' );
File_browse1 = ChooseFile( Dlg0, 'file_name', label="Press Browse, select a file:", save=False, default="/path")
# Dialog end
if Dlg0.Run():
    print(Dlg0.file_name)
else:
    print("You have canceled this operation")
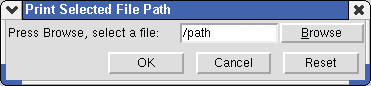
Dialog from the above script.
File_save1 = ChooseFile( parent , " Dictionary item name ", label=" Prompt string ", save=True, default=" Default value " ) creates a ChooseFile object and assigns it to the variable File_save1 , thus creating a file path entry field with a " Browse " button. save=True enables the writing to a file. If you use the " Browse " button to select a file that already exists, a yes-no dialog will open with the message, " Do you want to overwrite? "
Group_title1 = Frame( parent , "Group title") creates a Frame object and assigns it to the variable Group_title1 . The first argument, parent , identifies the column or frame or dialog in which this field is to be placed ( Dlg0 is the " Dialog name " in the following script). The second argument is required to get a heading.
# Generates a dictionary from a two-column
 dialog of text-entry fields.
    from dialog import Dialog
    from dialog.entry import StrEntry
    from dialog.frame import Frame
    Dlg0 = Dialog( "Pattern: GroupTitle_Entry" )
Group_title1 = Frame( Dlg0, "Group
 title" )
    Entry2 = StrEntry( Group_title1, 'x', label="Entry:",
 default="xxx" )
    # dialog closes after user presses "OK" or "Cancel"
    if Dlg0.Run():
        print("Congratulations! You successfully pressed OK.")
    else:
        print("Way to go! You pressed Cancel.")
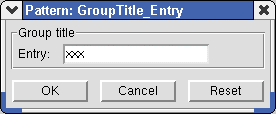
Dialog from the above script.
Column1 = Column( parent ) creates a Column object and assigns it to the variable Column1 . Columns are used to layout widgets side-by-side.
# Generates a dictionary from a two-column dialog of text-entry fields.
from dialog import Dialog
from dialog.entry import StrEntry
from dialog.frame import Column
from dialog.dialog import ResponseNotOK
Dlg0 = Dialog( "Pattern: c1_e2_e3_c4_e5_e6" )
Column1 = Column( Dlg0 )
Entry2 = StrEntry( Column1, 'job', label="Job:", default="Building 506" )
Entry3 = StrEntry( Column1, 'fabricator', label="Fabricator:", default="Fab, Inc." )
Column4 = Column( Dlg0 )
Entry5 = StrEntry( Column4, 'detailer', label="detailer:", default="Mandarin Orange" )
Entry6 = StrEntry( Column4, 'engineer', label="Engineer:", default="Sparky Silvershoes" )
# dialog closes after user presses "OK" or "Cancel"
try:
    dd = Dlg0.done()
    print(dd)
except ResponseNotOK:
    print("You have canceled this operation.")
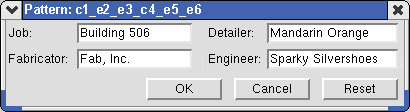
Dialog from the above script.
Tabset1 = Tabset( parent ) creates a container for Tabs. Tab1 = Tab(Tabset1, "Tab Name") adds a Tab to the Tabset . Widgets may be added to Tabs in the same manner as Frames and Columns.
# Generates a two-tab dialog with text-entry fields.
from dialog import Dialog
from dialog.entry import StrEntry
from dialog.tabset import Tab
from dialog.tabset import Tabset
# Dialog opens
Dlg0 = Dialog( "Pattern: Tabset_Tab_Tab" )
Tabset1 = Tabset( Dlg0 )
Tab2 = Tab( Tabset1, "Tab One" )
Entry3 = StrEntry( Tab2, 'x', label="Entry 1:", default="xxx" )
Tab4 = Tab( Tabset1, "Tab Two" )
Entry5 = StrEntry( Tab4, 'y', label="Entry 2:", default="yyy" )
# dialog closes after user presses "OK" or "Cancel"
if Dlg0.Run():
    print("Congratulations! You successfully pressed OK.")
else:
    print("Way to go! You pressed Cancel.")
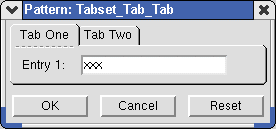
Dialog from the above script.
Mtrl_browse1 = ChooseMtrl( parent , " Dictionary item name ", " List ", label=" Prompt string ", default=" Default value " ) creates a ChooseMtrl object and assigns it to the variable Mtrl_browse1 , thus creating a field for selecting section sizes. The first argument, parent , identifies the column or frame or dialog in which this field is to be placed ( Dlg0 is the " Dialog name " in the following script). The " Dictionary item name " is "size" in the script. "List" is a tuple in the form ("W flange", "Channel", "Angle") or can be a list [...] -- it sets the types of materials that are checked ( ![]() ) to be shown on the selection list that is opened with the file button (
) to be shown on the selection list that is opened with the file button ( ![]() ).
). label= " Prompt string " is the field's name on the dialog ( "Select a section:" ). default= assigns the " Default value " that is automatically entered when the dialog first opens -- this default value should be a string from the local shape file ( "W8x24" in the script).
# Prints material specs of section size the user selects.
from param import Units
from dialog import Dialog
from dialog.choose_file import ChooseMtrl
from dialog.dialog import ResponseNotOK
from shape import Shape
Units("feet")
# dialog opens
Dlg0 = Dialog("Select a section size:")
Mtrl_browse1 = ChooseMtrl(Dlg0, "size", ("W Flange", "Channel", "Angle"), label ="Select a section:", default="W8x24")

# dialog closes after user presses "OK" or "Cancel"
if Dlg0.Run():    # user presses "OK"
    sz = Shape(Dlg0.size)
    print("Material type:", sz.Type())
    print("Section size:", sz.SectionSize)
    print("Depth:", sz.depth)
    print("Web thickness:", sz.tw)
    print("Flange width:", sz.bf)
    print("Flange thickness:", sz.tf)
    print("k distance:", sz.k)
else:   # user presses "Cancel"
    pass
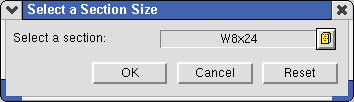
Dialog from the above script.
Dlg0.done() creates a dictionary from a dialog object (the dialog object in this example is Dlg0 ).
An example of a dictionary:
{'detailer': 'Mandarin Orange', 'engineer': 'Sparky Silvershoes',
                'erector': 'Vlad the Impaler'}
The above dictionary was created from the
"Dictionary item name"anddefault=values in the script below. The dictionary is calledddand was generated usingobject.done(). Note that no dictionary is created if the user presses " Cancel " on the dialog since " Cancel " returnsResponseNotOK.# Outputs entered project information as a dictionary. from dialog import Dialog from dialog.entry import StrEntry from dialog.dialog import ResponseNotOK # dialog opens Dlg0 = Dialog( "Project Information" ) Entry1 = StrEntry( Dlg0, "engineer", label="Engineer:", default="Sparky Silvershoes" ) Entry2 = StrEntry( Dlg0, "detailer", label="detailer:", default="Mandarin Orange" ) Entry3 = StrEntry( Dlg0, "erector", label="Approval:", default="Vlad the Impaler" ) # dialog closes after user presses "OK" or "Cancel" try: dd = Dlg0.done() # creates a dictionary named dd print(dd) except ResponseNotOK: # user presses "Cancel" print("You have canceled this operation.")
Fields and methods you can add to a dialog box using a text editor :
Dlg0.Run() is an alternative to Dlg0.done() . It returns True (if the user clicks "OK") or False (if the user clicks "Cancel"). Compare the following script with the script shown for Check_box1 = Checkbox() .
# Check box gives option to print whatever text the user enters.
from dialog import Dialog
from dialog.checkbox import Checkbox
from dialog.entry import StrEntry
Dlg0 = Dialog( "Print Text" )
Entry1 = StrEntry( Dlg0, 'str', label="Type in some text:", default="some text" )
Check_box2 = Checkbox( Dlg0, "prnt", label="Print the text I entered", default=True )
if Dlg0.Run():         # user presses "OK"
    if Dlg0.prnt:
        print(Dlg0.str) # prints the text that has been entered
else:                  # user presses "Cancel"
    print("You have canceled this operation.")
Dialog from the above script.
Entry1 = Radio(parent, "var_name", choices ="string", default=item in choices) creates a Radio object and assigns it to the variable Entry1 , thus creating a field with radio buttons, which allows only one item at a time to be selected.
# Opens a dialog with menu choices and
 prints your choice.
from dialog import Dialog
from dialog.radio import Radio
# dialog opens
Dlg0 = Dialog( "Your Menu, Sir" )
Entry1 = Radio(Dlg0, "choice", ["Lasagna", "Nacho", "Big Mac"], label="What food do you want?", default="Lasagna")
Entry1.vertical = True
# dialog closes after user presses "OK" or "Cancel"
if Dlg0.Run():        # user presses "OK"
        print("Your choice:", Dlg0.choice)
else:                 # user presses "Cancel"
    pass
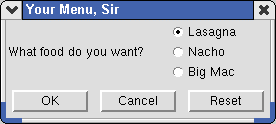
Dialog from the above script.
Entry = Text( parent, "var_name", default="String" ) creates a Text object and assigns it to the variable Entry , thus creating an area for muli-line text entry.
# Type in multiple lines. Get output in the report viewer.
from dialog import Dialog
from dialog.text import Text
from dialog.dialog import ResponseNotOK
Dlg0 = Dialog( "Enter Multi-line Text" )
    Entry1 = Text( Dlg0, "txt", default="Press Enter for a new line." )
if Dlg0.Run():          # user presses "OK"
    print(Dlg0.txt)      # prints the text that has been entered
else:                   # user presses "Cancel"
    print("You have canceled this operation.")
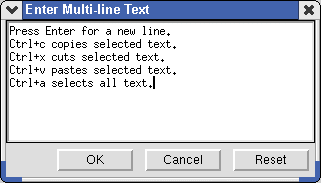
Dialog from the above script.
Methods for disabling and validation of dialog fields :
Entry1.DisableOtherIf(Entry2, "expression that returns True or False") applies a DisableOtherIf() method to the dialog object Entry1 . The first argument, Entry2 , is the field that will be disabled when the quoted expression in the second argument is True .
# Check box disables text entry and text output when checked.
from dialog import Dialog
from dialog.checkbox import Checkbox
from dialog.entry import StrEntry
Dlg0 = Dialog( "Disable Other If Checked" )
Check_box1 = Checkbox( Dlg0, "dsabl", label="Disable the text entry", default=True )
Entry2 = StrEntry( Dlg0, 'str', label="Type in some text:", default="some text" )
Check_box1.DisableOtherIf(Entry2, 'dsabl is True')
if Dlg0.Run():                            # user presses "OK"
    if Dlg0.dsabl is False:
        print(Dlg0.str)                    # prints the text that has been entered
    else:
        print("Text entry is disabled")
else:                                     # user presses "Cancel"
    print("You have canceled this operation.")
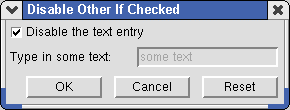
Dialog from the above script.
Related methods for disabling, enabling :
obj.DisableIf(),obj.EnableIf(),obj.EnableOtherIf().
Entry.ValidateRange(lower_limit, upper_limit) applies a ValidateRange() method to the Entry dialog object. The dialog object can be a IntEntry or FloatEntry or DimensionEntry object. The lower_limit or upper_limit can be an integer or a floating point number . A " Value must be ... " message that is based on the entered range displays when the entry is outside the specified range and the user hovers the offending entry.
# Raises a number (0 to 100) to a power (0 to 100).
from dialog import Dialog
from dialog.entry import IntEntry
Dlg0 = Dialog( "Base ** Power" )
Entry1 = IntEntry( Dlg0, 'base', label="Base (0 to 100):", default=2 )
Entry1.ValidateRange(0,100)
Entry2 = IntEntry( Dlg0, 'power', label="Power (0 to 100):", default=4 )
Entry2.ValidateRange(0,100)
if Dlg0.Run():                            #  user presses "OK"
    print(Dlg0.base ** Dlg0.power)
else:                                          # user presses "Cancel"
    pass
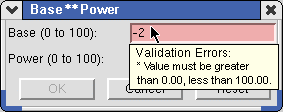
Dialog from the above script.
Entry.Validate("string expression", "string message") . The entry that the user makes is valid when the "string expression" is True . The string expression may be a range (such as "0 <= base <= 100" in the example below) or a prohibited value (such as "power != base" ) or multiple prohibited values (such as "power not in [0, 1]" ). The "string message" displays when the field entry is invalid and the user hovers the entry.
# Raises a number to a power, validates with user out-of-range message.
from dialog import Dialog
from dialog.entry import IntEntry
Dlg0 = Dialog( "Base ** Power" )
Entry1 = IntEntry( Dlg0, 'base', label="Base (0 to 100):", default=2 )
Entry1.Validate("0 <= base <= 100", "Base must be >= 0 and <= 100")
Entry2 = IntEntry( Dlg0, 'power', label="Power (0 to 100):", default=4 )
Entry2.Validate("power != base", "Power cannot  be same as Base")
if Dlg0.Run():                            #  user presses "OK"
    print(Dlg0.base ** Dlg0.power)
else:                                     # user presses "Cancel"
    pass
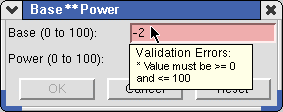
Dialog from the above script.
Entry.PopupValidate(variable_from_def, "string message") . The first argument calls a function defined using def . When writing the validation expression for that function, use the Get() method to get the current value of the field. The "string message" pops up as a warning when the field entry is invalid (returns False ).
# Raises a number to a power, may pop up invalid range message.
from dialog import Dialog
from dialog.entry import IntEntry
from dialog.dialog import ResponseNotOK
import Tkinter
Dlg0 = Dialog( "Base ** Power" )
Entry1 = IntEntry( Dlg0, 'base', label="Base (0 to 100):", default=2 )
def valid(Entry1):
    return 0 <= Entry1.Get() <= 100
Entry1.PopupValidate(valid, "Base must be >= 0 and <= 100")
Entry2 = IntEntry( Dlg0, 'power', label="Power (0 to 100):", default=4 )
Entry2.Validate("power not in [0, 1]", "Power cannot be 0 or 1")
if Dlg0.Run():                            # user presses "OK"
    print(Dlg0.base ** Dlg0.power)
else:                                     # user presses "Cancel"
    pass
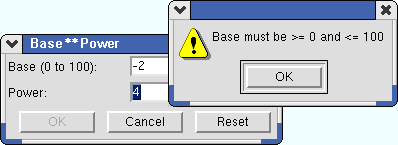
Dialog from the above script. The warning appears when the user tabs out of the field after an illegal entry (-2 in the example). " OK " puts the user back in the field.

