The Extruded Profile setup window ( Job Settings )
|
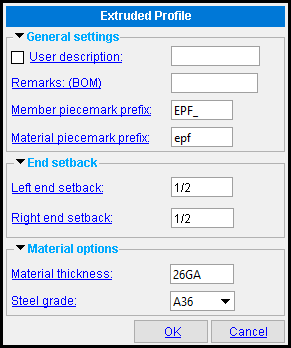
Most of the links at left take you to the ExtrudedProfile Member Edit window. When you add a new extruded profile member in Modeling , the ExtrudedProfile Member Edit window is populated with settings from this window. Thereafter, during that same Modeling session, each subsequently added extruded profile member will use the settings from the extruded profile that was last added or last edited. |
Material piecemark prefix: An extruded profile member's main material has a material edit window much like other SDS2 members do. The submaterial mark that is reported on that window uses the prefix that is entered here.
Example: Before adding members to a Job, you open this window and assign ' epf ' as the " Material piecemark prefix . " In Member and Material Piecemarking , ' 1 ' has been entered to " Starting number for material piecemarks ." When you later add extruded profile members, the submaterial mark epf1 is assigned to the submaterial of the first extruded profile member that is generated. The next such material -- if it is different -- is assigned the submaterial mark epf2 .
home > project settings > job > plugin defaults > member plugin defaults >


"OK" (or the Enter key) closes the Extruded Profile window and saves the settings on it to the Job Settings file loaded with your current Job . These options are applied the next time you add an extruded profile member.
"Cancel" (or the Esc key or the
button) closes this window without saving any changes made to it.
home > project settings > job > plugin defaults > member plugin defaults > | top

