SDS2 2026
BEFORE INSTALLATION:
-
Verify that your system meets the minimum system requirements, and your hardware meets the minimum requirements to run the product.
-
Log into Windows as an Administrator or verify that you have Administrator rights to complete installation.
-
Read the Release Notes.
-
Download the latest version of SDS2 from the SDS2 website
-
Installation types:
-
Standalone: installs both program files and data files on an independent computer. This option is best for a single-user environment in SDS2.
-
Server: installs both program files and data files on a server computer. The data files can be used by client machines for a multi-user environment in SDS2.
-
Client: installs only program files on a client computer. The client computer is connected by network to a server computer which hosts the SDS2 data files for a multi-user environment in SDS2.
-
- Standalone
- Server
- Client
- Custom
- Load Planning
Advanced standalone installation instructions
Follow these steps to complete your recommended standalone installation of SDS2.
-
Launch the associated EXE file.
-
A welcome window will appear. Select Recommended and Standalone. Click Next.
-
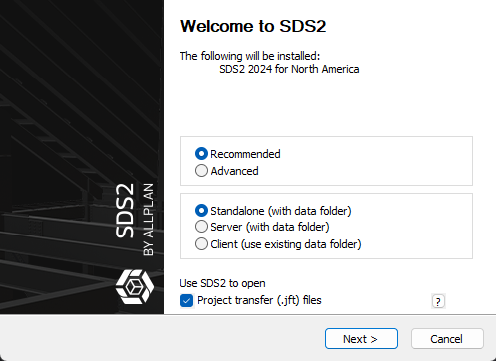 Project transfer (.jft) files if checked will set any .jft file to be opened with SDS2.
 -
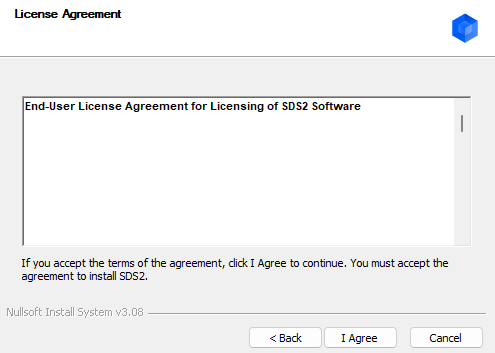
Read the License Agreement and click I Agree.
-
-
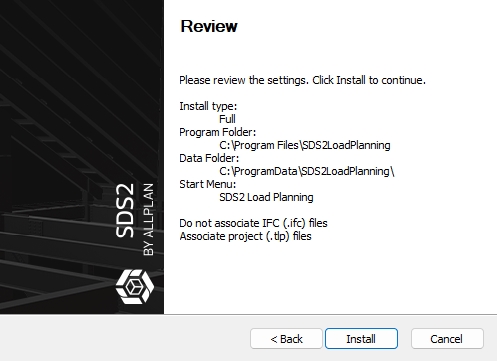
A review window will open. Select Install
-
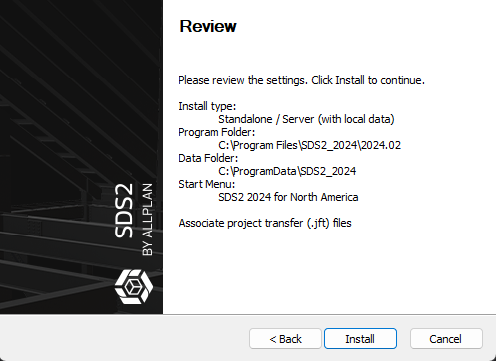
Note: If no previous installation can be found for the version being installing, SDS2 will install into the default file locations as shown above. - The installation will go through the full process. The progress bar shows the progress of the installation.
-
The finish screen appears, select Finish to complete the installation.
Optional: If you checked Install SDS2 Load Planning, the installer will run before proceeding to the next step.
Follow these steps to complete your advanced standalone installation of SDS2.
If you wish to do a standalone installation but specify where the program files and data files are located do the following.
-
A welcome window will appear. Select advanced. Click Next.
-
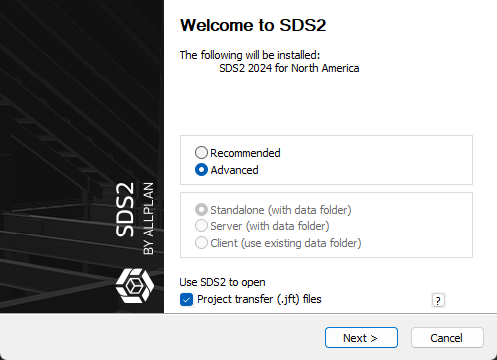 Project transfer (.jft) files if checked will set any .jft file to be opened with SDS2. These files are created using Project Transfer within SDS2.
-
-
Read the License Agreement and click I Agree.
-

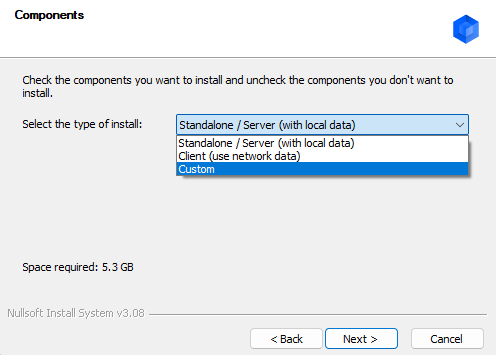
- Select Standalone / Server (with local data)for the type of install. Click Next.
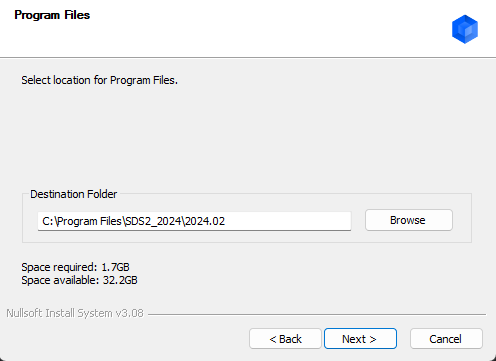
- Select the location for the Program Files, it is not suggested to place these anywhere but the default location (C:\Program Files\SDS2_2025).
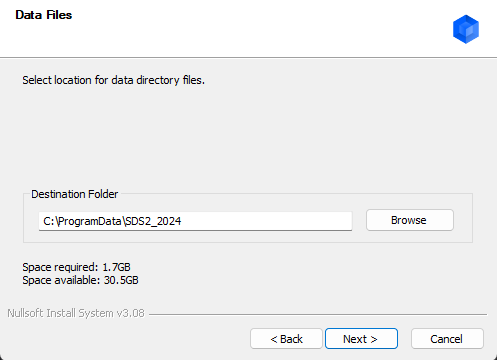
- Select the location for the Data Files. This is where the data files will be stored. This can be placed anywhere, the default location is C:\ProgramData\SDS2_2025. It is necessary to keep each yearly release in it's own folder.
-
Select which item(s) you wish to copy from a user specified location (typically a previous data directory). If installing to an existing data directory, this window likely will not be seen (only the items that cannot be found in the location you are installing will be shown).
-
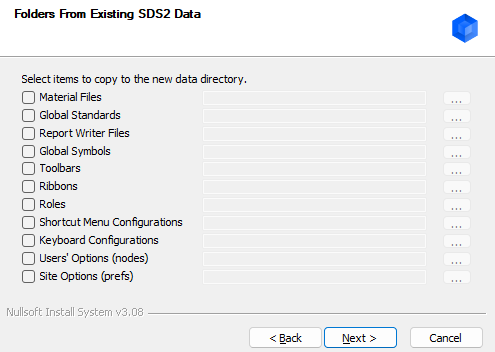
- When the checkbox is checked, the installer selects the corresponding folder from the prior version's data directory. To select a folder aside from the default location, click the 3-dot button, browse to the directory, and select the corresponding folder (listed below).
- Material Files: conf_mtrl
- Global Standards: global_stds
- Report Writer Files: reports
- Global Symbols: gbl_sym
- Toolbars: toolbars
- Ribbons: ribbon_menus
- Roles: roles
- Shortcut Menu Configurations: shortcut_menu_configurations
- Keyboard Configurations: keyboard_configurations
- Users' Options (nodes): nodes
- Site Options (prefs): prefs
-
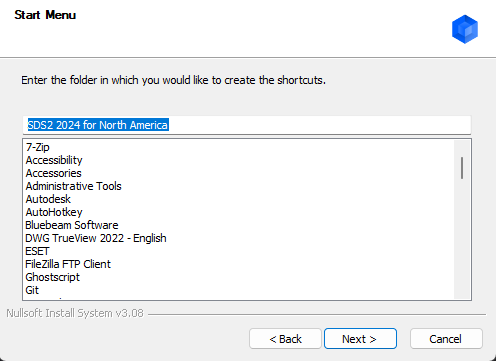
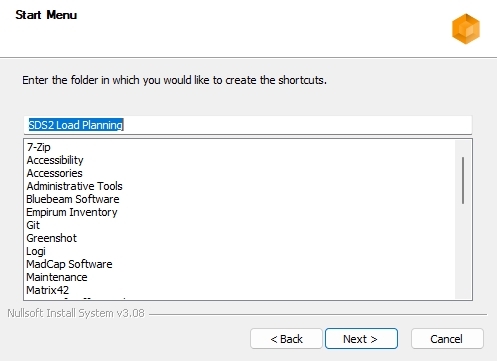
- Specify the name of the folder where the shortcuts are located
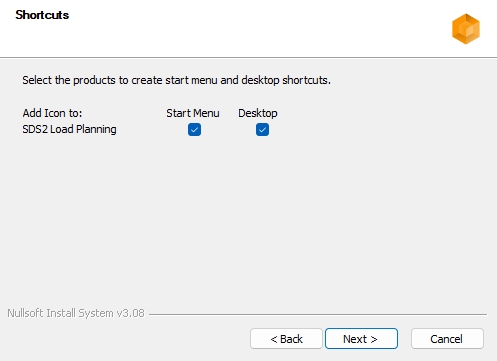
- Select which solutions you want to appear in the start menu and on the desktop.
- A review window will open. Select Install
- The installation will go through the full process. The progress bar shows the progress of the installation. Select Next > to get to the final screen.
-
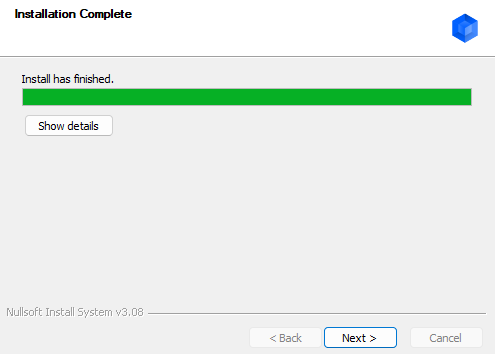
Optional: If you checked Install SDS2 Load Planning checked, follow the instructions here. You cannot proceed with the SDS2 installation until you have completed the SDS2 Load Planning installation.
- On the final screen select Finish to finish the installation.
Advanced server installation instructions
Follow these steps to complete your recommended server installation of SDS2.
-
Launch the associated EXE file.
-
A welcome window will appear. Select Recommended and Server. Click Next.
-
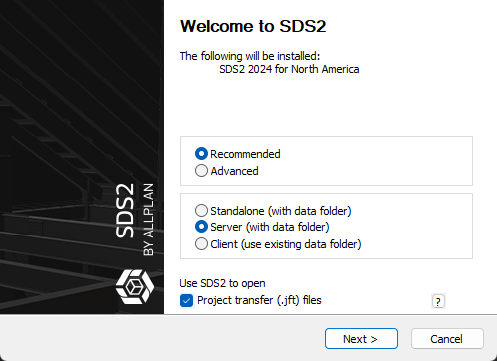 Project transfer (.jft) files if checked will set any .jft file to be opened with SDS2. These files are created using Project Transfer within SDS2.
 -
Read the License Agreement and click I Agree.
-

- A review window will open. Select Install
-

Note: If no previous installation can be found for the version being installing, SDS2 will install into the default file locations as shown above.
- The installation will go through the full process. The progress bar shows the progress of the installation.
-
The finish screen appears, select Finish to complete the installation.
Optional: If you checked Install SDS2 Load Planning, the installer will run before proceeding to the next step.
Follow these steps to complete your advanced server installation of SDS2.
If you wish to do a standalone installation but specify where the program files and data files are located do the following.
-
Launch the associated EXE file.
-
A welcome window will appear. Select advanced. Click Next.
-
 Project transfer (.jft) files if checked will set any .jft file to be opened with SDS2. These files are created using Project Transfer within SDS2.
-
-
Read the License Agreement and click I Agree.
-

- Select Standalone / Server (with local data)for the type of install. Click Next.
- Select the location for the Program Files, it is not suggested to place these anywhere but the default location (C:\Program Files\SDS2_2025).
- Select the location for the Data Files. This is where the data files will be stored. This can be placed anywhere, the default location is C:\ProgramData\SDS2_2025. It is necessary to keep each yearly release in it's own folder.
- Select which item(s) you wish to copy from a user specified location (typically a previous data directory). If installing to an existing data directory, this window likely will not be seen (only the items that cannot be found in the location you are installing will be shown).

- When the checkbox is checked, the installer selects the corresponding folder from the prior version's data directory. To select a folder aside from the default location, click the 3-dot button, browse to the directory, and select the corresponding folder (listed below).
- Material Files: conf_mtrl
- Global Standards: global_stds
- Report Writer Files: reports
- Global Symbols: gbl_sym
- Toolbars: toolbars
- Ribbons: ribbon_menus
- Roles: roles
- Shortcut Menu Configurations: shortcut_menu_configurations
- Keyboard Configurations: keyboard_configurations
- Users' Options (nodes): nodes
- Site Options (prefs): prefs
- Specify the name of the folder where the shortcuts are located
- Select which solutions you want to appear in the start menu and on the desktop.
- A review window will open. Select Install
- The installation will go through the full process. The progress bar shows the progress of the installation. Select Next > to get to the final screen.
-

Optional: If you checked Install SDS2 Load Planning checked, follow the instructions here. You cannot proceed with the SDS2 installation until you have completed the SDS2 Load Planning installation.
- On the final screen select Finish to finish the installation.
While browsing for your mapped network drive location you can right click on "This PC" and map the network drive to the same location again while in this elevated installer instance. Next, cancel the browse window only and select the browse again on the installer window. Now you should see it in your drive letter list. You can also potentially add an entry into your registry and re-run your installer. For more information on this Windows setting limitation please see the information provide by Microsoft and workaround methods 1 or 2 provided by Microsoft Here.
Advanced client installation instructions
Follow these steps to complete your recommended client installation of SDS2.
-
Launch the associated EXE file.
-
A welcome window will appear. Select Recommended and Client. Click Next.
-
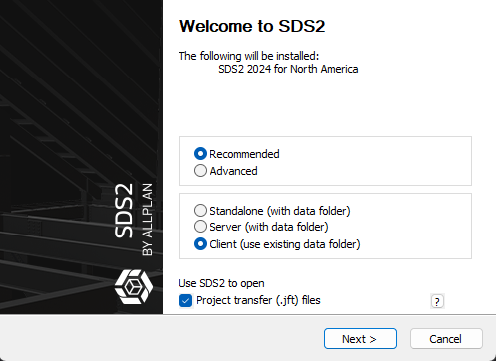 Project transfer (.jft) files if checked will set any .jft file to be opened with SDS2. These files are created using Project Transfer within SDS2.
 -
Read the License Agreement and click I Agree.
-

-
A review window will open. Select Install
-
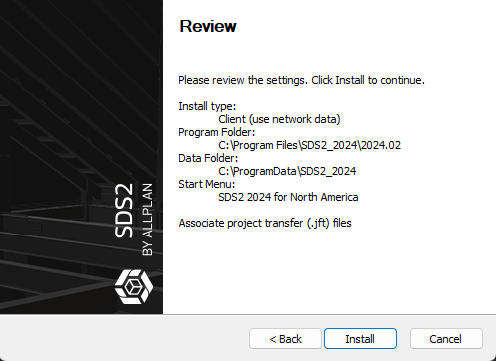 Note: This will install SDS2 into an existing DATADIR location if found, otherwise you will be prompted for the location.
Program files will be located here: C:\Program Files\SDS2_2024 - The installation will go through the full process. The progress bar shows the progress of the installation. Select Next > to get to the final screen.
-
The finish screen appears, select Finish to complete the installation.
Optional: If you checked Install SDS2 Load Planning, the installer will run before proceeding to the next step.
Follow these steps to complete your advanced client installation of SDS2.
If you wish to do a client installation but specify where the program files and data files are located do the following.
-
Launch the associated EXE file.
-
A welcome window will appear. Select advanced. Click Next.
-
 Project transfer (.jft) files if checked will set any .jft file to be opened with SDS2. These files are created using Project Transfer within SDS2.
-
-
Read the License Agreement and click I Agree.
-

- Select client (use network data)for the type of install. Click Next.
- Select the location for the Program Files, it is not suggested to place these anywhere but the default location (C:\Program Files\SDS2_2024).
- Select the location for the Data Files. This is where the data files are currently stored. This could be on the local PC or any network location.
- If this directory location cannot be found, see the note here.
- If this directory location cannot be found, see the note here.
- Specify the name of the folder where the shortcuts are located
- Select which solutions you want to appear in the start menu and on the desktop.
- A review window will open. Select Install
- The installation will go through the full process. The progress bar shows the progress of the installation. Select Next > to get to the final screen.
-

Optional: If you checked Install SDS2 Load Planning checked, follow the instructions here. You cannot proceed with the SDS2 installation until you have completed the SDS2 Load Planning installation.
- On the final screen select Finish to finish the installation.
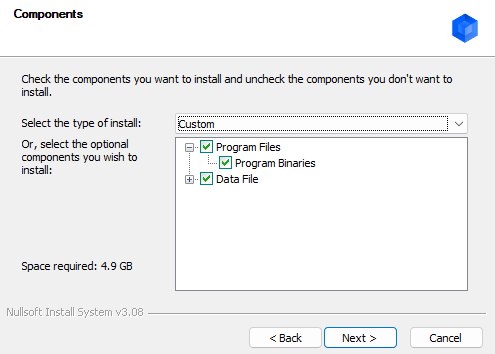
The custom installation is only available while running an advanced installation.
The custom installation allows the user to specify what components of the software they wish to install. This will allow a user to install all, or only parts of the software. Below you will see examples of the different components available both in the Program Files and Data Files. Any item that has the checkbox checked will get installed.
A custom installation may be used if you are wanting to install just a portion of the software. If including all program files, and no data files, it would be the same as doing a client install. If you are installing all of the program files and all of the data files, this would be the same as doing a server/standalone install.

Advanced installation instructions
Follow these steps to complete your recommended installation of SDS2 Load Planning.
-
A welcome window will appear. Select Recommended, and click next.
-
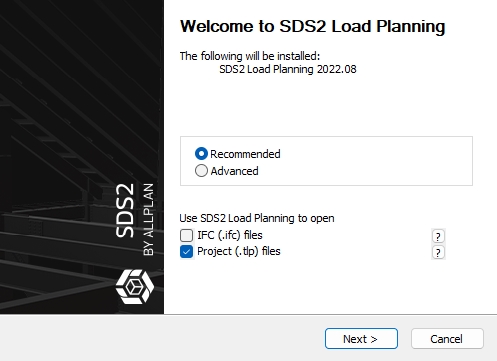 Project transfer (.tlp) files if checked will set any .tlp file to be opened with SDS2 Load Planning.
 -
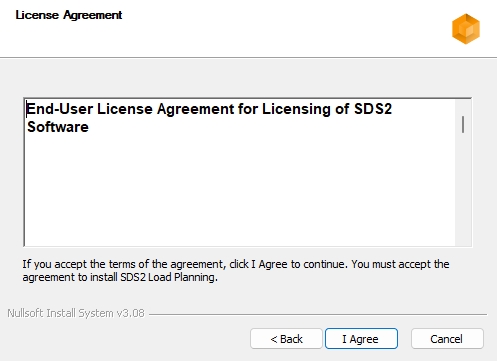
Read the License Agreement and click I Agree.
-
-
A review window will open. Select Install
-
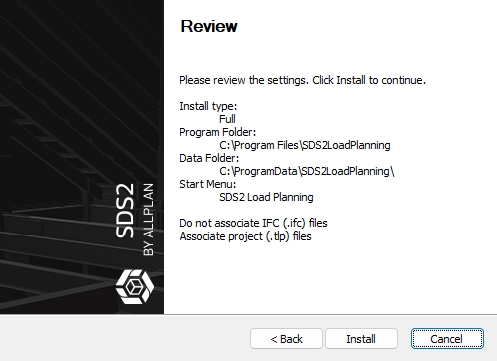
Note: If no previous installation can be found for the version being installing, SDS2 Load Planning will install into the default file locations as shown above. - The installation will go through the full process. The progress bar shows the progress of the installation.
-
The finish screen appears, select Finish to complete the SDS2 Load Planning installation and allow you to complete the SDS2 installation.
Follow these steps to complete your advanced installation of SDS2 Load Planning.
If you wish to do a standalone installation but specify where the program files and data files are located do the following.
-
A welcome window will appear. Select advanced. Click Next.
-
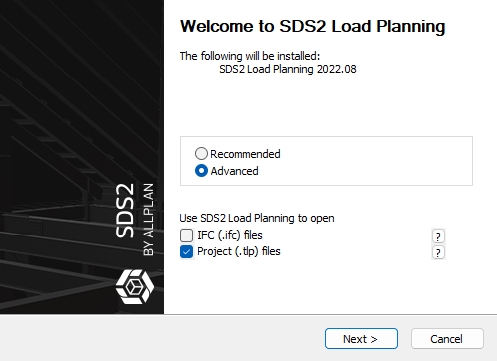 Project transfer (.tlp) files if checked will set any .tlp file to be opened with SDS2 Load Planning.
-
-
Read the License Agreement and click I Agree.
-

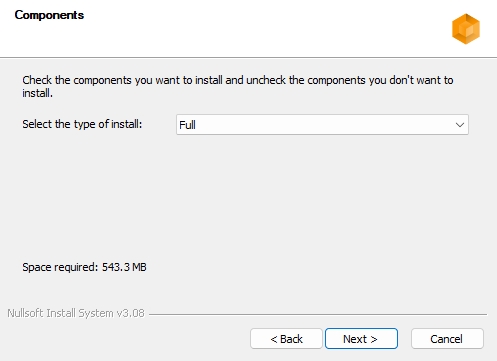
- Select full for the type of install (unless repairing files). Click Next.
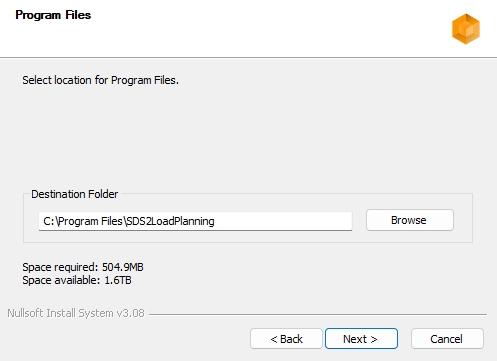
- Select the location for the Program Files, it is not suggested to place these anywhere but the default location (C:\Program Files\SDS2LoadPlanning).
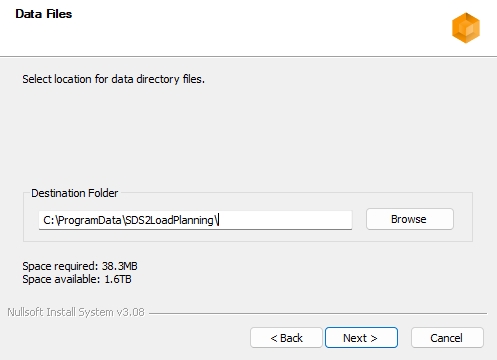
- Select the location for the Data Files. This is where the data files will be stored. This can be placed anywhere, the default location is C:\ProgramData\SDS2LoadPlanning.
- Specify the name of the folder where the shortcuts are located
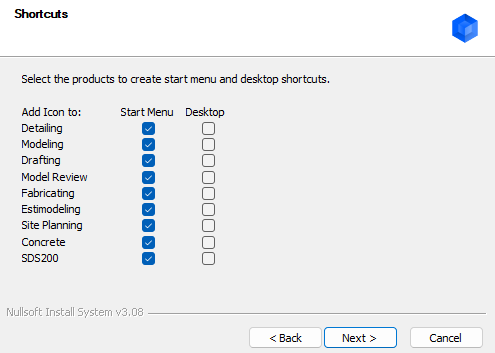
- Select which solutions you want to appear in the start menu and on the desktop.
- A review window will open. Select Install
- The installation will go through the full process. The progress bar shows the progress of the installation. Select Next > to get to the final screen.
-
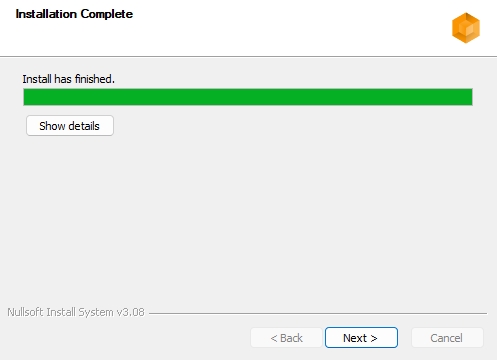
- Select Finish to complete the SDS2 Load Planning installation and allow you to complete the SDS2 installation.
If you need further assistance, contact SDS2 Support at 888-883-2492 or send an email to: sds2‑support@allplan.com.
