 Assembly Add ( Modeling > a a )
Tool summary :
- Adds an assembly of materials to a member. An assembly can also include bolts and welds.
- The materials making up the assembly become submaterials of the member you Add them to. You can add any assembly that is in your current Job. The view that you add the assembly in should be similar to the view in which the assembly was saved.
- You cannot add an assembly to a member that has its " Model completed " date set.
- To add an assembly as a member, press F2 > filter for "
 Miscellaneous steel " > double-click " Miscellaneous - Assembly ."
- See (on this page) the videos (
 ) and step-by-step instructions
Also see :
- One of the solid forms (member saved to needs to be in)
- Screen axes (default coordinate system for rotation/mirroring of assembly)
- Model completed (assembly cannot be added if member has this date set)
- Rotate Material (window used for rotating assembly)
- Save Assembly (to create an assembly in Modeling )
- Copy Project Items (to copy an assembly from another Job)
- Add Miscellaneous Member (to add assembly as a member)
- Material Copy (another way to copy material)
- MemberMaterial.Material.SubMaterial.UsedInAnAssembly ( Report Writer )
- UsedInAnAssembly ( Advanced Selection )
Videos :
|
|
Step-by-step instructions :
- The following instructions assume that you arein Modeling , using a 3-button mouse, that the User and Site Options > General > " Point location target " is set to ' Fancy ' (
 ), and that you use mouse bindings similar to those shown in these illustrations.
- Before you begin, make sure that the member you want to add the assembly to is displayed in one of the three solid forms . Also, the member should be similar to the member you Saved the assembly from. For example, if you're adding double clip angles onto a beam, the beam should have the same web thickness as the beam you saved the clip angles from.
- The view of the member should be similar to the view from which the assembly was Saved . If you are in the same view (relative to the member) as when you Saved the assembly and you Add the assembly at the same reference point with " Screen axes " the selected " Coordinate system ," you do not have to rotate the assembly into place.
- Step 1 (preselection) is optional. If you don't do step 1, in-tool selection is required -- see note 2 .
1 . Select a member to add the assembly to. It changes to the User and Site Options > Modeling > " Primary selection surface color " (green). 
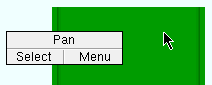
2 . Invoke Add Assembly . If you didn't do step 1, see note 2 before going to step 3. 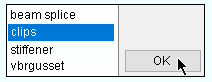
3 . Select the assembly that you want. Tip : If you double-click the listing, you don't have to press " OK ." 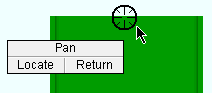
4 . The status line prompts, "Locate assembly :" Left-click ( Locate ) when the target ( 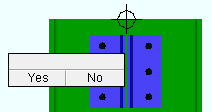
5 . The status line prompts, " Confirm assembly location. " Left-click ( Yes ) to confirm the assembly is properly placed. Or right-click ( No ) if you want to go back to step 4 and relocate the assembly. 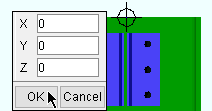
6 . Press " OK " on the Rotate window to accept the rotation that is shown. Or you can change the rotation, then press " OK ." The " Cancel " button ends the operation. 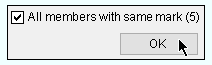
7 . Check the box to add the assembly to four additional members. See note 5 . 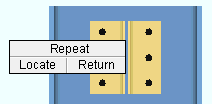
8 . Right-click ( Return ) unless you want to place another copy of the assembly on the same member. The two clip angles that make up this assembly are now on five columns.
Note 1: To invoke Add Assembly ...
Method 1 : Click the Add Assembly icon, which is pictured above. The icon can be taken from the group named ' Model -- Assembly ' and placed on a toolbar (classic) or the ribbon (lightning).
Method 2 : If " Modeling layout style " is ' Classic ', you can use the menu system to choose Model > Assembly > Add .
Method 3, 4 or 5 : Add Assembly can also be configured to be invoked using a keyboard shortcut , the context menu , or a mode . For the lightning interface, this configuration is done using Customize Interface . The default keyboard shortcut for Add Assembly is a a .
Method 6 : To add an assembly as a legacy miscellaneous member: Confirm that the box is checked for User and Site Options > Site > "
Note 2: If you didn't do step 1 (preselection), Add Assembly activates Select One Item mouse bindings, and the status line prompts you to " Select a member ." This prompting also occurs if more than one member is selected or if a submaterial (rather than a member) is selected.

Select One Item bindings
Note 3: Pressing the " Cancel " button in step 3 or right-click ( Return ) in step 6 in ends the Add Assembly operation.
Note 4: Add Assembly displays the assembly in the User and Site Options > Modeling > " Secondary selection color " (blue in steps 5 and 6).
Note 5: You get the following dialog for adding the assembly to like members only if there are like members in your current Job. The dialog's " All members with the same mark " option applies to members with the same member piecemark . The " All like members (any mark) " option applies to those same members and may also apply to additional members that are exactly the same but have different marks -- for example, because you have applied a " User piecemark ."
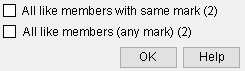
Check one or the other of these boxes (
Leave both check boxes not checked (
) if you want to apply the assembly to only the one member you selected.
Note 6: Left-click ( Locate ) in step 8 places another copy of the assembly and lets you rotate it, middle-click ( Repeat ) places another copy in the same rotation.
Tip: If you added the assembly to the main material of a legacy miscellaneous member, you may now want to use Match Holes to generate matching holes in the material you have added the assembly to. If you added the assembly to the main material of a beam, column, brace, girt or purlin, match holes and generate bolts is done automatically during Create Solids .