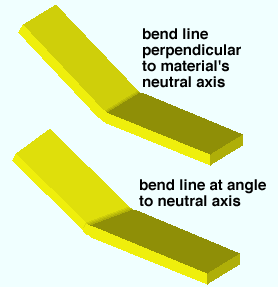
 Bend on Line ( Modeling )
Tool summary :
Also see :
- Modeling (where Bend on Line is a tool)
- A solid form (material to bend needs to be in)
- Depth checking (affects Bend on Line )
- Model completed ( Bend on Line can't be used on material whose member has this date set.
- Bend on Radius Point (for bends perp to axis)
- Bent Plate Add (for single bend on plate)
- Bent Plate Layout (for multiple bends on plate)
- Weak axis rolling (available for some materials)
- MemberMaterial.Material.SubMaterial.IsMaterialBent
page 1 | contents | model > material > | model -- material | bend on radius point (alternative) | top
 Step-by-step instructions :
The following instructions assume that you are using a 3-button mouse. You must do either step 1d (preselection) or step 3 (in-tool selection) to perform this operation.
1 . Before using this tool:
1a : Make sure that the material you want to bend is displayed in one of the three solid forms .
1b : Use one of the Surface tools to go to the surface on which you want to bend the material. The bending will be toward you. The view should show the length and width (but not the thickness) of the material. On a wide flange or channel section, for example, snap to web near side if you want the bending to be toward the near side.
1c : Place construction lines so that there are INCL points where you want to locate the bending line.


Select Items bindings (step 1d) 1d (optional) : In Select Items mode with an appropriate selection filter selected, left-click ( Select ) the one (1) material that you want to bend. When selected, the material will be displayed in the User and Site Options > Modeling > " Primary selection surface color ," which by default is green. Tip: To select a member main material, right-click ( Menu ) and choose " Select Other " on the context menu or first set the selection filter to ' Material '.
2 . Invoke Bend on Line using any one (1) of the following methods:
Methods 1, 2 & 3 : Click the icon, or use a keyboard shortcut, or use the context menu. A Bend on Line icon can be added to your toolbar (classic) or ribbon (lightning). The icon, keyboard shortcut or context menu command can be found in the group named ' Model -- Material '. For lightning, Customize Interface is used to configure ribbons, keyboards, the context menu and modes.
Method 4 : If " Modeling layout style " is ' Classic ', you can use the menu system to choose Model > Material > Bend on Line .
Method 5 : With Material Fit Mode mouse bindings active, hold down the Shift key and right-click ( Bend Line ).
3 . Skip this step if you already selected a material in step 1d.
|
|
|
Select One Item bindings. |
3a (if you preselect a material) : Bend on Line prompts you to use Select One Item mouse bindings to left-click ( Select ) the one to-be-bent material. This prompting also occurs when more than one material or a member (rather than a submaterial) is selected.
4 . The status line prompts, "Locate bend base line." Locate- Pan -Return mouse bindings become active along with various Locate options.
|
|
|
bindings |
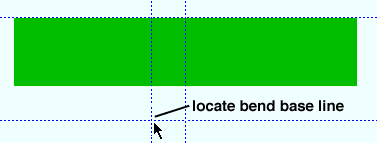
Alternative 1 : Select the Locate icon you want (if it's not selected already), then place your mouse pointer (
) so the point location target (
) snaps to a point above or below the material, then left-click ( Locate ). Go to step 5.
Alternative 2 : Right-click ( Return ) to cancel the Bend on Line operation. Do not continue.
5 . The status line prompts, "Locate second point."
|
|
|
bindings |
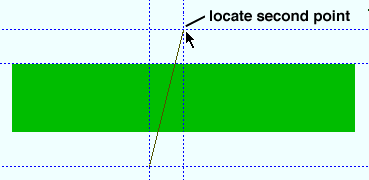
Alternative 1 : Position the point location target (
) on a point that is on the opposite side of the material as the first point, then left-click ( Locate ).
Alternative 2 : Right-click ( Return ) to cancel the Bend on Line operation. Do not continue.
6 . The Angle dialog opens. On it are entry fields for an " Angle of bend " and " Bend radius ."
Angle of bend: A positive or negative (-) number of degrees. The magnitude of the angle defines the angle of the bend. The sign (+ or - ) defines which end of the material bends toward you in the current view.
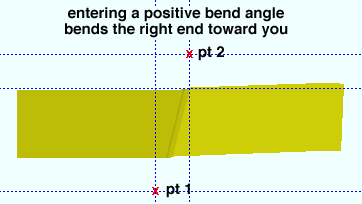
A positive angle bends the material counterclockwise around point 1 to point 2 of the line established in steps 4 and 5 .

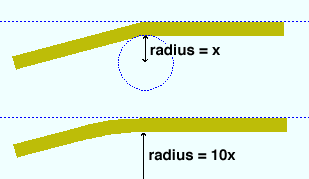
A negative (-) angle bends the material in a clockwise direction (looking from point 1 to 2). Bend radius: A positive distance (in the primary dimension " Units " or other units ) that defines the sharpness of the bend. A smaller distance gets you a sharper bend. Larger distances result in a more gradual bend.

Alternative 1 : Press the " OK " button to apply the " Angle of bend " and " Bend radius " to the material being bent. Go to step 7.
Alternative 2 : Press the " Cancel " button to end the Bend on Line operation and keep everything as it was before step 2. Do not continue.
7 . Yes - No mouse bindings become active, and the status line prompts, "Is this bend OK?" Your computer screen redraws to show the bend.
|
|
|
bindings |
Alternative 1 : Left-click ( Yes ) to continue on to step 8.
Alternative 2 : Right-click ( No ) to cancel the Bend on Line operation and keep everything as it was before step 2. Do not continue.
8 . The Change All Options window opens. On it is a " Warnings " list. Material change " Options " become active along with the Warnings if the 3D model contains other pieces of material with the same submaterial piecemark as the material you performed this operation on.

Alternative 1 : Make the appropriate selections on this window to apply the cut to the one piece of material selected in step 1d (or 3), or to all like material on all like members with or without the same piecemark, then press the " OK " on the bottom of the window to regenerate the material. Go to step 9.
Alternative 2 : Press the " Cancel " button to end the Bend on Line operation and keep everything as it was before step 2. Do not continue.
9 . The material(s) is regenerated to include the new bend that you have just defined. The mouse bindings that were active before you invoked Bend on Line again become active. The member(s) on which the operation was performed are marked for detailing.
page 1 | contents | model > material > | model -- material | bend on radius point (alternative) | top
 To undo a Bend on Line :
1 . Double-click the bent material to open that material's edit window.
1a : Press the " OK " button at the bottom of the material edit window.
2 . A dialog box appears with the question, "Do you want to regenerate this material to clear user modified material operations?
2a : Press the " OK " button.
3 . The material is regenerated per its original settings. In other words, the bend disappears.
page 1 | contents | model > material > | model -- material | bend on radius point (alternative) | top
