 Edit Palette ( Drawing Editor , ' Classic ')
Also see :
- Add Arc ( Edit Palette sets certain defaults for)
- Add Circle ( Edit Palette sets certain defaults for)
- Cloud Add ( Edit Palette sets defaults for)
- Add Dimension ( Edit Palette sets certain defaults for)
- Line Add ( Edit Palette sets certain defaults for)
- Pointer Add ( Edit Palette sets certain defaults for)
- Drawing Presentation (also sets color/line type defaults)
page 1 | contents | edit > edit palette | top
|
Entries to the Edit Palette apply immediately, without your having to press " OK ." This lets you, for example, quickly change line thicknesses and dash patterns when adding lines. |
page 1 | contents | edit > edit palette | top
Tools that the Edit Palette affects :
Drawing Tool What the Edit Palette Does Add Arc The last-added or last-edited arc sets the default pen number for subsequently added arcs unless you change the Edit Palette in the meantime. Add Circle Works the same as for Add Arc . Cloud Add Works the same as for Add Arc . The pen number for auto-detailed clouds is set in Drawing Presentation . Add Dimension The Edit Palette sets the default character size of user-added " Primary dimension " and " Secondary dimension " labels. Line Add The Edit Palette works the same as for Add Arc . Selections made during an Line Add affect the next to-be-added line segment. Pointer Add Same as for Add Arc , except that pointers can only be drawn with solid lines. The pen number for auto-detailed pointers is set in Drawing Presentation .
page 1 | contents | edit > edit palette | top
Tools the Edit Palette does not set defaults for :
The Edit Palette cannot be used to define the line type or color of to-be-added bevel symbols or weld symbols . The colors of these objects can be changed on their edit windows as they are added. Also, you can set the defaults colors for these objects under the " Pens " tab in Drawing Presentation .
The Edit Palette cannot be used to define the color of to-be-added bolts , which are always drawn with line type 1 (a non-dashed line) and pen ' 1 ' (white).
The Edit Palette cannot be used to set the size of characters added using Weld Add .
page 1 | contents | edit > edit palette | top
1 . In the Drawing Editor , invoke Edit Palette using one (1) of the following methods:
Method 1 : Choose Edit > Edit Palette .
Method 2 : On your toolbar, click on the icon pictured above .
Method 3 : Use a keyboard shortcut .
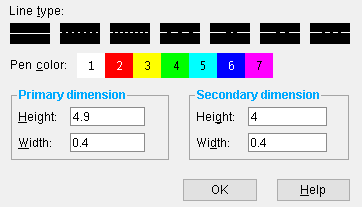
2 . The Edit Palette will appear on screen with options for defining the color and dash pattern and character sizes of to-be-added objects. The button corresponding to the currently selected default line type (dash pattern) will be depressed.

2a (optional) : If you want a different default line type for Add Arc , Add Circle , Cloud Add or Add Line , simply press a different button. The choice you make here will remain applicable so long as you remain in the Drawing Editor ; if you exit the Drawing Editor then restart, the default will be line type# 1 (a continuous, non-dashed line).
2b (optional) : The button corresponding to the currently selected default printer pen number (color) will be depressed.

If you want a different color for Add Arc , Add Circle , or Line Add , press a different button (for Cloud Add or Pointer Add , you can only change colors after the command is invoked). The choice you make here will remain applicable so long as you remain in the Drawing Editor ; if you exit the Drawing Editor then restart, the default will be printer pen number 1 (white).
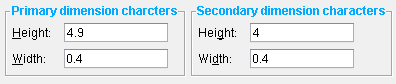
2c (optional) : The primary and secondary default character " Height " and " Width " are the same as the equivalent Primary Dimension and Secondary Dimension settings in Drawing Presentation (unless you have changed them here). They set the defaults for dimension labels to be added using Add Dimension .
|
|
2d : Changes made to the Edit Palette take effect immediately. When you are done making changes, you can keep the Edit Palette on screen. You do not have to press " OK " to apply the options you selected (or entered). Changes made to the Edit Palette remain applicable as long as you remain in the Drawing Editor .
page 1 | contents | edit > edit palette | top