 Cloud Add ( Drawing Editor )
Tool summary :
- Draws a cloud based on points that you locate. Or you can click and drag to draw the cloud.
- These instructions assume that you are not in a crane placement drawing . In a crane placement drawing, Cloud Add can add to any layer, not just a comment layer. In a non crane placement drawing, Cloud Add is restricted to placing objects on comment layers .
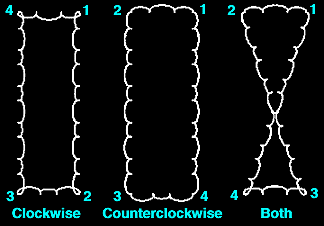
- If you draw a cloud by locating points, best results are achived by locating in a counter-clockwise rotation. Also, snapping points On Line squares up the cloud. A cloud can be defined with as few as three points or by more than a hundred points.
- Right-click ( Return ) when you are done defining points. The Cloud Edit window will open. The same edit window opens when you click and drag to draw a rectangular cloud .
- After a cloud has been added, the choices made on its edit window set the default pen (color) and line type (dash pattern) for subsequently added clouds unless you change the Edit Palette or edit that cloud or edit another cloud in the meantime.
- See (on this page):
- Example 1 : Click and drag to draw a rectangular cloud (
 )
)
- Example 2 : Drawing clouds by locating points ( )
- Step-by-step instructions
- Example 1 : Click and drag to draw a rectangular cloud (
Also see :
- Clouds (topic)
- Edit Palette (sets linetype and pen for to-be-added clouds)
- Comment layer (layer type a cloud must be added to if you are not in a crane placement drawing)
page 1 | contents | objects > clouds > | objects -- clouds | xxx add | clouds
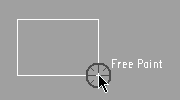
Example 1 : Click and drag to draw a rectangular cloud
|
|
1 . Click and drag, moving your mouse pointer ( |
|
2 . When you release the left mouse button, the rectangular cloud is drawn. |
page 1 | contents | objects > clouds > | objects -- clouds | xxx add | clouds | top
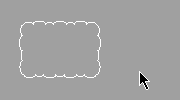
Example 2 : Drawing clouds by locating points
|
|
page 1 | contents | objects > clouds > | objects -- clouds | xxx add | clouds | top
Step-by-step instructions (for adding a cloud by locating ponts) :
The following instructions assume that you are using a 3-button mouse.
1 . Before using this tool:
1a (optional) : On the layer selection tool , select the comment layer that you want to add the cloud to. You cannot add objects to non-comment layers in SDS2 Site Planning. This step is optional because a comment layer will be created for you, if needed.
1b (optional) : Set the printing pen number (on-screen display color) and/or line type (dash pattern) for the to-be-added cloud using the Edit Palette . Otherwise, the cloud inherits the thickness and dash pattern of the last-added or last-edited cloud.
1c (optional) : To set the defaults for the to-be-added cloud(s) to be those of an existing cloud that is on a comment layer, double-click the existing cloud then press " OK " on its edit window.
2 . Invoke Cloud Add using one (1) of the following methods:
Method 1 : Click the Cloud Add icon. The icon can be taken from the group named ' Objects -- Clouds ' and placed on a toolbar (classic) or the ribbon (lightning).
Method 2 : If " Drawing Editor layout style " is ' Classic ', you can use the menu system to choose Objects > Clouds > Add .
Method 3, 4 or 5 : Cloud Add can also be invoked using a keyboard shortcut , the context menu , or a mode . For the ' Lightning ' layout style, configuration of the interface is done using Customize Interface .
3 . Locate - Remove - Return mouse bindings become active along with various Locate options.
|
|
|
bindings |
Alternative 1 : With FRPT the selected Locate option, click and drag, moving from left to right, to draw a rectangular cloud as shown in example 1 . Go to step 4.
Alternative 2 : ). The program places an X where you locate the point. Locate Locate ) snaps to where you want one of the perimeter points of the cloud, then left-click (
( point location target ) so that the
that you want (if it's not pressed already), then place the mouse pointer ( Locate icon Select the at least two additional points (moving counterclockwise as shown in example 2 to define the perimeter of the cloud). If you lay out too many points, you can middle-click ( Remove ) to delete the last one. Right-click ( Return ) when you are done defining points. Go to step 4.
4 . The cloud is drawn on screen, and Locate - Remove - Return mouse bindings become active. Do one (1) of the following:
|
|
|
bindings |
Alternative 1 : Optionally change the line type and pen number (step 1), and repeat step 3 to draw additional clouds.
Alternative 2 : If you are done adding clouds, right-click ( Return ). Go to step 5.
5 . The mouse bindings that were active when you invoked Cloud Add become active again.
Note: Any clouds added using this procedure can be instantly removed (one at a time, in reverse-order of their addition) by using Undo .
page 1 | contents | objects > clouds > | objects -- clouds | xxx add | clouds | top