Sheet Revisions review window (opens when you double-click a revision chart)
| Options on this window are read-only . In a full-featured SDS2 program , users can change the information presented on this window. |
Options :

To open this window, double-click a revision chart that is on a sheet or sheet outline.
- " OK "
Also see :
- Sheet Revisions (a related setup window)
- "Revision Chart" tab, Drawing Presentation (related setup options)
- Sheet Revision Chart Editor (where users in a full-featured program can enter lines to a revision chart)
page 1 | contents | double-click a revision chart | revision chart
Settings on the Sheet Revisions window :
|
|
|
|
|
If this box is checked (
), the perimeter lines and interior lines and column text and revision line text are shown on the revision chart that you are reviewing.
If the box is not checked (
), only the revision line text and column text are shown. The interior lines and perimeter lines are not shown.
Setup: " Show grid " under the " Revision Chart " tab in Drawing Presentation .
Wrap fields to next line: ![]() or
or ![]() . This applies when, in the Sheet Revision Chart Editor , more characters have been entered to a cell than that cell has room for.
. This applies when, in the Sheet Revision Chart Editor , more characters have been entered to a cell than that cell has room for.
|
||||
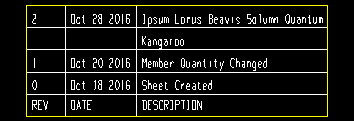
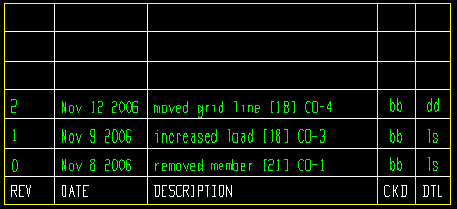
| The revision 2 " Description " is too long to fit in a single cell. |
If this box is checked (
If the box is not checked (
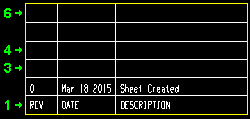
Number of lines: The minimum number of lines (rows) that will be shown in this revision chart . This number is a minimum because it will be changed automatically, as needed, in a full-featured SDS2 program , when new lines are entered to the Sheet Revision Chart Editor .
|
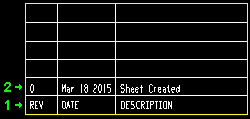
The number of lines in this revision chart is ' 6 '. |
For multiple revision charts on a sheet, the first chart will be filled until all of the " Number of lines " are filled, then the second chart will begin to be filled.
Setup: " Number of lines " under the " Revision Chart " tab in Drawing Presentation
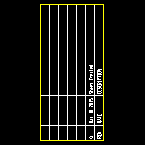
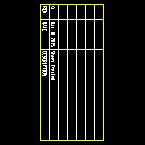
Header position: ![]() Top or
Top or ![]() Bottom . Assuming that " Rotation " is set to ' 0 ', the top of a revision chart is the actual top of the revision chart.
Bottom . Assuming that " Rotation " is set to ' 0 ', the top of a revision chart is the actual top of the revision chart.
|
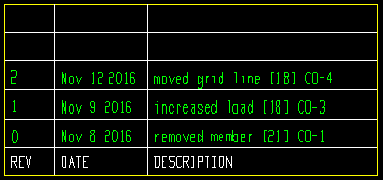
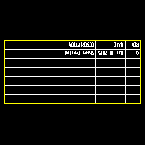
' For this example, " Order of revision lines " is set to ' Bottom to top '. |
|
' For this example, " Order of revision lines " is set to ' Bottom to top '. |
'
Top ' indicates that the cells of the revision chart that contain the header line text are at the top of the revision chart.
'
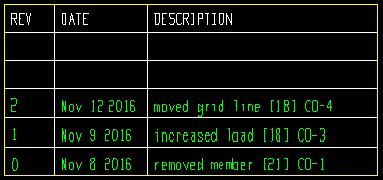
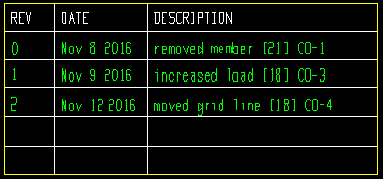
Order of revision lines: ![]() Top to bottom or
Top to bottom or ![]() Bottom to top . Assuming that " Rotation " is set to ' 0 ', the top of a revision chart is the actual top of the revision chart.
Bottom to top . Assuming that " Rotation " is set to ' 0 ', the top of a revision chart is the actual top of the revision chart.
|
' For this example, " Header position " is set to ' Top '. |
|
|
' For this example, " Header position " is set to ' Top '. |
'
'
Rotation: 0º or 90º or 180º or -90º . Rotation is counterclockwise around the " Anchor location " of the revision chart.
| " Anchor location " = ' Lower left ' | |||
| 0º | 90º | 180º | -90º |

|
|
|
|
Setup: " Rotation " under the " Revision Chart " tab in Drawing Presentation
Anchor location: Upper left or Upper right or Lower left or Lower right . The spatial orientation of an already placed revision chart with respect to its anchor point.
|
|
| This illustration shows different insertion points being used for placing a revision chart in a full-featured SDS2 program .The " Anchor location " in Drawing Presentation sets this insertion point and, therefore, also sets the default " Anchor location " that is reported here. |
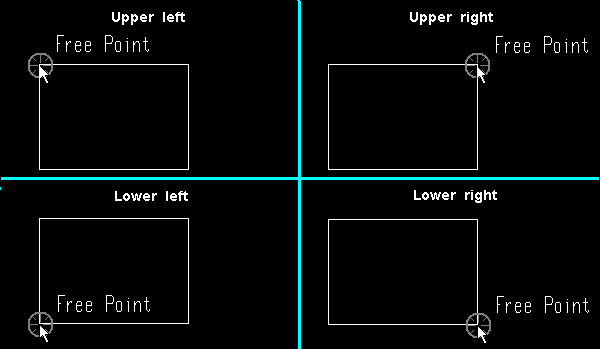
' Upper left ' indicates that the revision chart's anchor point is at its upper, left corner.
' Upper right ' indicates that the revision chart's anchor point is at its upper, right corner.
' Lower left ' indicates that the revision chart's anchor point is at its lower, left corner.
' Lower right ' indicates that the revision chart's anchor point is at its lower, right corner.
Setup: " Anchor location " under the " Revision Chart " tab in Drawing Presentation .
Character height: The character height (in millimeters) of all text in the revision chart that you are reviewing. This includes both the revision line text (" Sheet revision font ") and the column title text (" Column title font ").
|
Line 2 is revision line text. Line 1 is the column title text. |
Font dependencies: This applies to whatever fonts are selected as the " Font " and " Column title font ," regardless of whether those fonts are TrueType fonts or the ' SDS2 ' font.
Revision chart size: Since the size of a revision chart is based on the number of characters of text permitted in the cells that make up the chart, increasing or decreasing the text size by changing the font " Character height " or " Character width/height ratio " results in the revision chart being resized.
Setup: " Character height " under the " Revision Chart " tab in Drawing Presentation .
Character width/height ratio: The width/height of the characters that make up the text in the revision chart that you are reviewing. This includes both the revision line text (" Sheet revision font ") and the column title text (" Column title font ").
|
|
Line 2 is revision line text. Line 1 is the column title text. |
Font dependencies: This applies to whatever fonts are selected as the " Font " and " Column title font ," regardless of whether those fonts are TrueType fonts or the ' SDS2 ' font. For a TrueType font, a ratio of ' 0.6 ' renders that font at its native width. A ratio larger than ' 0.6 ' stretches the font. A ratio less than ' 0.6 ' compacts the font. For the ' SDS2 ' font, ' 0.4 ' is the default choice.
Revision chart size: Since the size of a revision chart is based on the number of characters of text permitted in the cells that make up the chart, increasing or decreasing the text size by changing the font " Character height " or " Character width/height ratio " results in the revision chart being resized.
Setup: " Character width/height ratio " under the " Revision Chart " tab in Drawing Presentation .
Font: The font that is selected applies to the revision line text only.
|
|||
| The green-colored text in the revision chart shown above is printed in the " Sheet revision font " that is selected here. |
Revision line text may be entered to a revision chart using the Sheet Revision Chart Editor in a full-featured SDS2 program .
Also see: The " Font style " (below) applies the " Font " selected here. The " Character height " and " Character width/height ratio " set the font size.
Setup: " Sheet revision font " under the " Fonts " tab in Drawing Presentation .
Font style: The style (' Bold ' or ' Bold Italic ' or ' Italic ' or ' Regular ') of the selected " Font ." Different fonts have different styles available to them.
Available styles are listed alphabetically in the font style list box , and the first style that is listed for a particular font is the style that is selected by default, You may, instead of using the default, prefer to choose ' Regular ', which is generally the most popular style for a particular font. ' Regular ' is the only choice that is available for the ' SDS2 ' font. To adjust the stroke thickness of the ' SDS2 ' font, you can change the " Bill label pen color " under the " Pens " tab in Drawing Presentation .
Setup: " Sheet revision font style " under the " Fonts " tab in Drawing Presentation .
Column title font: The font that is selected applies to the column title text, not to revision line text.
|
Line 1 is the column title text, to which the " Column title font " applies. |
Also see: The " Column title font style " (below) applied to the " Column title font " selected here. The " Character height " and " Character width/height ratio " set the font size.
Setup: " Column title font " under the " Revision Chart " tab in Drawing Presentation .
Column title font style: The style (' Bold ' or ' Bold Italic ' or ' Italic ' or ' Regular ') of the selected " Column title font ." Different fonts may have different styles available to them.
|
|
Line 1 is the column title text, to which the " Column title font style " applies. |
Available styles are listed alphabetically in the font style list box , and the first style that is listed when you change to a different " Column title font " is automatically selected as the style for that font. You may, instead of using the automatically selected font style, prefer to choose ' Regular ', which is generally the most popular style for a particular font. ' Regular ' is the only choice that is available for the ' SDS2 ' font. To adjust the stroke thickness of the ' SDS2 ' font, you can change the " Bill label pen color " under the " Pens " tab in Drawing Presentation .
Setup: " Column title font style " under the " Revision Chart " tab in Drawing Presentation .
Outside pen color: 1 or 2 or 3 or 4 or 5 or 6 or 7 .
|
|
| The selected button sets the drawing pen and on-screen display color of the revision chart's perimeter. Line Weights sets the thickness of lines that are printed using a particular drawing pen. |
|
The " Outside pen color " sets the color and line thickness of the revision chart's perimeter. In this example, the color is yellow (pen 3). |
Setup: " Outside pen color " under the " Revision Chart " tab in Drawing Presentation .
Inside pen color: 1 or 2 or 3 or 4 or 5 or 6 or 7 . This sets the default " Inside pen color " that will be applied to newly placed revision charts in a full-featured SDS2 program .
|
|
| The selected button sets the drawing pen and on-screen display color of the revision chart's perimeter. Line Weights sets the thickness of lines that are printed using a particular drawing pen. |
|
|
The " Inside pen color " sets the color and the line thickness for the revision chart's inner grid. In this example, the color is white (pen 1). |
Setup: " Inside pen color " under the " Revision Chart " tab in Drawing Presentation .
page 1 | contents | double-click a revision chart | revision chart | top
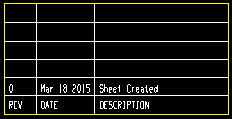
Choices made here, on this window, for the charts that follow:
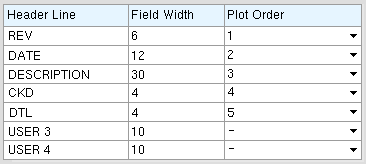
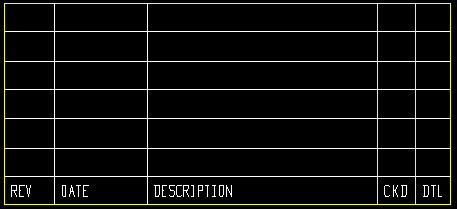
A revision chart generated from the choices shown above:
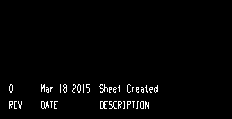
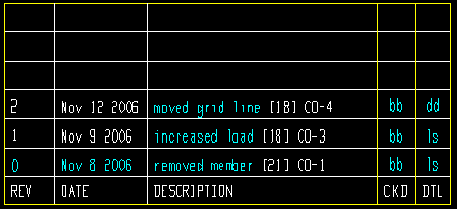
Same revision chart after entries have been made to it:
Report width in characters: The total number of characters that the revision chart will be wide. This number is automatically calculated from the " Field Width " assigned to columns on the revision chart. Two characters are added for each column in the chart (one space at the beginning, the other at the end) to create margins for separating the columns in the report.
page 1 | contents | double-click a revision chart | revision chart | top
To close the Sheet Revisions window :

"OK" (or the
button or the Enter key or the Esc key) closes this review window.
page 1 | contents | double-click a revision chart | revision chart | top