Tiles ( Modeling & Drawing Editor )
Tool summary :
- Splits or unsplits the Modeling or Drawing Editor window into separate tiles. Each tile icon's image shows the tile congfiguration that resuls from your clicking the icon.

|
| Modeling and Drawing Edito r windows can be split into separate tiles that display different views. |
- See (on this page):
Also see :
YouTube video: Split Windows
YouTube video: Splitting the Modeling window horizontally and vertically into tiles can give you multiple perspectives of the model. The Drawing Editor window can be split in a similar fashion.
- Split Windows (YouTube) (
 )
)
- SPLIT WINDOWS (a downloadable HOW/2 .pdf file)
- Modeling and the Drawing Editor (where Tiles is a set of tools)
- Reuse previous session's tile layout ( User and Site Options > Modeling > )
- Reuse previous session's tile layout ( User and Site Options > Drawings > )
- Hover tile color ( User and Site Options > General > )
- Active tile color ( User and Site Options > General > )
page 1 | contents | view > tiles (modeling) | view > tiles (drawing editor) | top
Overview :
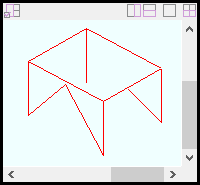
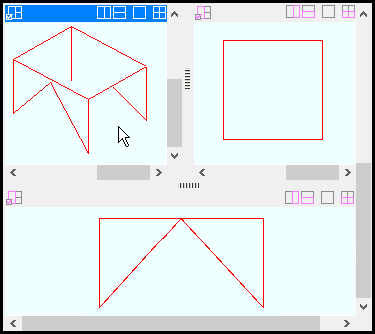
- The view window in Modeling or the Drawing Editor can be split into separate tiles. You can resize the tiles, split a tile to make new tiles, edit or relocate a view within a tile, and display different views in different tiles.
- For example, in Modeling you can create one tile to show a plan view and another tile to show an isometric view. The views can show different members, or they can show the same members from different perspectives.
- When Modeling or the Drawing Edito r opens, the current view is initially displayed in a single tile. That first tile has the focus . When a tile has the focus, navigation and view operations are applied to it, including zooming and panning and depth check changes. When you have more than one tile, only one tile has the focus at a time. To create multiple tiles, you can split tiles or choose a Preinstalled Tile Configuration .
- Focus follows the mouse pointer (
 ) until a tile has been made active . Navigation and view operations are applied to the tile that you hover, even if you haven't clicked inside of its border. The border of a tile that has focus is highlighted in the " Hover tile color ." The tile retains the focus until you hover over another tile. This behavior is convenient if you want to switch rapidly between views.
| See for yourself that the focus follows the mouse pointer. First, create multiple tiles . Hover ( without clicking) over one of the tiles, then roll your mouse wheel. You will see that the zoom level changes only in the tile that you hover. |
When a tile is made active -- that is, when either Toggle Active Tile or Set Active Tile has been applied to a tile -- it has the focus at all times. You cannot change the focus until you Clear Active Tile or Toggle Active Tile again. The border of an active tile is highlighted in the " Active tile color ."

A tile without the mouse focus has no border highlighting A focused tile with a highlighted border -- gray, in this example A focused, active tile has a highlighted border -- blue, in this example
page 1 | contents | view > tiles (modeling) | view > tiles (drawing editor) | top
Activating Tile tools :
Method 1 : On your toolbar or on the ribbon, click the icon associated with that tool -- for example, the Split Tile Vertically icon. The icons can be taken from the group named ' View -- Tiles ' and placed on a toolbar (classic) or the ribbon (lightning).
Method 2 : If " Modeling layout style " or " Drawing Editor layout style " is ' Classic ', you can use the menu system to choose View > Tiles > xxx.
Method 3 & 4 : Use a keyboard shortcut (if you have set one up). Tile tools can also be configured to be invoked using a keyboard shortcut or a mode . For the lightning interface, this configuration is done using Customize Interface .
Method 5 : Right-click to open the context menu and choose Set Active Tile or Clear Active Tile , or choose Tiles > xxx to remove or split tiles. Note that if a tile is active, the context menu is only available in that tile.
Method 6 : When User and Site Preferences > General > " Tile decorations active " is checked (
), click the icon associated with one of the tools found on the decoration at the top of the tile:
Split Tile Vertically
Split Tile Horizontally
Single Tile
Remove Tile
page 1 | contents | view > tiles (modeling) | view > tiles (drawing editor) | top
Split Tile Horizontally and Split Tile Vertically
Split Tile Horizontally divides a focused tile horizontally into two tiles of equal size. Split Tile Vertically divides the tile vertically. Either command will create a new tile within the active tile if there is one. If there is no active tile, the tile will be created in the tile that you hover your mouse pointer ( ![]() ) over.
) over.
1 . In Modeling or the Drawing Editor, do one of the following:
Alternative 1 : Set active the tile that you want to split.
Alternative 2 : If there is no active tile, hover your mouse pointer over the tile that you want to split so that it has the focus . The border of a tile you hover is highlighted in the " Hover tile color ."
Note: If you do not have multiple tiles, the current view is displayed in a single tile -- in that case, it always has the focus.
2 . Invoke Split Tile Horizontally or Split Tile Vertically using any of the methods described here . Afterward, if you want to, you can then use either command to further split the active tile. You can also resize the resulting tiles.
Tip: Rather than manually splitting existing tiles, you can choose from the list of Preinstalled Tile Configurations -- for example, " One " or " Two , Horizontal " or " Three " or " Top " or etc.
page 1 | contents | view > tiles (modeling) | view > tiles (drawing editor) | top
 Preinstalled Tile Configurations :
|
|
|
|
|
|
|
|
|
|
|
|
|
|
|
To access Preinstalled Tile Configurations , use any of the methods described here (with the exception of the context menu). If you've already created your own tile configuration, the preinstalled configuration that you choose will replace it. The tiles within a configuration, once it has been added, can be resized .
|
A Preinstalled Tile Configuration can be selected as an alternative to Split Tile Horizontally or Split Tile Vertically . For example, you can select this configuration by choosing Model > Tiles > Three Tiles, Bottom . Note that different views -- isometric, plan, and elevation -- are displayed in each tile. |
page 1 | contents | view > tiles (modeling) | view > tiles (drawing editor) | top
Remove Tile :
Tiles, once created, can be removed. But if you have only a single tile, you cannot remove it -- in that case, Remove Tile does nothing.
1 . In Modeling or the Drawing Editor, choose the tile that you want to remove:
Alternative 1 : Set active the tile that you want to remove.
Alternative 2 : If there is no active tile, hover your mouse pointer (
2 . Invoke Remove Tile using any of the methods described here . The tile will disappear, unless it is your last tile.
Tip: To quickly revert Modeling or the Drawing Editor to a single tile , choose the " One " or the " Single Tile " preinstalled tile configuration. This is faster than applying " Remove Tile " to multiple tiles.
page 1 | contents | view > tiles (modeling) | view > tiles (drawing editor) | top
Single Tile :
Modeling or the Drawing Editor can be quickly reverted to show a single tile that takes up the entire view window. You cannot have less than one tile.
1 . In Modeling or the Drawing Editor, choose the tile that you want to remain:
1a . Set active the tile that you want to remain.
1b . If there is no active tile, hover your mouse pointer (
2 . Choose " Single Tile " on the context menu .
Alternative 1 : You can also chose the " One " Preinstalled Tile Configuration using any of the methods described here .
Alternative 2 : You can also apply the Remove Tile tool until you have one tile left. However, choosing " One " or " Single Tile " is usually much faster.
page 1 | contents | view > tiles (modeling) | view > tiles (drawing editor) | top
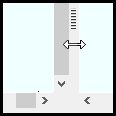
To resize tiles :
In Modeling or the Drawing Editor, hover your mouse pointer ( ![]() ) over the border that separates two tiles. The pointer changes to a double-sided arrow. Drag the border to resize both tiles.
) over the border that separates two tiles. The pointer changes to a double-sided arrow. Drag the border to resize both tiles.
|
Drag the border between two tiles to resize them. |
page 1 | contents | view > tiles (modeling) | view > tiles (drawing editor) | top
 Set Active Tile :
Only one tile can be set active at a time. Once activated, it will remain active until you Clear Active Tile or Toggle Active Tile .
1 . If another tile is already active, deactivate it using one (1) of the following commands:
Alternative 1 : Choose Clear Active Tile using any of the methods described here .
Alternative 2 : Choose Toggle Active Tile using any of the methods described here .
2 . Hover your mouse pointer ( ![]() ) over the tile that you want to activate so that it has the focus . The border of a tile you hover is highlighted in the " Hover tile color ."
) over the tile that you want to activate so that it has the focus . The border of a tile you hover is highlighted in the " Hover tile color ."
3 . Invoke Set Active Tile using any of the methods described here . The border of the tile you activated is highlighted in red .
page 1 | contents | view > tiles (modeling) | view > tiles (drawing editor) | top
 Clear Active Tile
When a tile is active, you cannot focus other tiles until you clear (deactivate) it. Clear Active Tile only deactivates the active tile, if there is one. If there is no active tile, this command does nothing.
Clear Active Tile can be invoked using any of the methods described here , with the exception of method 6 (tile decoration).. The deactivated tile may still be a hover tile, but you can easily move the focus by hovering your mouse pointer ( ![]() ) over another tile.
) over another tile.
Also see: Toggle Active Tile (activates a tile)
page 1 | contents | view > tiles (modeling) | view > tiles (drawing editor) | top
 and
and  Toggle Active Tile
You can toggle a tile's state between active and inactive by choosing Toggle Active Tile .
1 . Hover your mouse pointer (
2 . Invoke Toggle Active Tile using any of the methods described here . The border of a tile you activate is highlighted in the " Active tile color ."
page 1 | contents | view > tiles (modeling) | view > tiles (drawing editor) | top