The Hatch Add or Hatch Edit window ( Drawing Editor )
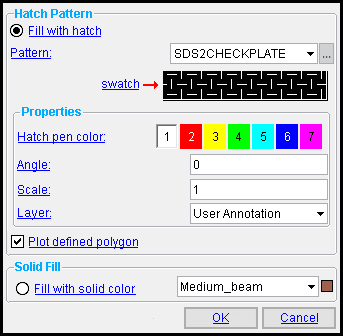
The Hatch Add or Hatch Edit window opens when you :
Note: If you opened this window using Hatch Edit All or by a multi-edit , the contents of many fields may be gray, which indicates mixed entries but does not prevent you from editing that field.
Also see :
- Hatches (topic)
- Hatches/Fills ( Display Options )
- Hatch Erase and Hatch Erase All can be used to delete hatches or fills.
- You can also select a hatch and press the Delete key.
- For hatches added using Hatch Add Define Polygon , deleting the hatch also deletes the polygon sides that make up the defined polygon that borders the hatch or fill.
page 1 | contents | objects > hatch > | objects -- hatch | top
----- Hatch Pattern -----
![]() Fill with hatch , when selected, lets you apply a hatch " Pattern " along with a " Hatch pen color " " Angle " and " Scale ."
Fill with hatch , when selected, lets you apply a hatch " Pattern " along with a " Hatch pen color " " Angle " and " Scale ."
If, instead of a hatch, you want a color fill, select '
Fill with solid color '.
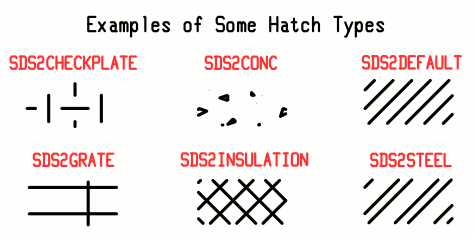
Pattern: SDS2CHECKPLATE or SDS2CONC or SDS2DEFAULT or SDS2GRATE or SDS2INSULATION or SDS2STEEL are some of the patterns that are installed in the Drawing Editor .
|
is a browse button that lets you select hatch patterns stored at any location that is accessible from your computer.
|
|
|
swatch |
The swatch displays the selected " Pattern " To show a different swatch, change to a different " Pattern ."
If " Scale " = ' 1 ' and " Angle " = ' 0 ' and " Hatch pen color " = ' 1 ' and '
Fill with hatch ' is selected, the swatch pattern will match the actual hatch pattern that is shown in the drawing.
No swatch pattern is shown for mixed entries . That is, if you are editing multiple hatches that have different patterns.
When '
Fill with solid color ' is selected, the swatch is irrelevant.
----- Properties -----
Hatch pen color: 1 or 2 or 3 or 4 or 5 or 6 or 7 . The pen that is pressed, by default, for the first hatch that is added during a Drawing Editor session is the " Hatch pen color " that is set at Home > Project Settings > Fabricator > Detailing > Drawing Presentation . Each new hatch that is subsequently added during that same session will, by default, be assigned the " Hatch pen color " of the last-added hatch. No button is pressed if you are editing multiple hatches that are drawn with different pens.
![]()
|
The choice made here sets the thickness at print time of the lines that make up the hatch pattern. It also sets the hatch's on-screen display color. The actual color of the hatch pattern, when printed, is defined in Line Weights . By default, all drawing pens are defined to be the color black.
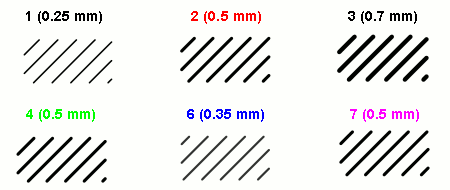
Same hatch pattern, six different pen numbers. The pen width (mm) for each pen number is written in parentheses. The pen widths are assigned to pen numbers in Line Weights .
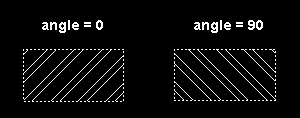
Angle: The number of degrees ( 0 to 360 ) that the hatch pattern is to be rotated.
|
' 0 ' degrees is the default rotation. The hatch pattern at ' 0 ' degrees is unrotated. The swatch shows the selected hatch at this angle.
' 90 ' degrees rotates the hatch pattern counterclockwise 90 degrees.
' 180 ' degrees rotates the hatch pattern counterclockwise 180 degrees.
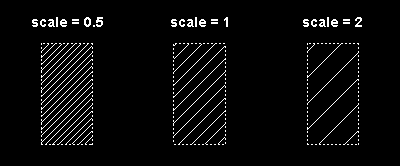
Scale: A number that controls the tightness of the hatch pattern. Small numbers cause the hatch pattern to be drawn more tightly. Large numbers cause the pattern to be drawn more loosely.
|
' 0.5 ' scales the hatch by a factor or 0.5, resulting in less space between the lines that make up the hatch pattern.
' 1 ' is the default scale. The swatch shows the selected hatch at this scale.
' 2 ' scales the hatch by a factor of 2, resulting in more space between the lines that make up the hatch pattern.
Layer: The drawing layer that the hatch you are adding or editing will be drawn on after you press " OK " to close this window. If that layer happens to be hidden (not marked " Show "), the hatch will disappear after the first Redraw .
![]()
A hatch and its polygon are always on the same layer. The layer that the hatch is assigned to is also the layer that the polygon is assigned to.
Plot defined polygon: ![]() or
or ![]() . This applies when you have added a polygon using Objects > Hatch > Add Define Polygon . The "defined polygon" that is added in this way is composed of polygon sides , which can be edited on the Polygon Side Edit window to, for example, adjust their line type (dash pattern) and pen number (plotted stroke weight).
. This applies when you have added a polygon using Objects > Hatch > Add Define Polygon . The "defined polygon" that is added in this way is composed of polygon sides , which can be edited on the Polygon Side Edit window to, for example, adjust their line type (dash pattern) and pen number (plotted stroke weight).
|
If this box is checked (
), both the defined polygon and the hatch pattern bordered by that polygon can be printed.
If the box is not checked (
), the hatch pattern can be printed, but not its polygon border.
----- Solid Fill -----
![]() Fill with solid color applies the selected color to fill the polygon. You can select a predefined color or a custom color . If you don't want a fill, but instead want a hatch, select '
Fill with solid color applies the selected color to fill the polygon. You can select a predefined color or a custom color . If you don't want a fill, but instead want a hatch, select ' ![]() Fill with hatch '.
Fill with hatch '.
|
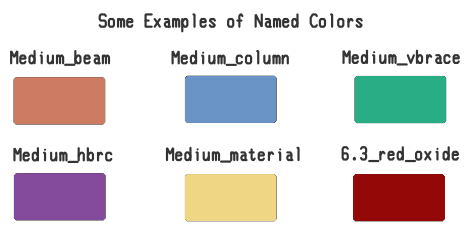
The predefined colors are set up on the Predefined Colors window. The color swatch next to the list box (
) displays the color that is selected.
Select ' Custom Color ' (last choice on the list) to launch your operating system's color picker and define any color you like.
page 1 | contents | objects > hatch > | objects -- hatch | top
![]()
![]()
"OK" (or the Enter key) closes this window and completes the operation you are performing.
Note: After making changes to this window and pressing " OK ," you can still undo your changes by using Revert or Undo . If you Save to make your changes permanent, you can no longer Revert , but you can still Undo .
"Cancel" (or the Esc key or the ![]() button) closes this window without saving any of the changes you have made.
button) closes this window without saving any of the changes you have made.
page 1 | contents | objects > hatch > | objects -- hatch | top
