Output Configuration
- General Overview
- Tips and Tricks
- Related Tools
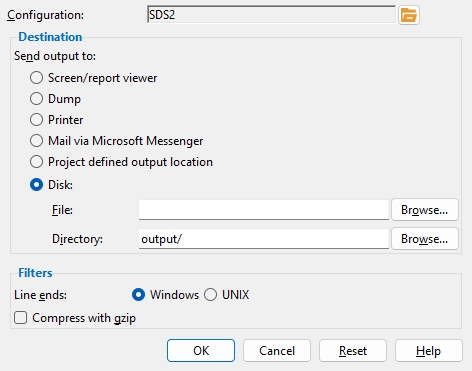
Configuration: The file name of the output configuration.
Note: This field is read-only if you opened this window using the Edit ... button on the User and Site Options window. If you opened this window during output of a file you can create a new configuration or select a different configuration using the browse button (
). Selecting a different Configuration file sets this as the new default in User and Site Options > Output > Output configurations.
Destination
Send output to: Screen/report viewer or Dump or Printer or Disk or Mail (Windows only) or Project defined output location or File or Directory .
Screen/report viewer sets the file to be sent to your computer screen. You can then view the information in the file on screen, and you will also have the option to save it or print it. On a selection dialog, the Destination button will say Screen.
Dump sets the file to be sent to your computer screen. You can then view the information in the file on screen, but you will not have the option to save it or print it.
Printer sets the file to be output directly to your printer. On a selection dialog, the Destination button will say Printer.
Mail via Microsoft Messenger allows you to output a file to your email box so that you can send it to somebody via email.
Project defined output location uses the path specified in Home > Project Settings > Fabricator > Project Output . On a selection dialog, the Destination button will say Project.
Disk sets the file to be sent to the hard drive or CD drive specified for File or Directory.
File: or Directory: Choose one only -- do not fill out both File and Directory. Enter a file path to File if the output is a single file (BIF, EJE Export). Enter a path to Directory if your output is one or more files that are named by the SDS2 module that does the exporting (CNC, Export Model).
File :
D:/folder/subfolder/file.txt 
Directory :
D:/folder/subfolder File : You can type in the file path that you want, or you can press the Browse button and, in the dialog that opens, select a file (
) to enter a path to that file. On a selection dialog, the Destination button will say File.
Directory : You can type in the path to the file folder that you want, or you can press the Browse button and, in the dialog that opens, select a file folder (
) to enter a path to that folder. On a selection dialog, the Destination button will say Directory.
Filters
Line ends: Windows or UNIX . Select the operating system that the program which reads the text file operates under.
Windows instructs the text file (ASCII file) to be output in a format (with line ends) that is compatible with programs that operate under a Windows operating system.
UNIX outputs the file in a format that is compatible programs that operate in a Linux or Unix operating system.
Note: Text files that SDS2 can output include BIF, Estimating and Production, Import Model, Parametric, and Export Model files as well as reports.
When this option is checked (
), the data being output will be compressed, resulting in a reduction of approximately 90% in large files such as .dxf files. Files compressed in this manner can be unzipped (decompressed) using programs such as WinZip , GZip and PKZip . A .gz extension will be added to files written in compressed form.
If the box is not checked (
), the file will not automatically be compressed.
OK (or the Enter key) closes this window and applies the settings. If you are outputting a file, that file will be output to the destination entered on this window. However, the next time you output a file of this same type, the default destination will be set according to the file selected under User and Site Opitons > Output > Output configurations. If you opened this window using Edit configuration, then OK saves any changes you made to the configuration file.
Cancel (or the Esc key) closes this window without saving any changes.
Reset undoes all changes made to this window since you first opened it. The window remains open.
-
If you opened this window by pressing the button under the Destination heading on a selection dialog, making changes to Send output to temporarily overrides the output configuration settings. It does not permanently modify the output configuration. To modify an output configuration, press Edit on the User and Site Options window.

