 Excel Reports
Tool summary :
- Exports the selected Report Writer report or Python report to an .xlsx file that is compatible with Microsoft Excel and other programs.
- The "
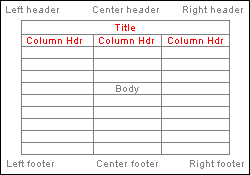
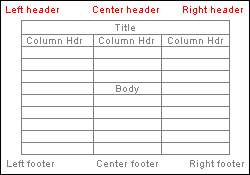
 Run report " section ot the Output Excel Report window (shown below) is used to select the report.
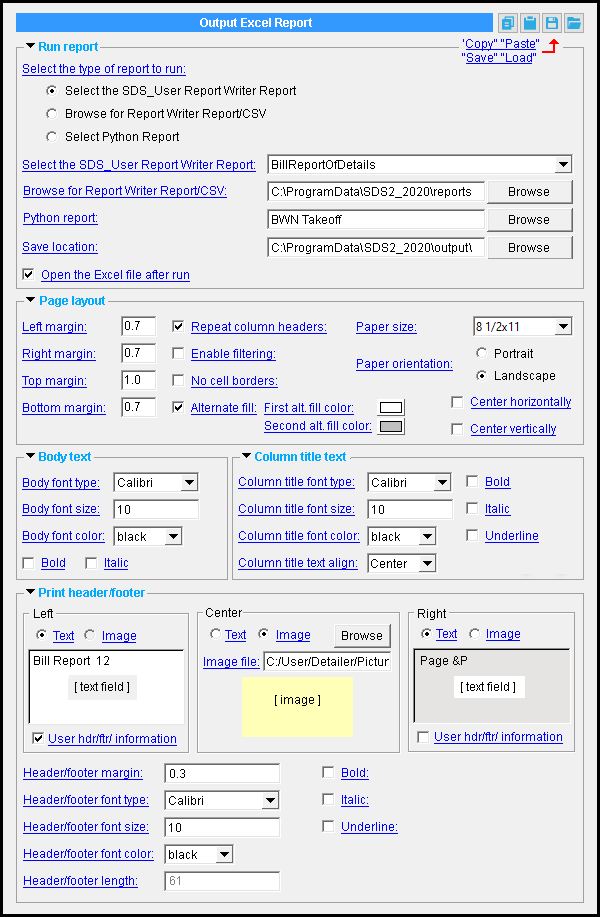
The Output Excel Repor t window (shown at left) configures the Excel Reports tool. Similar options configure the Cost Estimator tool.
The "
"
"
- The Excel Reports icon -- which opens the window shown above-- can be found in the command group ' Reports ' for the Ribbon Editor.
- The button " Create Excel Report " is not shown above. Press it to close the window and output the report.
- Do yourself a favor: With the exception of options in the " Run report " section, the Output Excel Report window is used to adjust XLSX formatting. Until you are familiar with the formatting options, you can safely leave them set to their default values.
- Tip 1: You can adjust formatting settings when you open these files with the spreadsheet program (for example, Microsoft Excel) that you use to view and edit XLSX files. Consult that program's documentation for more information or if you want to make further formatting changes after you export these files.
- Tip 2: If you find that you often use the same formatting settings, you can " Save " them to a file and " Load " them into this window the next time you open it. You can also configure them on the Setup Excel Report window.
Also see :
- Modeling (where Excel Reports is a tool.)
- Setup Excel Report window (setup)
 " Copy " " Paste " " Save " " Load " buttons :
- You'll find buttons like these at the top of each section in this window. They apply to all user-editable settings that are on that section. Click here for more information.
- You can " Copy " (
 ) the settings from each section on this window, then " Paste " (
  ) those back to that section later.
- " Save " (
 ) saves a "form" file to the
  form/ExcelReport folder that is used by your current version of this program. Give the form a name that will help other users identify its purpose. " Load " (
  ) copies over all settings in the section on this window from which the form file was saved with the settings that are stored in the file that you select.
------ Run Report ------
Select the type of report to run: Select the SDS_User Report... or Browse for... or Select Python Report .
'
Select the SDS_User Report Writer Report '
'
'
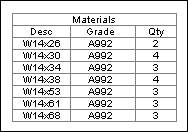
Select the SDS_User Report Writer Report: BillReportOfDetails or BillReportOfDetailsSelect by sheet , etc . These are the same reports that you find at Home > Reports > Generate Report . This option is available when you " Select the type of report to run " and choose ' Select the SDS_User Report Writer Report '.
Browse for Report Writer Report/CSV: A file path . The location, including the filename, of the Report Writer report that you want to run. Such a report must be the ' Excel(Version 2) ' " Export report type " and have appropriate entries in its " Export report columns " table. Type in the file path of the report (if you know it), or press the " Browse... " button to browse for its location. This option is available when you " Select the type of report to run " and choose ' Browse for Report Writer Report/CSV '.
Python report: BNW Takeoff or Connection Engineer , etc . Not every option that is available here will work. For an option to work, the plugin for that report tool needs to be installed. This option is available when you " Select the type of report to run " and choose ' Select Python Report '.
Save location: A file path . The location, including the filename, of the XLSX file to be output. Type in the file path (if you know it), or press the " Browse... " button to browse for a folder in which to save the file.
Open Excel file after run: ![]() or
or ![]() .
.
If this box is checked (
), the file that you output when you press ' Create Excel Report ' will be written to the " Save location " and will open in Microsoft Excel, if it is installed on your workstation.
If the box is not checked (
), the file that you output when you press ' Create Excel Report ' will be written to the " Save location " but will not open in another application.
------ Page layout ------
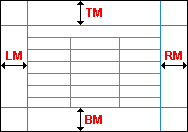
Left/Right/Top/Bottom margin: A distance in inches. This determines the distance of the table from the edges of the media, or to the edge of any margin that is added by the printer. These options should not be confused with the header (or footer) margins .
|
LM = " Left margin "
|
|
|
If this box is checked (
When this box is not checked (
|
|
If this box is checked (
If the box is not checked (
|
|

If this box is checked (
If the box is not checked (
|
|
If this box is checked (
If the box is not checked (
Note: Change the " Body font color " to change the color of the text.
First alternate color: The color that you want applied to the background of alternate rows of cells after the title (if any), starting with the first row. This option is available when " Alternate fill " is checked ( ![]() ). The button displays the selection that you make when you press it and pick a color on the " Color " window.
). The button displays the selection that you make when you press it and pick a color on the " Color " window.
Second alternate color: The color that you want applied to the background of alternate rows of cells after the title (if any), starting with the second row. This option is available when " Alternate fill " is checked ( ![]() ). The button displays the selection that you make when you press it and pick a color on the " Color " window.
). The button displays the selection that you make when you press it and pick a color on the " Color " window.
Paper size: 8 1/2 x 11 or 11 x 17 or D size sheet etc. This is a media size.
Tip: Consider the number of columns in the chosen report when you select a " Paper size ." If the report requires more columns than will fit on a page of the media you select, an extra sheet will be generated to contain the rest of the columns.
Paper orientation: Portrait or Landscape . This option orients the media. The table's orientation remains fixed.
|
|
Tip: Consider the number of columns in the chosen report when you select a " Paper orientation ." If the report requires more columns than will fit on a page when it is oriented in the manner that you select, an extra sheet will be generated to contain the rest of the columns.
|
|
If this box is checked (
If the box is not checked (
|
|

If this box is checked (
If the box is not checked (
------ Column title text ------
|
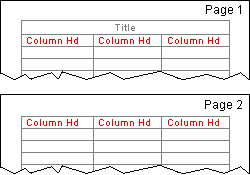
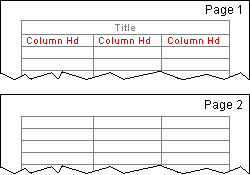
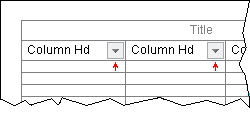
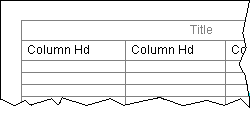
Column headings appear above the body of the table. Depending on the report type that you select, a title may also be placed at the top of the table. That title would be affected by column title options. |
Column title font type: A font that is installed on your workstation.
Be sure to verify whether " Bold " and " Italic " are checked (
See also: " Enable filtering " applies sorting filters to each column.
Column title font size: A size in points.
Column title font color: A color . This changes the color of the column heading text. Its background color is unaffected.
Column title text align: Center or Left or Right . This sets the alignment of text in the column heading. This does not change the formatting of the body text within that column.
When ' Center ' is selected, the text is centered in the column heading.
When ' Left ' is selected, the text is left aligned in the column heading.
When ' Right ' is selected, the text is right aligned in the column heading.
If this box is checked (
If the box is not checked (
If this box is checked (
If the box is not checked (
If this box is checked (
If the box is not checked (
------ Body text ------

|
Body text is placed within the margins, below the headers, and above the footers. |
Body font type: A font that is installed on your workstation.
Be sure to verify whether " Bold " and " Italic " are checked (
Body font size: A size in points.
Body font color: A color . This changes the color of the body text. Its background color is unaffected.
If this box is checked (
If the box is not checked (
If this box is checked (
If the box is not checked (
------ Print header/footer ------
|
|
|
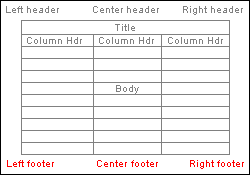
| Headers appear at the top of each page. | Footers appear at the bottom of each page. |
Left/Center/Right Header/Footer: Text or Image .
Choose '
Choose '
Image file: A file path . The location of an image file (GIF, JPEG, PNG, etc.). Type in the file path (if you know it), or press the " Browse... " button to browse for the file location. This option is available when " Image " is chosen for " ...Header ."
User header/footer information: ![]() or
or ![]() . This option is available when " Text " is chosen for " ...Header ."
. This option is available when " Text " is chosen for " ...Header ."
If this box is checked (
If the box is not checked (
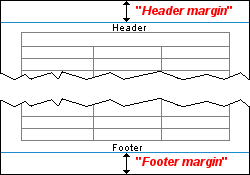
Header/footer margin: A distance in inches. This determines the distance of the top of the header or footer from the top or bottom of the media, or to the edge of any margin that is added by the printer.
|
Header and footer margin settings are applied independently of the left, right, top, or bottom margins settings, and do not affect them. |
Header/footer font type: A font that is installed on your workstation.
Header/footer font size: A size in points.
Header/footer font color: A color . This changes the color of the footer text. Its background color is unaffected.
Header/footer length: A read-only integer reporting the sum of the characters, including whitespace, in the left, right, and center headers at either the top or the bottom of the page.
Note: Microsoft Excel will reject headers whose combined length is greater than than 255 characters. When that number is exceeded, this field will be highlighted in Red. You need to remove text from those fields to be able to close this window using " Create Excel Report ."
If this box is checked (
If the box is not checked (
If this box is checked (
If the box is not checked (
If this box is checked (
If the box is not checked (
To close the Output Excel Report window :
"Create Excel Report" (or the Enter key) closes the Output Excel Report window. Depending on the report you selected, you will either be prompted to select members, or a selection dialog will open. After you select members, the Excel report is generated. If " Open Excel file after run ," is checked, the report will open in Microsoft Excel, if it is installed on your workstation.
Validation: If the " Header... " or " Footer length " is invalid, you will not be permitted to exit this window until you shorten an entry in a header or footer text field.
"Reset" undoes all changes made to this window since you first opened it. The window remains open.
Esc or the ![]() button closes this window without saving any changes that you might have made to it.
button closes this window without saving any changes that you might have made to it.

