 The file name window -- Report Writer ( Reports > Report Writer )
To open the Report Writer :
Also see :
VIDEO 
Setting " Select " in Report Writer to ' Member Numbers ' lets you select from the model instead of from a list when you Report > Run the affected report. In this video, selection of members in the model is accomplished by using a selection list that is opened using Edit > Load Selection .
VIDEO A report is created from scratch in Report Writer . When the path to that report is entered to " Report Writer Report " on the Table Edit window, a table is generated. The table lists nonstandard field bolts in the erection view on that sheet.
- ModelBasic
- ModelAll
- ModelAdvanced
- BOM
- Run Report Writer Report
- reports/SDS2 (default reports provided by SDS2 are stored in)
- Report Writer Report (populating a table with a report) (
 ).
).
![]() How to export a selection report :
How to export a selection report :
Purpose of a selection report: Settings under the Page Setup or Layout tabs do not affect a selection report. This makes a selection report more simple to output than a report that requires layout. You might output the data simply to see what a particular selection gives you for a set of Selected Items . Or you might export the data to a spreadsheet or database program so that you can use that program to format the data.
Please note: If somebody you know has already created a Report Writer file and you want to generate a report from that file, just File > Open , select the file name, then follow these instructions beginning with step 2.
1 . Select the data you want output:
1a : Under the Data tab, select the " Data source ." Then double-click data source fields in the Source list to move them to the Selected Items list.
1b : For " Select " under the Selection tab, select the category (' Piecemarks ', ' Member numbers ' or etc.) of items you want listed in the selection dialog that appears in step 3.
2 . Under the " Destination " tab:
2a : Select an " Export selection type " (' Delimited ' or ' SYLK ' or ' Excel ', but not ' None ').
2b (optional) : Press the " xxxx " button (xxxx = " Screen " or " File " or " Printer ") if you want to change the default destination. This step is optional since you can output to a different destination (step 3a) without changing this default.
2c : Press the " Export " button.
3 . Unless you selected ' None ' for " Select " in step 1b, a selection dialog opens. On it is a listing of items of the particular type you selected (piecemarks, member numbers or etc.).
3a (optional) : The destination for this report can optionally be changed at this time by pressing the destination button (" Screen " or " File " or " Printer ") to open the Output Configuration window. Doing this does not change the default destination (step 2b).
3c (optional) : Checking " Show all " (
) broadens the list to include items that are set to be hidden on the Hide Items window. Pressing the " Hide... " button opens the Hide Items window so you can limit or expand the list of drawings to specific classes (when " Show All " is not checked).
3b : Select the items you want data on, then press " OK ."
4 . A report is output to the destination set in step 2b or 3a. If the output is to the report viewer (" Screen "), you can review the report on screen then optionally save it to a file.
![]() To generate a FreeFormat report :
To generate a FreeFormat report :
Purpose of a FreeFormat report: The reports found in the reports/SDS2 folder are ' FreeFormat ' versions of standard SDS2 reports (see Open ). All of the settings that you need to format such a report are available in the Report Writer (under the Page Setup or Layout tabs). Typically you will want to output a ' FreeFormat ' report to your printer.
Please note: If somebody you know has already created a Report Writer file and you want to generate a report from that file, just File > Open , select the file name, then follow these instructions beginning with step 4.
1 . Before formatting the report:
1a : Draw a picture showing how you want the report to look. Include a cover page if you want one. Also draw the column heads and page numbers that you want repeated on every page.
1b : Set your printer to use a fixed-pitch font (a font that does not produce proportional character spacing).
2 . Set the data you want output:
2a : Under the Data tab, select the " Data source ." Then double-click data source fields in the Source list to move them to the Selected Items list.
2b : For the " Select " field under the Selection tab, select the category (' Piecemarks ', ' Member numbers ' or etc.) of items you want listed in the selection dialog that appears in step 5 .
3 . Set layout and grouping:
3a : Under the Sort and Group tab, place any item in the Sort Items list that you want to sort or group by. For example, if you want to group data for all members with the same piecemark, you can group by piecemark. This creates " Group_Header... " and " Group_Footer... " sections.
3b : Under the Page Setup tab, use the page size and margins that are set as the defaults. If there is too much white space in the printed report or the report prints too close to a margin, you can then change the settings under this tab.
3c : Under the Layout tab, set the data fields, column headers and page headers you want included in the report. If you want grouped data, place those data fields you want grouped in section items under the " Group_Header... " (or " Group_Footer... ") section that you created in step 3a.
4 . Output the report:
4a : Under the " Destination " tab, select ' FreeFormat ' as the " Formatted report type ."
4b ( optional ): Press the " xxxx " button (xxxx = " Screen " or " File " or " Printer ") if you want to change the default destination. This step is optional since you can output to a different destination (step 5a) without changing this default.
4c : Press the " Generate " button.
5 . Unless you selected ' None ' for " Select " in step 2b, a selection dialog opens. On it is a listing of items of the particular type you selected (piecemarks, member numbers or etc.).
5a (optional) : The destination for this report can optionally be changed at this time by pressing the destination button (" Screen " or " File " or " Printer ") to open the Output Configuration window. Doing this does not change the default destination (step 2b).
5b (optional) : Checking " Show all " (
5c : Hold down the Ctrl key and click each item you want to select, then press " OK ." Go to step 6.
Note: If the " Item selection expression " limits selection, the report will include only a subset of those items you select in this step. For examples of selection-limiting expressions, see the " Selection " menu.
6 . A report is output to the default destination set in step 4b or 5a. If the output is to the report viewer (" Screen "), you can review the report on screen then optionally print it or output it to disk. If the report is output to a file (" File "), you can import the data in that report to a database or spreadsheet program.
![]() To output an export report :
To output an export report :
Follow the instructions for How to generate a FreeFormat report , except as noted below.
You don't have to set your printer for a fixed-pitch font (step 1b) since you will likely be printing the report using the database or spreadsheet program that imports the report.
In step 4a, select a " Export report type " instead of a " Formatted report type ."
In step 4c, press the " Export " button (the one next to " Export report type ").
Before exporting the report, you must set up " Export report columns ."
![]() New clears the settings on this window and creates an "Untitled" report.
New clears the settings on this window and creates an "Untitled" report.
1 . Choose File > New . Go to step 3 unless step 2 applies.
2 (if applicable) : If you have made changes to the currently loaded Report Writer file , a dialog opens. On it are three (or four) buttons that you can press. Do one (1) of the following:
Option 1 : Press " Save " to save any changes you have made to the currently loaded Report Writer file. Go to step 3.
Option 2 : Press " Save As " to save your current Report Writer file under a file name that you enter. Then go to step 3.
Option 3 : Press " Ignore " to go directly to step 3.
Option 4 : Press " Cancel " to end this operation, presumably so that you can keep working on the currently loaded file. Do not continue.
3 . Report Writer clears all the selections on this window so that you can have a fresh start defining a new Report Writer file. The name "Untitled" is reported in this window's title .
![]() Open lets you load any Report Writer file that has previously been saved. By default, it opens to the reports folder, which probably contains many of the reports that Design Data supplies. The reports/SDS2 folder should have all updated versions of reports that Design Data supplies, since it is updated with each new SDS2 software install. This means that, if you want to modify one of the reports/SDS2 reports, you should copy-and-rename that report file into the reports folder or modify the version that is found in the reports folder.
Open lets you load any Report Writer file that has previously been saved. By default, it opens to the reports folder, which probably contains many of the reports that Design Data supplies. The reports/SDS2 folder should have all updated versions of reports that Design Data supplies, since it is updated with each new SDS2 software install. This means that, if you want to modify one of the reports/SDS2 reports, you should copy-and-rename that report file into the reports folder or modify the version that is found in the reports folder.
1 . Choose File > Open . Go to step 3 unless step 2 applies.
2 (if applicable) : If you have made changes to the currently loaded Report Writer file , a dialog opens. On it are three (or four) buttons you can press. Do one (1) of the following:
Option 1 : Press " Save " to save any changes you have made to the currently loaded Report Writer file. Go to step 3.
Option 2 : Press " Save As " to save the Report Writer file under a file name that you enter. Go to step 3.
Option 3 : Press " Ignore " to go directly to step 3.
Option 4 : Press " Cancel " to end this operation, presumably so that you can keep working on the currently loaded file. Do not continue.
3 . The Select a Report dialog opens. The dialog lists files in the
reports folder that is used by your current version of this program. Be aware that you can use the dialog to browse to another, different location.
3a : Double-click the file that you want to load.
4 . The selection fields on this window are automatically filled out with information from the file you selected in step 3a. The name of that file is now shown as this window's title .
![]() Save does a quick save of the selections currently made on this window to the file that is listed in this window's title . Exception: If this window's title is "Untitled," your changes do not write to a file of that name. Use " Save As " instead.
Save does a quick save of the selections currently made on this window to the file that is listed in this window's title . Exception: If this window's title is "Untitled," your changes do not write to a file of that name. Use " Save As " instead.
![]() Save As lets you save the selections currently made on this window to a file name that you enter.
Save As lets you save the selections currently made on this window to a file name that you enter.
1 . Go to step 3 unless step 2 applies.
2 . In the Save As dialog:
Alternative 1 : Enter the " File name " that you want, then press the " Save " button. Go to step 3.
Alternative 2 : Press the " Cancel " button to dismiss the dialog box and end this operation without saving. Do not continue.
3 . Your current Report Writer file is saved under the file name entered in step 2. The name of that file is now shown as this window's title .
Reset reloads the file shown as this window's title . If that file is "Untitled," all user-modifiable fields revert to their default settings.
Generate Report is the same as pressing the " Generate " button under the Destination tab.
![]() Exit is the same as pressing the " OK " button.
Exit is the same as pressing the " OK " button.
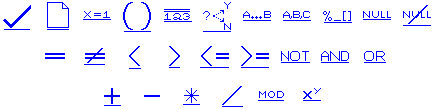
| This menu becomes active when you are on the Selection tab. Use it to apply SQL expressions to the " Item selection expression ." SQL stands for "Structured Query Language." SQL expressions may be used to limit the selection that is made. For example, if the user selects columns and beams and braces in step 4 , but the SQL expression entered to " Item selection expression " limits selection to beams, then only the beams that the user selected are output to the report. |
Check validates the entry made to " Item selection expression ."
Export accomplishes the same results as pressing the " Export " button that is next to " Export selection type ."
Group adds () around the text that is selected in " Item selection expression ." Doing this groups the items within the parentheses.
Example: When "B_1", "B_2", "B_3" is selected, selecting this changes it to ("B_1", "B_2", "B_3") .
IF (?, Y, N) works as in the example documented for the Layout menu.
BETWEEN a AND b inserts BETWEEN a AND b in the " Item selection expression ." This expression is the equivalent to: >= a AND <= b. It is used to sort data in a range.
Example: The expression Member.Piecemark BETWEEN "B_1" AND "B_10" limits the output in the report to beams within the specified range.
IN (a, b) inserts the expression IN ("a", "b") in the " Item selection expression ."
Example: The expression Member.Piecemark IN ("B_1", "B_2", "B_3") limits the output in the report to the beams that are listed in the parentheses.
LIKE a adds LIKE "a" in the " Item selection expression ." The expression may be used to select a pattern using the following special characters: % selects any number of characters -- it mimics DOS "*" wildcard; _ selects any single character -- it mimics the DOS "?" wildcard; # is the SQL "Escape" character ( example : #* makes * function as a character instead of as the multiplication operator); [ ] matches a list of characters to a single position in the string in which it is embedded ( example : "a[nd]d" would select "and" or "add" but would reject "a2d" or "abd").
IS NULL inserts IS NULL in the " Item selection expression ." 0 is null for a numeric field (date, dimension, etc.). An empty string (blank) is null for a string field. No = 0 = null for a ' Boolean ' field.
IS NOT NULL inserts IS NOT NULL in the " Item selection expression ."
Example: The expression Piecemark_Drawing_Information.Released_For_Fabrication IS NOT NULL keeps members that have not yet been assigned a " Released for fabrication " date from being included in the report.
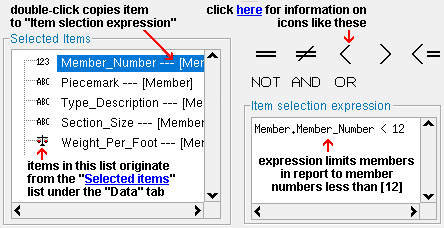
Equal inserts = a (equals the value a) in the " Item selection expression ."
Example: The expression Member.Member_Description = "Beam" limits the output in the report to members that are beams.
Not Equal inserts <> a (does not equal the value a) in the " Item selection expression ."
Example: The expression Member.Member_Description <> "Miscellaneous" limits the output in the report to members other than miscellaneous members.
Less Than inserts < a (less than the value a) in the " Item selection expression ."
Example: The expression Member.Member_Number < 12 limits the output in the report to members with member numbers of 11 or less.
Greater Than inserts > a (greater than the value a) in the " Item selection expression ."
Example: The expression Member.Member_Number > 12 limits the output in the report to members with member numbers of 13 or more.
Less Than or Equal inserts <= a (less than or equal to the value a) in the " Item selection expression ."
Example: The expression Member.Member_Number <= 12 limits the output in the report to members with member numbers of 12 or less.
Greater Than or Equal inserts >= a (greater than or equal to the value a) in the " Item selection expression ."
Example: The expression Member.Member_Number >= 12 limits the output in the report to members with member numbers of 12 or more.
NOT inserts NOT (inverts the result of a compare) in the " Item selection expression ."
Example: The expression Not (Member.Member_Number >= 12 OR Member.Type_Description = "Beam") limits the output in the report to members other than beams with member numbers of less than 12.
AND inserts AND (compares two conditions to determine if BOTH are true) in the " Item selection expression ."
Example: The expression Member.Member_Number >= 12 AND Member.Type_Description = "Beam" limits the output in the report to beams with member numbers of 12 or more.
OR inserts or (compares two conditions to determine if EITHER are true) in the " Item selection expression ."
Example: The expression Member.Member_Number >= 12 OR Member.Type_Description = "Beam" limits the output in the report to member numbers of 12 or greater unless a member with a number of 12 or less is a beam.
Add inserts + a (add the value a) in the " Item selection expression ."
Subtract inserts - a (subtract the value a) in the " Item selection expression ."
Multiply inserts * a (multiply by the value a) in the " Item selection expression ."
Divide inserts / a (divide by the value a) in the " Item selection expression ."
Modulus inserts % a (divide by the value of a and return the remainder) in the " Item selection expression . " This operation requires whole numbers (integers).
Example: 21 % 6 = 3
Power inserts ^ a (raise the value to the power of a) in the " Item selection expression ."
Example: 2 ^ 4 = 16
Hide item selection expression toolbar removes the icons from the toolbar for the Selection tab.
| This menu is active for the Layout tab. Use the mathematical symbols and functions on this menu to write formulas for the " Item expression " field. |
Example: You enter TOTAL (a, "FOO") to an " Item expression " field, then choose Layout > Check . Unless there is a Report Writer section named FOO, you get a warning that says "TOTAL function has invalid section name."
Example: The expression (Member.Material_detail_Length_Dimension / 12) * Member.Material_File.Weight_Per_Foot converts the reported material length value from inches to feet (by dividing it by 12) and then multiplies that total times the weight/feet for the material type to calculate a unit weight value.
inserts NEWPAGE() in " Item expression " or " Action before " or " Action after ."
Example: Open the BillReportOfdetails report that is found in the reports/SDS2 folder. NEWPAGE() is used in " Action before " of the Group_Header_for_Piecemark_of_BillOfMaterial section to cause the BillReportOfdetails to output each selected piecemark as a separate report.
inserts SET( x, 1 ) in " Item expression " or " Action before " or " Action after ." In this expression, x is a variable, and 1 is the value assigned to that variable.
Example: Open the FieldBolt Summary report that is found in the reports/SDS2 folder. Under the Group_Footer_for_Washer_Nut_2_Description... section you will find a section item named line_no that uses this expression to set a variable called line_num.
TOTAL inserts the function TOTAL (a, "detail") in " Item expression " or " Action before " or " Action after ." In this expression, a is the field (entered as the " Item expression " for a different item) that is to be totaled, and "detail" refers to the " Detail " section.
Example 1: To the " Item expression " field in an item in the Report_Footer section , you enter the expression TOTAL ((Member.Material_detail_Length_Dimension / 12) * Member.Material_File.Weight_Per_Foot , "detail") . This generates a total on the last page of the report for all of the unit weights reported earlier in the report.
Example 2: To the " Item expression " field in an item in the Report_Footer section , you enter the expression TOTAL (1, "detail") . If Member.Member_Number is an item in the Selected Items list (or in the " Detail " section), this expression assigns a value of 1 to each member number and tallies the total.
Example: To the " Item expression " field in an item in the Report_Footer section , you enter the expression "Total number of beams: = "+ TOTAL (IF(Member.Type.Description = "Beam", 1, 0, "detail") . The "Total number of beams:" is generated on the last page of the report. Report Writer tallies this result by assigning 1 to beams and 0 to non-beams when Member.Member_Number is an item in the Selected Items list (or in the " Detail " section).
Example 1 (numerical): Entering the expression $page + 1 to the " Item expression " field for the Page_Header or Page_Footer section and assigning its " Type " to be ' Number ' results in page 1 being printed as 2, page 2 being printed as 3, and so on....
Example2 (output is a string): Entering the expression "Page " + $page to the " Item expression " field for the Page_Header or Page_Footer section and assigning its " Type " to be ' String ' results in the page number being printed on each page. The expression "Generated at " + $time + " on " + $date works in a similar way.
Example 1 (numerical): Member.Material_detail_Length_Dimension - 12 is entered to the " Item expression " field with the " Type " set to ' Dimension '. Assuming you are using ' Imperial ' dimensioning, the length printed in the report is 12 inches shorter than the actual length.
Example2 (output is a string): Member.Type_Description - "Vertical" - "Horizontal" is entered to the " Item expression " field with the " Type " set to ' String '. Vertical and horizontal braces are printed in the report as "Brace" instead of "Vertical Brace" and "Horizontal Brace."
Example 1 (numerical): The expression Member.Material_detail_Length_Dimension * 25.4 converts a value in inches to millimeters.
Example 2 (string): Entering the expression "-" * 75 in the " Item expression " field and assigning its " Type " to be ' String ' causes the - character to be repeated 75 times across the page, thus creating a dividing line across the page.
Example 1 (numerical): The expression Member.Material_detail_Length_Dimension / 12 converts a value in inches to a value in feet by dividing it by 12.
Example 2 (string): The expression Member.Type_Description / 2 outputs only the 1st half of the total characters in the string (the " Type " must be ' String '). This means that the report prints "Be" for a beam, "Col" for a column, "Vertica" for a vertical brace.
Example 1 (numerical): You enter 21 % 6 to a particular " Item expression " field. When the report is output, the result shown in the report for that field is "3."
Example 2 (output is a string): The expression Member.Type_Description % 2 outputs only the 2nd half of the total characters in the string (the " Type " must be ' String '). This means that the report prints "am" for a beam, "umn" for a column, "laneous" for a miscellaneous member.
Example: You enter 2 ^ 4 to a particular " Item expression " field. When the report is output, the result shown in the report for that field is "16."
Hide item toolbar removes the icons from the toolbar for the Layout tab.
| Data | Selection | Sort and Group | Destination | Page Setup | Layout |
|
These options let you select data source fields for any type of report. For unformulated, delimited data that is " Exported ," the top-to-bottom order of data fields is the left-to-right order of fields on an individual line in the exported file. |
Data source: ModelAll or ModelAdvanced or ModelBasic or BOM . This sets which data source fields are available in the Source list. Note: If you change the " Data source ," you are prompted to " Save " or " Save As " or " Ignore " or " Cancel. " Choose " Save " if you are changing to a different " Data source " for a currently loaded report. Choose " Save As " if you are changing to a different " Data source " and want to rename your report.
' ModelAll ' provides the largest listing of data source fields that you can select from for inclusion in the report or exported file.
' ModelAdvanced ' includes most of the data source fields in ' ModelAll '.
' ModelBasic ' includes a basic set of data source fields. All ' ModelBasic ' data source fields can also be found in ' Model ' and ' ModelAdvanced '.
' BOM ' includes data source fields from member bills of material. Currently you cannot mix fields from this source with other sources.
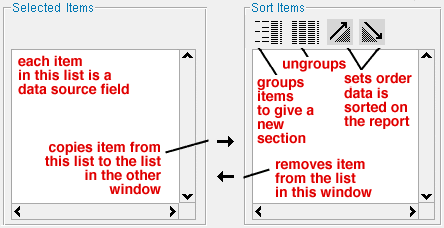
The Source list and a Selected Items list:
Select a different " Data source " to change the source fields that appear in the Source list. The source fields that you copy to Selected Items may be output to a " Formatted Report " or an " Export " file.
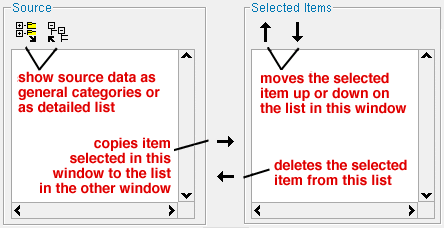
Shortcut: Instead of using the "=>" button, double-click an item in the Source list to move it to the " Selected Items " list. Double-click an item in the Selected Items list to remove that item. The "up arrow" and "down arrow" buttons (illustrated above) arrange the order of items in the Selected Items list. The up-to-down order sets the left-to-right order of data on individual lines in a delimited " Export " file.
Each item on the Source list has an output code symbol:
| Output code symbols used in the Source list | |||
| symbol | type | example | comments |
|
|
' Date ' | 7/16/04 | mainly for status data |
|
(distance) |
' Dimension '
or ' Decimal number ' |
1-1 1/8 or
13.125 |
you can select "_Dimension" or decimal output |
|
(angle) |
' Decimal number ' | 15.0 | a number of degrees |
|
|
' Decimal number ' | 9.999 | positive or negative decimal output |
|
|
' Boolean ' |
1 or 0
Yes or No |
1 = checked (Yes);
0 = not checked (No) |
|
|
' String ' | sequence_1 | strings may be defined by users |
|
(weight) |
' Decimal number ' | 892. 5 | a decimal number in pounds |
|
(integer) |
' Number ' | 1 or 2 or 3 | data is usually a count or a reference to an index |
Equivalent items may be referenced in different ways:
| Examples of how selected "Source" item affects output | ||
| Example
(from "Source") |
Example (on report) |
Comments |
|
|
1
C_1 |
An item may be referenced by its index number or its character string. |
|
|
17.9000
1-5 7/8 |
A measurement can be expressed as the stored decimal value or the dimensioned value. |
|
|
6
Wide Flange |
An item may be referenced by its index number or its character string. |
Searches using Find Source Item :
|
|
|
Find Source Item |
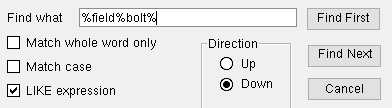
Find what: Defines the string of characters to be searched for in the Source list. An SQL expression may be entered to this field if the box is checked for " LIKE expression ."
Match whole word only: When this box is checked (
), you can enter a partial word. Example: " wei " finds " Weight_Per_Foot ."
Match case: When this box is checked (
LIKE expression: When checked (
Direction: Up or Down . Sets the direction of the search that is done when the " Find Next " button is pressed.
"Find First": Press this button to find (select/highlight) the first data source field in the Source list that matches the string that is entered to the " Find what " field.
"Find Next": Press this button to find (select/highlight) the next data source field in the Source list beginning from the location of the source field that is currently selected. Report Writer searches in the " Direction " that is set (' Up ' or ' Down ').
"Cancel": Press this button to close this window.
Tip: Before you press " Cancel ," you can double-click source fields to copy them to the Selected Items list.
| Data | Selection | Sort and Group | Destination | Page Setup | Layout |
Click an icon for information about it from the Selection menu.
 |
Select: None or Member numbers ( special capabilities ) or Piecemarks or Submaterials or Erection views or Detail sheets or Gather sheets or Erection sheets . The selection made here sets the type of files listed on the selection dialog that appears when you press the " Export " " Generate " or " Export " button to output the report. This also applies when you do a Run Report Writer Report and select this report. Note that ' Member numbers ' has special capabilities.
|
|
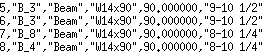
A selection dialog like this one opens when " Select " is set to ' Piecemarks ' for this report. |
' None ' means no selection dialog will appear when you press the " Export " " Generate " or " Export " button to output the report. Data from the entire model is output to the report if no " Item selection expression " has been entered. The " Item selection expression " defines the set of items from your current Job that will be included in the report. Examples: Take a look at ShopBoltSummary or PlateReportByHoleSize in the reports/SDS2 folder. Both of these reports have ' None ' selected and an " Item selection expression " entered. The ShopBolt Summary outputs data for all shop bolts. The PlateReportByHoleSize outputs data for all plates with holes that are not dummy material or submaterials of existing members.
' Member numbers ' lets you select by member number the members you want to include in the report. This option is disabled (grayed out) when the " Data source " is 'BOM'. Special capabilities: If you create a report that selects on ' Member numbers ', you can select members in the model, then run the report using Run Report Writer Report or by pressing a launcher icon . The report will output data on the selected members. This only works when ' Member numbers ' is selected -- it does not work when ' Piecemarks ' is selected.
' Piecemarks ' lets you select by member piecemark the members you want included in the report. Example: You choose this option and your report outputs submaterial marks . The report lists each submaterial mark for each member that you select.
' Submaterials ' lets you select items that you want to be included in the report by their submaterial piecemark.
' Erection views ' lets you select by erection view name. Members, submaterials, bolts and holes that are shown on the erection view can be output to the report.
' Detail sheets ' lets you select by detail sheet name. Data on members placed on the detail sheets that you select will be included on the report.
' Gather sheets ' lets you select by gather sheet name. Data on submaterials placed on the gather sheets that you select will be included on the report.
' Erection sheets ' lets you select by erection sheet name. Members, submaterials, bolts and holes that are shown on the erection view that is on the sheet can be output to the report.
Use hide: ![]() or
or ![]() . This applies to items of the type selected above .
. This applies to items of the type selected above .
If this box is checked (
If the box is not checked (
Icons or the menu: Click here for more information.
The " Item selection expression " area is actually an entry field. You can use it to enter logical expressions that define the set of items from your current Job that you want included in the report. See the Selection menu for examples.
| Data | Selection | Sort and Group | Destination | Page Setup | Layout |
| These options set the order in which data is compiled into individual columns in the report (ascending or descending). To set the arrangement (left to right) of report columns or of report sections, see the Layout tab. |
|
||||
| Tips: Copy only those items from the Selected Items list that you want to group or to sort in a particular way. Also, you can double-click on items in the Selected Items list to copy them to the Sort Items list. |
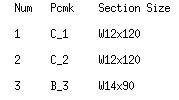
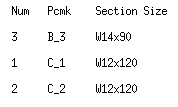
Items in the Sort Items list can be set to (ascending) or (descending):
| alphanumeric | numeric | |
|
ascending
|
B_6
B_7 C_1 C_2 |
4
5 6 7 |
|
descending
|
C_2
C_1 B_7 B_6 |
7
6 5 4 |
| Report Writer Setting | Actual Report Output |
|
The report at right is set to be sorted (ascending) by member number. |
 |
| Report Writer Setting | Actual Report Output |
|
The report at right is set to be sorted (ascending) by piecemark. |
 |
An item in " Sort Items " can be grouped or not grouped:
To group a " Sort Item " . . . 

1 . Select a "Sort Item." 2 . Press the button.> 3 . The item is grouped. 4 . Group_Header_xxx and Group_Footer_xxx sections (folders) appear under the Layout tab. Data source fields that you want grouped should be placed into one of these folders -- see " Item expression ."
To ungroup a " Sort Item " . . . 


1 . Select a "Sort Item." 2 . Press the button. 3 . The item is ungrouped 4 . The Group_Header_xxx and Group_Footer_xxx sections associated with the previously grouped item are deleted. Any data source fields placed in section items in those sections are also deleted.
| Data | Selection | Sort and Group | Destination | Page Setup | Layout |
| To ensure that a report is up to date, you may need to Process and Create Solids , then Update the ABM, then auto detail members and submaterials. To get ABM data in the model that Report Writer can read, choose Modeling > Reports > Advanced Bill of Material > 'New ." |
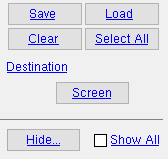
Export selection type: None or Delimited or SYLK or Excel(Version2.1) . See how to export a selection report .
' None ' prevents output of an export selection type file when you Run Report Writer Report .
' Delimited ' outputs a character-delimited file that can be imported by common database or spread sheet programs. The fields for " Field delimiting character " and " String delimiting character " become active. The database or spreadsheet program that imports the file may require that the file has a .csv or .txt extension. Change the extension to .txt if the importing program does not properly parse fractions in the .csv file.
The Microsoft ' SYLK ' (Symbolic Link) format is commonly used for the interchange of spreadsheet data between applications such as Microsoft Multiplan and Excel. Comprised of only ASCII characters, it is easily processed by other applications, such as databases. SYLK files normally have a .slk extension.
The ' Excel ' export may be used to import data into the Microsoft Excel v2.1 program and into newer-version Excel programs that are backwards compatible with v2.1. Excel files normally have a .xls extension.

. " xxx " is " File " or " Screen " or " Printer " -- it specifies the default destination and opens the Output Configuration window so that you can change that destination. Press the " Export " button to export data to the specified destination.
Formatted report type: None or FreeFormat . You need to fill out " Page Setup " and " Layout " information before you can output this type of report. See how to generate a FreeFormat report .
' None ' prevents output of a file of this type when you Run Report Writer Report .
' FreeFormat ' outputs a formatted report when press the " Generate " button. The Page Setup and Layout tabs set how the report is formatted. Also, you can output this report using Run Report Writer Report .

Export report type: None or HTML Table or HTML Absolute or Delimited or SYLK or Excel(Version2.1) . You need to fill out " Page Setup " and " Layout " information before you can export a report. A choice other than ' None ' must be selected in order to, on this window, " Export " a report to a file. A choice other than ' None ' must be selected in order to, in Modeling or the Drawing Editor , Reports > Run Report Writer Report to generate an export file in one of the following formats. ' None ' provides special capablilities for Export Report Writer Report .
' None ' instructs Report > Export Report Writer Report to apply the choice made to User and Site Options > Output > " Report writer export report type (per user) ." If that option is set to ' None ', then the export format is the choice made to User and Site Options > Site > " Report writer export report type ." If all three of these options are set to ' None ', then Export Report Writer Report outputs a CSV file.
' HTML Table ' outputs a report in the form of an HTML table. When you resize the browser window used to view the table, each cell in the table expands or contracts to maintain relative column widths. To be properly read by a web browser, the file should be given a .htm or .html extension.
' HTML Absolute ' outputs data fields and headers that closely match what you would see in a ' FreeFormat ' report. To be properly read by a web browser, the file should be given a .htm or .html extension.
' Delimited ' outputs the same data and headers that appear in a ' FreeFormat ' report. Each line in the ' FreeFormat ' report appears on a distinct line in the export file. The number and spacing of " Export report columns " should relate to the number and spacing of items in the ' FreeFormat ' report if you want each item in the export file to be delimited by the " Export field delimiting character ." The database or spreadsheet program that imports the file may require that the file has a .csv or .txt extension. Change the extension to .txt if the importing program does not properly parse fractions in the .csv file.
' SYLK ' outputs a report in the Micorsoft SYLK (Symbolic Link) format, which is used for interchange of spreadsheet data between applications such as Microsoft Multiplan and Excel. SYLK files normally have a .slk extension.
' Excel ' outputs a report that can be loaded into the Microsoft Excel v2.1 program and into newer-version Excel programs that are backwards compatible with v2.1. Excel files normally have a .xls extension.
Export field delimiting character: A text string of to 10 characters may be entered to separate fields in the exported file. Spaces are not allowed before, after or between characters. A comma ( , ) is the default " Export field delimiting character " since many spread sheet and database programs are able to recognize comma-delimited data files.
|
| Comma-delimited output that tells the member number, piecemark, member type, weight/ft and length of selected members. |
Export string delimiting character: A text string of to 10 characters may be entered to separate strings in the exported file. A double quote ( " ) is the default " String delimiting character " since placing strings in quotes is the standard convention used by many programming languages. For most exports, do not enter spaces or leave this field blank or use the " Export field delimiting character "; spaces or no characters should be used only for the special case where quoted strings are not permitted by the importing program.
|
|
| "Beam" is a string in this example. Numerical values are not placed in quotes. |
Keep paging on report exports: ![]() or
or ![]() . This applies when you export a ' FreeFormat ' report as a file in the ' HTML Table ' or ' HTML Absolute ' or ' Delimited ' or ' SYLK ' or ' Excel(Version2.1) ' format. In a ' FreeFormat ' report, the paging is set by the " Vertical size " and, for example, when NEWPAGE() or " Keep together " is used.
. This applies when you export a ' FreeFormat ' report as a file in the ' HTML Table ' or ' HTML Absolute ' or ' Delimited ' or ' SYLK ' or ' Excel(Version2.1) ' format. In a ' FreeFormat ' report, the paging is set by the " Vertical size " and, for example, when NEWPAGE() or " Keep together " is used.
If this box is checked (
When the box is not checked (
Export report columns: This applies when the " Export report type " is ' HTML Table ', ' Delimited ', ' SYLK ' or ' Excel(Version 2) '. It sets the number of columns and their location in the spreadsheet program that will be importing the report.
| Col# | Start Left |
| 1 | 0 |
| 2 | 18 |
| 3 | 36 |
| 4 | 54 |
Col #: read-only . A entry should be made to " Start Left " for each column that you want to appear in Microsoft Excel or another program when this report is imported. For a report exported using the settings shown above, the spreadsheet will show four columns.
Start Left: Enter the distance from the left margin (in the layout units set below ) where you want each column to begin. For a report exported using the settings shown above, the first column of the spreadsheet will begin at the " Left margin ," the second column begins 18 units to the right of the " Left margin ," and so on ...
| Data | Selection | Sort and Group | Destination | Page Setup | Layout |
| Options under this tab let you define the margins for a ' FreeFormat ' report or any of the various export reports. See how to generate a FreeFormat report and to output an export report . |
------ Page ------
Layout unit of measurement (UOM): Character (font pitch and line spacing) or Inch or Centimeter (10 millimeters) or Millimeter or Pica (traditional units for American printers) or Point (1/12 of a pica).
| characters *
(char x lines) |
inches
(horz x vert) |
centimeters
(horz x vert) |
pica
(horz x vert) |
| 85 x 66 | 8.5 x 11 | 21.59 x 27.94 | 51 x 66 |
| 85 x 84 | 8.5 x 14 | 21.59 x 35.56 | 51 x 84 |
| 110 x 102 | 11 x 17 | 27.94 x 43.18 | 66 x 102 |
| * for a 10-pitch font with 6 lines per inch. | |||
' Character ' sets horizontal spacing to be measured as the font pitch (e.g., 10 pitch = 10 characters per inch; 12 pitch = 12 characters per inch) and vertical spacing to be measured as line spacing (e.g., 6 lines per inch). Be sure to set your printer to use a fixed-pitch font (a non-proportional font). Positioning with characters begin with ' 1 ' -- not ' 0 ' as with other units of measurement. Measurements with characters begin with ' 0 ' just like other units of measurement. Positioning applies to " Top " and " Left " under Section and to " Top " and " Left " under Item . All entries under this tab ( Page Layout ) are measurements that begin at ' 0 '.
' Inch ' or ' Centimeter ' or ' Millimeter ' or ' Pica ' set both horizontal and vertical spacing to be measured in the selected unit. Both measurements and positioning for any of these units begin with 0 -- not 1 for positioning as when ' Character ' is the " Layout unit of measurement ."
Vertical size: The length of the paper (in the layout units ) that the report will be printed on.
Example: Suppose the " Layout unit of measurement " is ' Character '. For six-lines-per-inch spacing, this is 6 times the number of inches that the paper is long. For 8 1/2 x 11 inch paper , enter '66' as the " Vertical size ."
Horizontal size: The width of the paper (in the layout units ) that the report will be printed on.
Example: Suppose the " Layout unit of measurement " is ' Character '. For a 10-pitch font, this is 10 times the number of inches that the paper is wide. For 8 1/2 x 11 inch paper , enter '85' as the " Horizontal size ."
Top margin: The distance (in the layout units ) that you want the top edge of the printable area on the paper to be from the first printed line on the report.
Example 1: On a typical laser printer, a 1/2-inch margin is automatically set at the top of each page -- enter ' 0 ' if this is all the margin you want.
Example 2: Same as example 1, but you want a 1-inch margin from the top of the page. If the " Layout unit of measurement " is ' Character ' for a printer that uses a fixed-pitch font with 6 lines per inch, an entry of ' 3 ' as the " Top margin " adds 1/2 inch to the 1/2-inch margin that is automatically provided, thus giving you a total top margin of 1 inch.
Also see: The first printed line on a page might, for example, be the "
Bottom margin: The distance (in the layout units ) from the last line of text on the page to the bottom edge of the paper.
Left margin: The distance (in the layout units ) from the left edge of the printable area on the paper to the first character of text.
Example 1: On a typical laser printer, a 1/4-inch left margin is automatically set on each page -- if this is all the left margin you want, you would enter ' 0 ' here.
Example 2: Same as example 1, but you want a 3/4-inch left margin. If the " Layout unit of measurement " is ' Character ' for a printer that uses a 10-pitch font, an entry of ' 5 ' as the " Left margin " adds a 1/2-inch margin to the 1/4-inch margin that is automatically provided, thus resulting in a total top margin of 3/4 inch.
Right margin: The distance (in the layout units ) from the last character in a line to the right edge of the paper.
| Data | Selection | Sort and Group | Destination | Page Setup | Layout |
Options under this tab let you define the content and layout for a ' FreeFormat ' report or an export report. See how to generate a FreeFormat report and to output an export report . Click an icon for information about it from the Layout menu.
 |
------ Section items ------
Buttons for adding or deleting section items :
| To add a new section item . . . | ||
|
|
|
|
| 1 . Select a section. | 2 . Press the button. | 3 . The new item appears. |
| 4 . Under the Item tab, change its name, make entries to " Item expression ", or etc. | ||
| To delete an existing section item . . . | ||
|
|
|
|
| 1 . Select a section item. | 2 . Press the button. | 3 . The item is deleted. |
| Warning: Entries made to " Item expression " for a section item are deleted when the section item is deleted. | ||
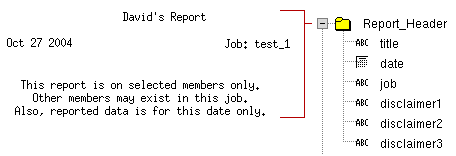
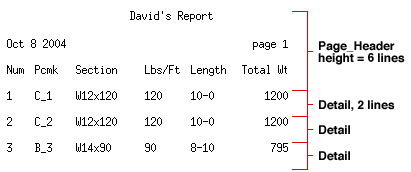
This report's title is "David's Report." The string "David's Report" is entered to the " Item expression " field for the item named title in the Report_Header section. The date ($date) is entered to the " Item expression " field for the date item and is printed to line 3 of the Report_Header section.
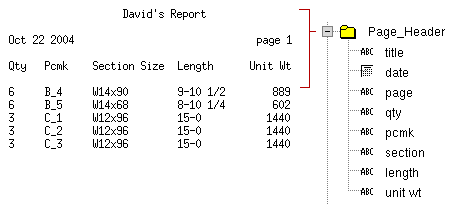
The column heads on this report come from the strings "Qty" "Pcmk" "Section Size" "Length" and "Unit Wt" entered to the " Item expression " field for the items named qty, pcmk, etc. These items appear on line 5 of the Page_Header section. The date ($date) is entered as a date on line 3 of the section. The page ("page "+$page) is entered as a string.
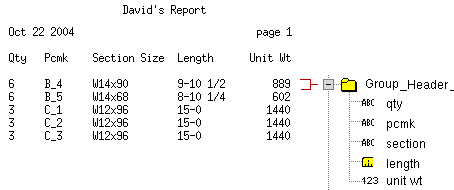
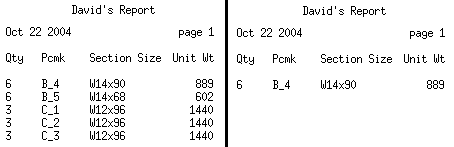
The data in this report comes from data source fields entered to the " Item expression " field for each item in the Group_Header_for_Piecemark_of_Member section.
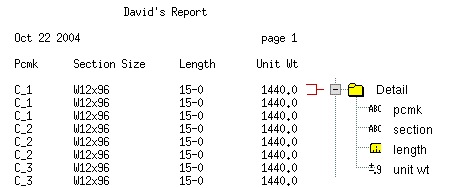
Compare this report with the report shown above . For this report, a data source is entered to the " Item expression " field for each item in the " Detail " section. For that other report, data is grouped by piecemark, and all members with the same piecemark are listed on the same line. This report lists each member on a separate line.
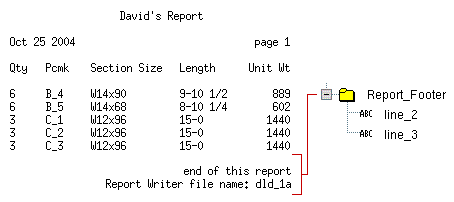
The string "end of this report" is entered to the " Item expression " field for the line 2 item of the Report_Footer section. The string " Report Writer file name: dld_1a" is entered to the " Item expression " field for the line 3 item of the Report_Footer section.
Tip: A blank numerical-entry field under this tab instructs the Report Writer to use the default. If all numerical-entry fields in a tab are blank, the section does not appear on a report. Section name: read-only . This tells you the name of the section that is selected in the " Section items " tree. Other fields under this tab apply to the section named here.
Example: Since the Page_Header section is selected in this example, ' Page_Header ' is the entry made to the " Section name " field.
To create a new section: " Group " an item in the Sort items list under the Sort and Group tab.
Keep together:
Suppress blank section:
Top: 0 or the distance in the layout units that you want this section to be from the " Top margin " set under the Page Layout tab. If ' Characters ' is the " Layout unit of measurement ', 1 or the number of lines greater than 1 (a counting number) are your choices. ' Character ' is used in the following example:
Left example: ' 1 ' line is entered to " Top " field in the " Detail " section (which has the data fields). Right example: ' 7 ' lines is entered to the " Top " field for the same section. Data is output to separate pages. Left: 0 or the distance in the layout units that you want this section to be indented from the " Left margin ." If ' Character ' is the " Layout unit of measurement ," 1 or the number of characters greater than 1 (a counting number) are your choices.
Tip: Leave this field blank or enter ' 0 ' (' 1 ' for ' Character ' as the " Layout unit of measurement ") if you want to align this section with the left margin.
Width: Blank or the distance (in the layout units ) that you want this section to be wide.
Blank uses all of the available space between the left and right margins .
Validation: The Report Writer does not let you enter a distance that is greater than the space between the left and right margins .
Height: Blank or the distance (in the layout units ) that you want this section to be high. ' Character ' is the " Layout unit of measurement " used in the following example:
For the Detail section in this example, a " Height " of ' 2 ' lines was entered. Since " Top " was left blank, the Detail section is repeated on this first page instead of being printed once on this page, then once on the next page, and so on. Action before: Lets you enter expressions that are interpreted before Report Writer reads in section data.
Example: Open the BillReportOfdetails report that is found in the reports/SDS2 folder. NEWPAGE() and SET(page_no, 0) are used in " Action before " of the Group_Header_for_Piecemark_of_BillOfMaterial section to cause the BillReportOfdetails to output each selected piecemark as a separate report.
Action after: Lets you enter expressions that are interpreted after Report Writer is done reading in section data.
Tip: Pressing the default button ( ) for numerical-entry fields under this tab applies the Report Writer default.
Item name: The name (one word -- spaces not allowed) of the item that is selected in the Section items tree. Other fields on this tab apply only to the item with this name. Do not use the same name twice in the same section.
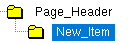
Example: The " Item name " of the currently selected item shown in this example is "New_Item." If you were to enter a different name here then press Tab to go to the next field, the new name would then appear in the Section items tree.
No effect on report: The " Item name " does not affect the output on the report. The name is used for reference within the Report Writer.
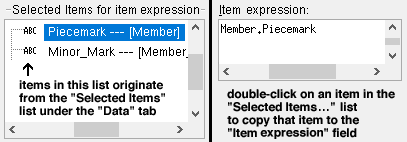
Item expression: Either select an item from the " Selected item for item expression " list (see the illustration below), or type in a string ( "David's Report" ) or special character ( $page or $date ) or write out a formula ( "_" * 64 ). See the Layout menu for examples.
Tip: You can use functions or mathematical symbols on the Layout menu to write formulas to the Item expression field. Type: Boolean or Date or Dimension or Decimal number or Number or String or Diameter or Thickness or Area (square feet or square meters) or Volume (cubic feet or cubic meters). Selecting the correct " Type " helps to ensure that the report correctly outputs data in the desired form. Following are some examples:
| " Type " | " Item expression " | Delimited
Output * |
FreeFormat
Output |
| ' Boolean ' |
|
Yes (or No) | Yes (or No) |
| ' Date ' | Member.DateErected
$date |
"Jan 9 2009"
N/A |
Jan 9 2009
Jan 9 2009 |
| ' Dimension ' |
|
171.0000
"14-3" |
14-3
14-3 |
| ' Decimal number ' |
|
14.5 | 14.5 |
| ' Number ' | xxx.QuantityOnDetail
$page |
3
N/A |
3
14 |
| ' String ' | Member.Piecemark
"Page " + $page |
"B_15"
N/A |
B_15
Page 14 |
| ' Diameter ' | xxx.Diameter
xxx.BoltDiameter |
0.8125
0.7500 |
13/16
3/4 |
| ' Thickness ' | xxx . Thickness | 0.7500 | 3/4 |
| ' Area ' | xxx.SurfaceArea | "3" |
2.8607
( DP = 4) |
| ' Volume ' | Thickness * SurfaceArea | N/A |
0.1788
( DP = 4) |
| * Delimited output is generated by choosing ' Delimited ' for " Export selection type " then pressing the " Export " button. The " Export string delimiting character " is " in these examples. Thickness * SurfaceArea can be calculated manually by dividing the thickness (inches) by 12 to get feet then multiplying by the area (square feet) to get cubic feet. For metric units, you need to divide the thickness (mm) by a 1000 to get meters then multiply by area (square meters) to get cubic meters. | |||
| Troubleshooting tip: If the output for a particular " Item expression " is unintelligible or blank, try selecting a different " Type " of output. |
Top: The distance (in the layout units ) from the " Top " of the section that you want this item to be printed on. The default (
If ' Inch ' or ' Pica ' or ' Centimeter ' or etc. is the " Layout unit of measurement " : ' 0 ' places the item at the " Top " of the section. ' 1.25 ' places the item 1.25 layout units below the top of the section.
If ' Characters ' is the " Layout unit of measurement " : ' 1 ' is the " Top " of the section, ' 2 ' is the second line of the section. For following illustration, ' 2 ' is a blank line used for spacing. In the same illustration, line ' 3 ' of the Page_Header section is the line that the column headers (Num, Pcmk, etc.) appear on.
The " Height " of the Report_Header section is ' 6 ' lines. The " Height " of the Detail section is ' 2 ' lines. The Detail section is repeated down the page. Left: The distance (in the layout units ) from the " Left " of the section that you want this item to be printed on. The default (
In this example, characters of 1, 7, 14, etc. are entered to " Left " for the same line of text in the same section. No extra spacing is provided between items. Width: The distance (in the layout units ) that you want to designate as the space into which this item is printed. The default (
In this example, widths of 6, 7, 14 etc. are entered for the same line of text in the same section. Height: The distance (in the layout units ) that you want this text block to be high. The default (
Decimal precision: The number of places past the decimal point that you want numbers to be printed out to. The default (
Precision Example ' 0 ' 98 ' 1 ' 98.0 ' 4 ' 98.0000 Justification: Left or Right or Center .
L = left justified. C = centered. R = right justified. ' Left ' outputs data that is left justified with respect to the " Width " that is set for that item.
' Right ' outputs data that is right justified with respect to the " Width " that is set for that item.
' Center ' causes the item's output data in the report to be centered with respect to the " Width " that is set for that item.
![]()
![]()
![]()
![]()
"OK" closes the Report Writer . If you have made changes since opening the Report Writer, the following happens:
1 . The SDS2 Report Writer dialog opens. On it is the message " The current report has changed. " The dialog has three (or four) buttons you can press in response to the message.
Alternative 1 : Press the " Save " button if you want to save to the current Report Writer file all of the changes you have made. Go to step 3.
Alternative 2 : Press the " Save As" button if you want to save the changes you have made to the Report Writer file under a new name. Go to step 2.
Alternative 3 : Press the " Ignore " button if you want to close the Report Writer without saving any of its settings to the currently loaded file. Go to step 3.
Alternative 4 : Press the " Cancel " button if you want to keep Report Writer open after all. Do not continue.
2 . Skip this step if you did alternative 1 or alternative 3. In the Save As dialog:
Alternative 1 : Enter the " File name " that you want, then press the " Save " button. Go to step 3.
Alternative 2 : Press the " Cancel " button to dismiss the dialog box without saving. Go to step 3.
3 . The Report Writer closes.
"Cancel" closes the Report Writer .
Warning: If you have made changes to the currently loaded file (named in this window's title ), those changes are lost when you press " Cancel ."
"Reset" reloads the file shown as this window's title . If that file is " Untitled ," all user-modified fields revert to their default settings.
"Generate" does the same thing as the " Generate " button under the Destination tab.

