 PDF Submittal
Tool summary :
- Exports sheets and submittal cover sheets to PDF files and provides convenient cloud-based hosting for them. On the Submittal window, you choose the sheets and provide project and contact information.
- The tool hosts files on Bluebeam Studio, a secure cloud-based subscription service that you access with your Bluebeam ID. Furthermore, a Bluebeam Revu license is required to upload files. Visit Bluebeam and search for "Studio Prime" and "Revu" for more information.
- Optionally, you can write the PDF files that are output to directory on (or accessible from) your workstation.
- PDF Submittal can be launched by clicking an icon, by keyboard shortcut, or via the context menu. You can find it in the group called ' interface '. For the lightning interface, use Customize Interface to configure the ribbon.

PDF Submittal
|
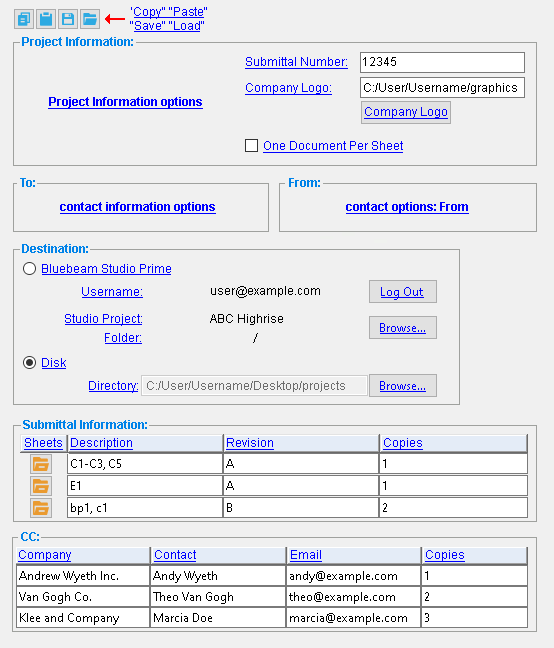
| The Submittal window provides information for the transmital cover, and selects sheets to be exported and a Destination for those sheets. |
Also see :
Toolbox (a list of Toolbox tools)
![]()
"Copy" "Paste" "Save" "Load" buttons :
- You'll find buttons like these at the top of each section in this window. They apply to all user-editable settings that are on that section. Click here for more information.
- You can " Copy " (
 ) the settings from each section on this window, then " Paste " (
  ) those back to that section later.
- " Save " (
 ) saves a "form" file to the form/bluebeam folder that is used by your current version of this program. Give the form a name that will help other users identify its purpose.
- "Load" (
 ) copies over all settings in the section on this window from which the form file was saved with the settings that are stored in the file that you select. Exception: Although loading a form will update the Destination , it won't update the " Studio Project " or the " Folder " when the destination is " Bluebeam Studio Prime ." Furthmore, " Sheet " selections are not stored in the form.
Step-by-step instructions
- Before creating a PDF submittal:
- Be sure that you have generated sheets for your project, and that it is otherwise ready to submit for approval.
- (optional): If the project is to be hosted on Bluebeam Studio, also be sure that you have…
- a Bluebeam Revu license.
- a Bluebeam ID for use with a Studio Prime account.
- permissions in Bluebeam Gateway to, for example, upload drawings.
- Open the Submittal window.
- Method 1: Home > Export > PDF Submittal
- Method 2, 3 or 4: Click the icon pictured above, or use a keyboard shortcut. If you have added PDF Submittal to the context menu, you can right-click and choose PDF Submittal on the context menu.
- On the Submittal window, do the following:
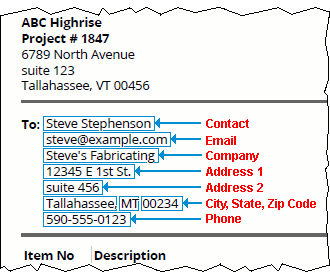
- Enter To: , From: , and Project Information that you want to appear on the PDF submittal cover sheet. This includes the " Project Name, " the recipient's " Company ," and similar information.
- (optional): Check or uncheck the box for " One Document Per Sheet " depending on whether you want the cover and all of the drawing sheets combined into a single file.
- Under the Submittal Information section, select " Sheets " (
 ) to include in the submittal.
- Enter other submittal information that you want to appear on the cover sheet. If " Autofill description " was checked (x) when you selected sheets in step 3c, a " Description " may already be entered. You may enter another description, if you like.a
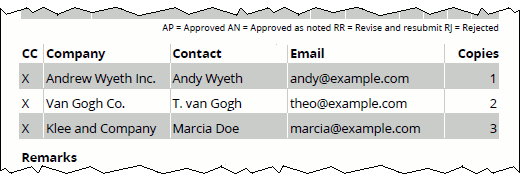
- Enter the CC: information that you want to appear on the cover sheet.
- (optional). Click the " Save " button ( ) to save the settings you have entered to a "form" file. This is recommended because of the great number of user-entered settings on this window, and the usefulness of reusing them for later submittals
- While still in on the Submittal window, select a Destination for the to-be-output PDF files.
- Option 1: Select " Bluebeam Studio Prime " to send the to-be-output PDF files to Bluebeam Studio Prime, then click " Browse " to choose an existing Bluebeam project or create a new one to upload to. Doing so logs you in to Bluebeam Studio if you are not already. (See Logging in to Bluebeam Studio ). The Bluebeam Upload Destination window opens. Select a " Studio Project " and a " Folder ," then click " OK " on that window.
- Option 2: Select " Disk " to write the to-be-output PDF files to a directory on (or accessible from) your local workstation. Select that directory by typing in the file path (if you know it), or pressing the " Browse… " button to browse for a folder.
- Press the "OK" button on the bottom of the window. Depending on which Destination you chose, this uploads the submittal to Bluebeam Studio, or writes PDF files to a local directory.
------ Project Information ------
|
| Project information that you enter on the Submittal window appears at the top of the submittal cover sheet. |
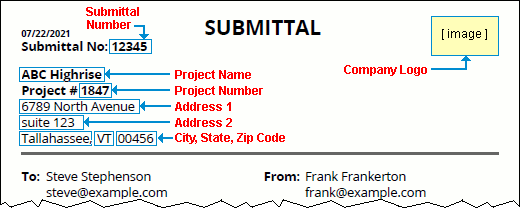
Submittal Number: A number that...
- appears at the top of the submittal cover sheet.
- appears in the PDF file as the name of the first-level bookmark for the submittal cover sheet.
Company Logo: A file path . Specifically, this is the location of an image file (JPEG, PNG, or TIFF). The image you choose will appear on the submittal cover sheet. Type in the file path (if you know it), or press the " Company Logo " button to browse for the file location.
If this box is checked (
), the detail, gather, and erection sheets and the submittal cover are output to the same file. The file is named for the " Submittal Number " and is given a .pdf extension.
If this box is not checked (
), each sheet is output to a separate PDF file. Sheet files are given the sheet name and a .pdf extension, while the cover sheet is named for the " Submittal Number ."
------ To: ------
|
" To: " heading settings that you enter on the Submittal window appear at the top of the submittal cover sheet. |
------ From: ------

|
" From " heading settings that you enter on the Submittal window appear at the top of the submittal cover sheet. |
------ Destination ------
Select one of the following destinations:
'
Bluebeam Studio Prime ' sends PDF files that you output to Bluebeam Studio Prime, a secure cloud-based subscription service.
Also see: Logging in to Bluebeam Studio Prime .
'
Directory: A file path . Specifically, a directory that is on your workstation, or accessible from it. This is enabled when " Destination " is " Disk. " Type in the file path (if you know it), or press the " Browse… " button to browse for a folder in which to save the to-be-created PDF files.
Note: Loading a form will change the choice of Destination , but it won't change the " Studio Project " or the " Folder " when the destination is " Bluebeam Studio Prime ."
------ Submittal Information ------

|
| The information table on the submittal cover sheet. |
Sheets: Pressing the "file cabinet" browse button ( ![]() ) opens the Select Sheets selection dialog. Use that dialog to select sheets in your project that you want to output to PDF files. Selecting sheets here behaves similarly to other SDS2 selection dialogs. If " One Document Per Sheet " is unchecked (
) opens the Select Sheets selection dialog. Use that dialog to select sheets in your project that you want to output to PDF files. Selecting sheets here behaves similarly to other SDS2 selection dialogs. If " One Document Per Sheet " is unchecked ( ![]() ), each selected sheet appears in the output PDF file as a third-level bookmark, just under the submittal cover sheet's bookmark.
), each selected sheet appears in the output PDF file as a third-level bookmark, just under the submittal cover sheet's bookmark.
The Select Sheets window :
If this box is checked (
If this box is not checked (
Reverse plot order: This applies when " ![]() One Document Per Sheet " is not checked.
One Document Per Sheet " is not checked.
If this box is checked (
If this box is not checked (
Select :
Note: You can simultaneously print detail sheets and/or gather sheets and/or erection sheets.
If this box is checked (
If this box is not checked (
If this box is checked (
If this box is not checked (
If this box is checked (
If this box is not checked (
Description: A string . This will be added automatically when you select sheets if " ![]() Autofill description " is checked. This is the description that…
Autofill description " is checked. This is the description that…
- appears on the submittal cover sheet in the "Description" column.
- appears in the PDF file as the name of a second-level bookmark under the submittal cover sheet bookmark.
Tip: Don't save a list of sheets as a description when saving " Submittal " settings to a form file. Because form files don't save sheet selections, loading the file will populate the description with a list of sheets even before you have selected any. This makes it appear that sheets have been already chosen when none have.
Revision: A string . This is the revision (letter or number) that appears on the submittal cover sheet in the "Rev" column.
Copies: A number . This is the number that appears on the submittal cover sheet in the "Copies" column.
Note: Changing the entry to " Copies " doesn't change the number of files that are output.
------ CC: ------
|
| The CC: table on the submittal cover sheet. |
Company: A string . This is the company name that appears on the submittal cover sheet in the "Company" column.
Contact: A string . This is the contact name that appears on the submittal cover sheet in the "Contact" column.
Email: A string . This is the email address that appears on the submittal cover sheet in the "Email" column.
Copies: A number . This is the number that appears on the submittal cover sheet in the "Copies" column.
Note: Changing the entry to " Copies " doesn't change the number of files that are output.
Logging in to Bluebeam Studio
-
Select " Bluebeam Studio Prime " as your Destination .
- Log in to Bluebeam Studio with your Bluebeam ID, if you are not logged in already, by clicking the " Log in " button or by clicking the " Browse… " button. Your ID is then reported as the " Username " on the Submittal " window.
Note: If, for some reason, you are logged in with the wrong ID, or you would like to log out, you can press the " Log Out " button.
- Your default web browser opens a webpage asking you allow SDS2 to access and modify data in your Studio Prime account.
Alternative 1: Click " Allow " to allow SDS2 to make changes. Another page opens in your browser to confirm your choice. Your Bluebeam ID is reported as your " Username ." Close that page. Return to the " Submittal " window or, if you clicked " Browse… ," Select a Bluebeam destination .
Alternative 2: Click " Deny " to disallow SDS2 from uploading files. A page opens in your browser to confirm your choice. Close that page and return to the " Submittal " window. You may instead choose " Disk " as your " Destination " and " Browse… " for a " Directory ." Otherwise, do not continue.
An alternative to logging in to Bluebeam Studio: Select " Disk " to write the to-be-output PDF files to a directory on (or accessible from) your local workstation.
Options on the Bluebeam Upload Destination window
------ Bluebeam destination ------
The destination tree lists Bluebeam projects that are already stored at Bluebeam Studio. If the tree is empty, there are no projects. In that case, you can create one by entering a " Studio Project " name and clicking the " New Studio Project "
|
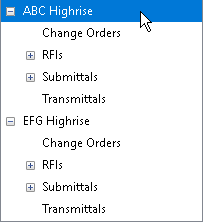
Example 1: Selecting the Studio project named "ABC Highrise" selects that project and the root folder of that project. When you press " OK " on this window, the Submittal window reports "ABC Highline" as the " Studio Project " and the root directory ("//") as the " Folder " of that project. } |
|
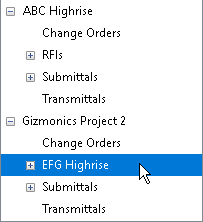
Example 2: Selecting a subfolder under a Studio project selects "EFG Highrise" and the "RFI" folder. When you press " OK " on this window, the Submittal window reports "RFI" as the " Folder " of that project, and "EFG Highrise" – the project the folder is under – as the " Studio Project ." |
------ New Studio Project ------
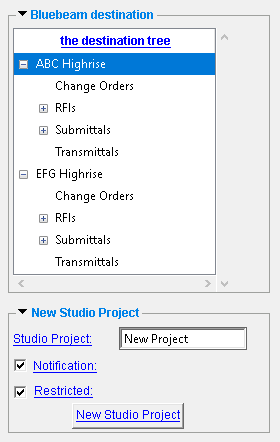
|
Enter a " Studio Project " to add it to the Bluebeam Studio destination tree. |
Studio Project: A name for a project that you want to create at Bluebeam Studio. The name you enter here will appear in the destination tree, when you click " New Studio Project ."
Documentation in progress for the following options:
Notification: ![]() or
or ![]() .. Sends a notification to the administrator of the Studio Prime account that a new project has been created. If there is no " Studio Project " name entered, this options is disabled (grayed out).
.. Sends a notification to the administrator of the Studio Prime account that a new project has been created. If there is no " Studio Project " name entered, this options is disabled (grayed out).
Restricted: ![]() or
or ![]() . Restricts access to the to-be-created Studio Prime account. If there is no " Studio Project " name entered, this options is disabled (grayed out).
. Restricts access to the to-be-created Studio Prime account. If there is no " Studio Project " name entered, this options is disabled (grayed out).
" New Studio Project " is the button that adds the " Studio Project " whose name you entered to the destination tree.
To close the Submittal window:
"OK" (or the Enter key) closes the Submittal window. A progress bar opens while the submittal cover is generated and while the cover – along with the detail, gather and erection sheets – is uploaded to Bluebeam Studio Prime or is wrote to a directory on a disk.
Possibility 1: You chose " Bluebeam Studio Prime " as your destination and you've previously uploaded the project to the cloud. The Item already exists window may open to warn that a file has already been updated.
Click " Keep Both " to keep both files under different names. An underscore and a number will be appended to the file name. For example, a new "12.pdf" file will be renamed "12_1.pdf" the first time it is re-uploaded, "12_2.pdf" the second time, and so on.
Click " Replace " to replace the previously uploaded file with a new file of the same name.
" Cancel " to close the Item already exists window. The file will not be uploaded.
Should you click either " Keep Both " or " Replace ," checking "
Possibility 2: You chose " Disk " as your destination and you've previously saved the project to the same " Folder ." Files that already exist are automatically renamed by appending an underscore and a number. For example, a new "12.pdf" file will be renamed "12_1.pdf" the first time it is re-saved, "12_2.pdf" the second time, and so on.
"Cancel" closes the Submittal window without saving any changes that you might have made to it. No files will be uploaded or saved.

