 Hole Add ( Drawing Editor )
Tool summary :
Also see :
- Drawing Editor (where you can add a hole)
- Hole Edit (window opens when you Hole Add )
- Comment layer (on most drawings, you must add objects to this type of layer)
- Crane placement drawings (drawing type on which you can add objects to non-comment layers)
- Filled hole pen color ( Fabricator > Detailing > Drawing Presentaton > " Pens " >)
- Holes (topic)
page 1 | contents | objects > holes > | objects -- holes | xxx add | holes | top
 Step-by-step instructions :
The following instructions assume that you are using a 3-button mouse.
1 . Invoke Hole Add using any one (1) of the following methods:
Method 1 : Click the Hole Add icon. The icon can be taken from the group named ' Objects -- Holes ' and placed on a toolbar (classic) or the ribbon (lightning).
Method 2 : If " Drawing Editor layout style " is ' Classic ', you can use the menu system to choose Objects > Holes > Add .
Method 3, 4 or 5 : Hole Add can also be invoked using a keyboard shortcut , the context menu , or a mode . For the ' Lightning ' layout style, configuration of the interface is done using Customize Interface .
Method 6 : With Hole Mode mouse bindings active, middle-click ( Add ).
2 . Locate - Repeat - Return mouse bindings become active along with various Locate options.
Alternative 1 : Select the Locate icon that you want (if it's not pressed already). Place the mouse pointer (
) on screen so the point location target (
) snaps to the location where you want the center of (or one end of) the hole to be, then left-click ( Locate ). Go to step 3.
Alternative 2 : Right-click ( Return ) if you do not want to add any more holes. Do not continue.
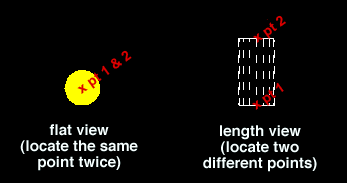
3 . Two points are required to define a hole. Do one (1) of the following:
Alternative 1 : Left-click ( Locate ) at the same point you did in step 2 to get a flat view (top/bottom view).
Alternative 2 : To get a length view of a hole, left-click ( Locate ) when the point location target (
) snaps to a different point than you located in step 2. The length of the hole is determined by the length between the two points.
4 . The Edit Hole window opens.
Alternative 1 : Enter the hole settings that you want, then press the " OK " button at the bottom of the window to cause the hole to appear on screen. Go to step 5.
Alternative 2 : Press the " Cancel " button to end the Hole Add operation without adding this hole. Do not continue.
5 . Locate - Repeat - Return mouse bindings again become active along with various Locate options. Do one of the following:
Alternative 1 : Follow these instructions beginning with step 2 to place additional holes with different settings than the one you just added.
Alternative 2 : Middle-click ( Repeat ) to cause a duplicate of the hole you just added to be placed where the point location target (
) is at. Do this as many times as you like, then right-click ( Return ) and go to step 6.
Alternative 3 : Right-click ( Return ) if you are done adding holes. Go to step 6.
6 . The mouse bindings that were active when you invoked Hole Add become active again.
Note: Any holes added using this procedure can be instantly removed (one at a time, in reverse-order of their addition) by using Undo .
page 1 | contents | objects > holes > | objects -- holes | xxx add | holes | top
