The Controlled Automation Options window
Choices made to this window customize a download file to include or exclude the stencil command or far side marking. Your machine may or may not be capable of interpreting such commands.
To open this window :
1 . On the Computer Numerically Controlled window, confirm that the " CNC type " is ' Contrl Auto Angle ' or ' Contrl Auto Beam ' or ' Contrl Auto Beam 2 '. Then press the " Setup " button to open the CNC Setup window.
Tip : To select a new or existing " CNC configuration ," press the " File " browse button (
) on the Computer Numerically Controlled window.
2 . On the CNC Setup window, press the " Options " button.
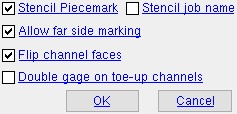
3 . The Controlled Automation Options window opens. Click here for information about the options that appear on this window.
------- Settings -------
Stencil piecemark: ![]() or
or ![]() . This applies when ' Control Auto Angle ' or ' Control Auto Beam ' is the " CNC type "
. This applies when ' Control Auto Angle ' or ' Control Auto Beam ' is the " CNC type "
 |
 |
If this box is checked (
), a command to stencil the piecemark on the material is generated in the download file . The piecemark is the same piecemark for which the download file is named.
If the box is not checked (
), stenciling of the piecemark is not performed.
 |
|
If this box is checked (
If the box is not checked (
Allow far side marking: ![]() or
or ![]() . This applies when ' Control Auto Beam ' is the " CNC type ."
. This applies when ' Control Auto Beam ' is the " CNC type ."
If this box is checked (
If the box is not checked (
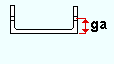
Double gage on toe-up channels: ![]() or
or ![]() . This applies, for example, when the " Toe direction for channels " is set to ' Toe up only '.
. This applies, for example, when the " Toe direction for channels " is set to ' Toe up only '.
 |
 |
If this box is checked (
If the box is not checked (
"OK" (or the Enter key) closes the Controlled Automation Options window. The CNC Setup window again becomes active. Press " OK " on that window to save the choices made on this window to the currently selected " CNC configuration " file in your current Job .
"Cancel" (or the Esc key) closes this window without saving any changes made to it. The CNC Setup window again becomes active.

