The CNC Setup window
| The CNC Setup window sets up the currently selected " CNC configuration " so that it precisely models the CNC machine you will " Download " to or Download Material by Location to or Download Members by Location to or generate a fabrication report for. |
Options:
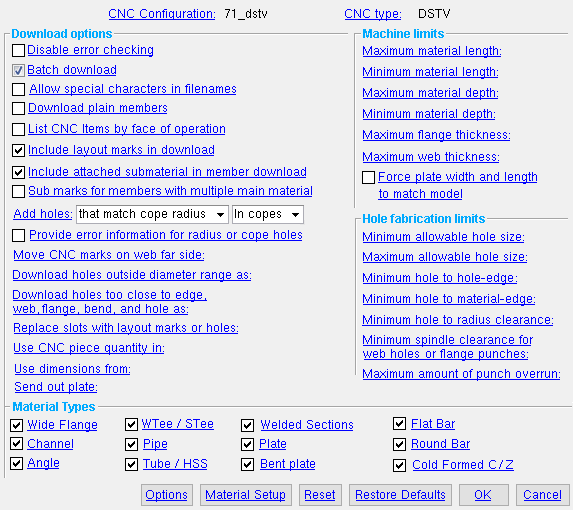
1 . On the SDS2 Computer Numerically Controlled window, press the " Setup " button.
2 . See Read-only information or Download Options or Machine limits or Hole fabrication limits for explanations of the options that appear on this window. You can get to additional setup options by pressing the " Options " and " Material Setup " buttons.
CNC contents | CNC main menu | top
CNC configuration: read-only . This tells you the CNC configuration that this window provides setup options for. See " CNC configuration " on the Computer Numerically Controlled window for more information.
CNC type: read-only . The type shown here determines the setup window that opens when you press the " Options " button. " CNC type " on the Computer Numerically Controlled window can be used to change the type shown here.
CNC contents | CNC main menu | top
------ Download options ------
| Generally speaking: These options let you control information that is included in the download file . |
Disable error checking: ![]() or
or ![]() . This applies when you press the " Download " button on the Computer Numerically Controlled window or, in Modeling , when you Download Material by Location or Download Members by Location .
. This applies when you press the " Download " button on the Computer Numerically Controlled window or, in Modeling , when you Download Material by Location or Download Members by Location .
If this box is checked (
), verification does not take place. Instead of getting an error message for selected materials that exceed setup limits (such as the Machine limits or Hole fabrication limits set on this window), the SDS2 CNC program will generate a download file . Exceptions: You may get the " Invalid type of material " error even if this box is checked. Also, if you attempt to download " Material types " that are disabled, you will get this message: " Download disabled for this material type ." And if you try to download a material that is not handled by the selected " CNC type ", you will get this message: " Invalid type of material ."
If this box is not checked (
), you will get error messages instead of a download file for any material that you select which is outside of the setup limits.
Batch download: ![]() or
or ![]() . This applies when you press the " Download " button on the Computer Numerically Controlled window or, in Modeling , when you Download Material by Location or Download Members by Location .
. This applies when you press the " Download " button on the Computer Numerically Controlled window or, in Modeling , when you Download Material by Location or Download Members by Location .
|
 |
 |
If this box is checked (
If this box is not checked (
Note: Regardless of the choice made here, the SDS2 CNC Module outputs the files to the destination that is selected in step 5 (or step 6b) of the download process.
Tip: If batching is on (
Allow special characters in file names: ![]() or
or ![]() . This applies to the file names of the download files that are generated when you download by "
. This applies to the file names of the download files that are generated when you download by " ![]() Details " or "
Details " or " ![]() Submaterial " or "
Submaterial " or " ![]() Detail Sheets " or "
Detail Sheets " or " ![]() Gather Sheets " or, in Modeling , when you Download Material by Location or Download Members by Location .
Gather Sheets " or, in Modeling , when you Download Material by Location or Download Members by Location .
|
If this box is checked (
If the box is not checked (
Download plain members (no holes or marks): ![]() or
or ![]() . This applies to member main materials and submaterials that do not have holes or marks.
. This applies to member main materials and submaterials that do not have holes or marks.
If this box is checked (
If the box is not checked (
List CNC items by 'face of operation': ![]() or
or ![]() . The machine itself drills/punches holes and performs other CNC operations in the same order regardless of the choice made here. This only affects the order that is shown on the machine's display.
. The machine itself drills/punches holes and performs other CNC operations in the same order regardless of the choice made here. This only affects the order that is shown on the machine's display.
If this box is checked (
If the box is not checked (
Include layout marks in download: ![]() or
or ![]() . This applies to all CNC marks , including bend marks .
. This applies to all CNC marks , including bend marks .
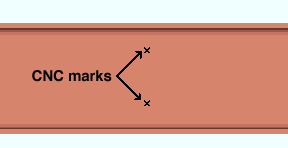
If this box is checked (
The box should be not checked (
Bend marks may be independently turned off using " Exclude bend marks " ( DSTV Options ) and " Exclude bend marks " ( DXF Options ). "
Include attached submaterial in member download: ![]() or
or ![]() . This applies when you download by "
. This applies when you download by " ![]() Details " or by "
Details " or by " ![]() Detail sheets " or, in Modeling , when you Download Members by Location or Download Material by Location and select a main material.
Detail sheets " or, in Modeling , when you Download Members by Location or Download Material by Location and select a main material.
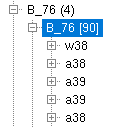
One member is selected using the Model Tree Three files are generated. Assuming the " CNC type " is ' DSTV ', the files are named B_76.nc1 , a38.nc1 and a39.nc1 . One file is generated. The file is named B_76.nc1 . It is the download of the member main material. If this box is checked (
If the box is not checked (
Use submaterial marks for members with multiple main material: ![]() or
or ![]() . Stairs and double-angle vertical braces and double-angle horizontal braces are three member types that have multiple main material. Welded plate wide flanges and welded plate box materials used as member main materials are also considered to be multiple main materials when "
. Stairs and double-angle vertical braces and double-angle horizontal braces are three member types that have multiple main material. Welded plate wide flanges and welded plate box materials used as member main materials are also considered to be multiple main materials when " ![]() Welded section is single material " is not checked for a beam or a column or vertical brace .
Welded section is single material " is not checked for a beam or a column or vertical brace .
|
||||||
| Note: " |
If this box is checked (
If the box is not checked (
Add holes ' that match a hole ' or ' that match cope radius ' either ' In copes ' or ' In all radii ' or ' No '.
r = cope radius.
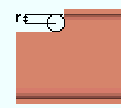 |
i = other radii.
 |
If both ' that match a hole ' and ' In copes ' (or ' In all radii ') are selected, the CNC machine will generate a hole in the radius of the cope (or in all radii). The radius of the hole will match the first hole in the download file that is applied on the surface that is being coped. By matching this hole, the machine operator doesn't have to switch tooling.
If both ' that match cope radius ' and ' In copes ' (or ' In all radii ') are selected, the download file instructs the CNC machine to generate a hole that exactly matches the radius.
If ' No ' is selected, radius holes are not generated in the download file.
Cope radii: Radii generated by operations such as Cope plain , Cope shop weld #3 , Cope field weld #1 , Cope field weld #1 , Cope shop weld #1 , Seismic cope field weld and Seismic cope shop weld .
All radii: All cope radii plus radii generated by operations such as Notch top/bottom , Notch near side/far side , Cut Layout (with corner rounding on) and Exact Fit (to a pipe or tube).
Warning message: " Warning, errors in cope radius holes ."
Provide error information for radius or cope holes: ![]() or
or ![]() . This applies when you " Download " from the Computer Numerically Controlled window or, in Modeling , when you Download Material by Location or Download Members by Location , Radius holes may be generated when " Add holes " is set to ' In all radii ' or to ' In copes '. The holes generate an error and are therefore not included in the download file if they are outside of the " Hole fabrication limits " that are set on this window.
. This applies when you " Download " from the Computer Numerically Controlled window or, in Modeling , when you Download Material by Location or Download Members by Location , Radius holes may be generated when " Add holes " is set to ' In all radii ' or to ' In copes '. The holes generate an error and are therefore not included in the download file if they are outside of the " Hole fabrication limits " that are set on this window.
|
Report on a cope radius hole error due to " Cope plain " :
Report on a radius hole error due to NS & FS " Cut flange flush " :
|


If this box is checked (
If the box is not checked (
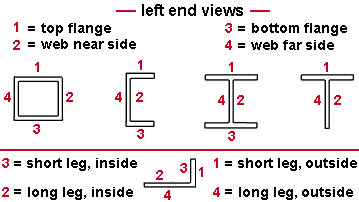
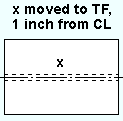
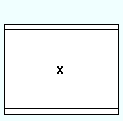
Move CNC marks on web far side: No or To top flange or To web near side or Omit .
No
|
To top flange
 |
To web near side
 |
Omit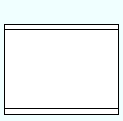 |
' No ' keeps the far side mark at its original location.
' To top flange ' moves the mark to the top flange, one inch in toward the far side from the center line.
' To web near side ' moves the mark from the far side of the web to the near side of the web.
' Omit ' stops the far side mark from being CNC downloaded.
Warning: This option does not perform error checking. If the top flange is coped off and a far-side mark is moved into the cope, it will not be detected.
Download holes outside diameter range as: A mark or Fail hole, print report or Fail hole, no report or Fail piece . This applies when " Disable error checking " is not checked ( ![]() ) and a hole on a material that is being downloaded is smaller in diameter than the " Minimum allowable holes size " or larger in diameter than " Maximum allowable holes size ." This does not affect the Punch List .
) and a hole on a material that is being downloaded is smaller in diameter than the " Minimum allowable holes size " or larger in diameter than " Maximum allowable holes size ." This does not affect the Punch List .
|
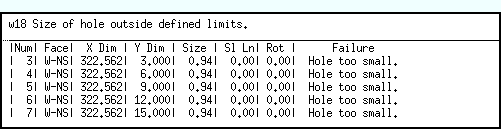
Report on Holes with Hole-Diameter Errors
|
' A mark ' changes holes into CNC marks in the download file if they are too large or too small. You do not receive any notification that CNC errors have occurred.
' Fail hole, print report ' stops holes that are too large or too small from being downloaded. A report like that shown above is printed to the report viewer for those holes that have hole-diameter errors. The resulting download file includes only those holes that do not have hole-diameter errors.
' Fail hole, no report ' stops holes that are too large or too small from being downloaded. You are notified that CNC errors have occurred, but you do not get the report shown above. The resulting download file includes only those holes that do not have hole-diameter errors.
' Fail piece ' stops the download file from being created for the selected piece with the hole diameter error. A report like that shown above is printed to the report viewer .
The hole-diameter error report: " Num " " Face " " Size " " Sl Ln " " Rot " are the same as on a Punch Report . "X Dim" is the distance of the hole from the left end. "Y Dim" is the distance that a web hole is from the top flange. Error messages appear in the "Failure" column.
Download holes too close to edge, web, flange, bend and hole as: A mark or Fail hole, print report or Fail hole, no report or Fail piece . This applies when " Disable error checking " is not checked ( ![]() ) and a hole on a material that is being downloaded is closer to another hole than the " Minimum hole-to-hole edge distance " or closer to the edge than the " Minimum hole to material edge distance " or closer to the radius than the " Minimum hole to radius clearance " or closer to the web or flange than the " Minimum spindle clearance for web holes or flange punches ." This does not affect the Punch List .
) and a hole on a material that is being downloaded is closer to another hole than the " Minimum hole-to-hole edge distance " or closer to the edge than the " Minimum hole to material edge distance " or closer to the radius than the " Minimum hole to radius clearance " or closer to the web or flange than the " Minimum spindle clearance for web holes or flange punches ." This does not affect the Punch List .
|
Report on Holes with Hole-Location errors

|
' A mark ' changes holes into CNC marks in the download file if those holes are in disallowed locations. A report like that shown above is printed to the report viewer . You do not receive any notification that CNC errors have occurred.
' Fail hole, print report ' stops holes that have location errors from being downloaded. A report like that shown above is printed to the report viewer for those holes that have hole-location errors. The resulting download file includes only those holes that do not have location errors.
' Fail hole, no report ' stops holes that have location errors from being downloaded. You are notified that CNC errors have occurred, but you do not get the report shown above. The resulting download file includes only those holes that do not have location errors.
' Fail piece ' stops the download file from being created for the selected piece with the hole-location error. A report like that shown above is printed to the report viewer .
The hole-location error report: " Num " " Face " " Size " " Sl Ln " " Rot " are the same as on a Punch Report . "X Dim" is the distance of the hole from the left end. "Y Dim" is the distance that a web hole is from the top flange. Error messages appear in the "Failure" column.
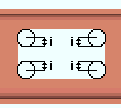
Replace slots with layout marks or holes: No or One mark or Two marks or 1 (ss) or 2 holes (ls) .
| slot |
two
marks |
one
mark |
1 or 2
holes |
|
|
|
|
|
Select ' No ' if the machine you are downloading to can generate slots or if you do not want to use the other alternatives to substitute for slots. (For Shop Data Systems compliance with ' DXF ', you should select ' No '.)
Select ' One mark ' if your CNC machine does not have slot capabilities and you want that machine to generate a single mark located at the center of the slot to indicate where the real slot should be.
Select ' Two marks ' if your CNC machine does not have slot capabilities and you want that machine to instead generate marks at the centers of two holes to indicate where the real slot should be.
Select ' 1 (ss) or 2 holes (ls) ' if your CNC machine does not have slot capabilities and you want that machine to fabricate an approximation of a true slot by drilling or punching one or two holes. If you get two holes, the shop can grind down the nubs left between the two holes to create a true slot. Be aware that you will only get two holes if the " Minimum hole-to-hole edge distance " set on this same window allows two holes. Unless you enter a negative " Minimum hole-to-hole edge distance " (which is not allowed on many CNC machines), you will probably only get 1 hole for short slots (ss) but 2 holes for long slots (ls).
Use CNC piece quantity in: Job or Selection . This applies when, in Modeling , you Download Material by Location or Download Members by Location . The capability to select individual items from under the same piecemark is not available when you " Download " on the Computer Numerically Controlled window.
|
' Job ' | ' Selection ' |
| The B_76.nc1 file reports a quantity of 4 . The a38.nc1 and a39.nc1 files each report a quantity of 26 , which is their quantity in the model. | The B_76.nc1 file reports a quantity of 1 . The a38.nc1 file and a39.nc1 files each report a quantity of 2 , since the beam has two a38s and two a39s. | |
| Example 1: One member is selected for Download Members by Location . Since " Include attached submaterial " is checked ( |
||
|
' Job ' | ' Selection ' |
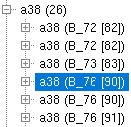
| The a38.nc1 file has a quantity of 26 , which is the total quantity of that angle in the Job. | The a38.nc1 file has a quantity of 1 , since it was the only item that is selected. | |
| Example 2: One material is selected for Download Material by Location . One CNC file is generated. Since the " CNC type " is ' DSTV ', its file name is a38.nc1. Selection is made using the model tree . | ||
' Job ' results in each file that is downloaded reporting a quantity that is equal to the total quantity under that member or submaterial piecemark in the model.
' Selection ' gives you a way to split quantities in CNC downloads without splitting piecemarks. Each file that is downloaded reports a quantity that is exactly equal to -- or exactly a multiple of -- its selected quantity. Each member or material on a selected detail sheet or gather sheet will have a quantity of 1. If the submaterials of selected members are output due to " Include attached submaterial " being checked (
Please note: If, in Modeling , you Download Material by Location or Download Members by Location and this option is set to ' Selection ', the number of items with the same member or submaterial piecemark that you select controls the piece quantity that is reported in each of the downloaded files. You might use this capability to, for example, generate downloads that include the exact quantities of member main materials or submaterials that are in particular sequences.
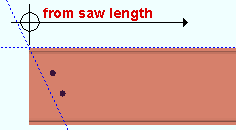
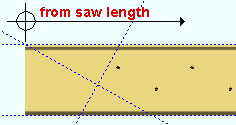
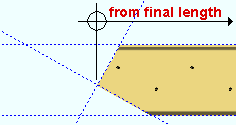
Use dimensions from: Saw length or Final length . This applies to any " CNC type " that is used for downloading holes. It affects the download file when the " Order length " and the " Part length " of the material are different. Two cases where these lengths may be different are illustrated below.
|
| Case 1 : You get cuts like those shown here when a " Web cut angle " and a " Cope " is on the same end of a rolled section. | |
' Saw length '
|
' Final length '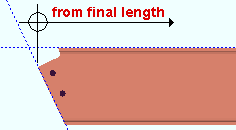 |
| Case 2 : ' Bolt to Floor ' as the " End condition " on a stair stringer. | |
' Saw length '
|
' Final length '
|
' Saw length ' specifies that the piece be dimensioned from the end of the material before it is cut. Choose this setting if the shop runs the material through the CNC punch or drill, then later cuts the material. Note: When the " Order length " and the " Part length " of a material differ, ' Saw length ' results in CNC dimensioning from the " Order length " where possible. However, Cut Layout or Cut on Plane may make this impossible. In those cases, CNC will figure out the saw length based on the polygon angles.
' Final length ' specifies that the piece be dimensioned from the end of the material that remains after the material has been cut. Choose this setting if the CNC machine adds the holes after the material has been cut.
Also see: " Exclude saw length info " (a DSTV file option).
Send out plate: Near side or Far side .
' Near side ' is the preferred choice and is the way that plate materials have traditionally been downloaded by the SDS2 CNC Module..
' Far side ' may be a choice you want to use in special cases where part of the near side surface of a plate has been cut away or abraded, but you want include that area in the downloaded contour so that the contour matches the true shape of the material.
Note: This option may apply when the " CNC type " is ' DSTV ' or ' DXF '. For DSTV, see the "A special case" note for the option " Flip far side scribing ."
CNC contents | CNC main menu | top
------ Material types ------
|
|
|
|
|
|
|
|
|
|
|
|
|
|
|
|
Effect on downloads :
Material types that are checked (
Material types that are not checked (
Special cases:
" Welded Sections " are welded plate wide flange sections or welded plate box sections. Any CNC machine that can handle wide flange should be able to work with welded plate wide flange, so long as the flange sizes are the same. ' DSTV ' can even place holes and cuts on welded plate wide flanges with different-size flanges. Welded plate box can be downloaded when ' DSTV ' is the " CNC configuration type ."
The " Round Bar " check box applies to round bar and to shear studs . Round bar material can be downloaded when ' DSTV ' is the " CNC configuration type ." The download will include header information, but not a contour.
The " Bent Plate " check box applies to bent plates and rolled plates , both of which are downloaded flat when ' DSTV ' or ' DXF ' is the " CNC configuration type ." Additionally, ' DSTV ' can download bent plate layouts , though not necessarily every layout that you might devise. If "
" Cold formed channel " and " Cold formed Z " can be downloaded when ' DSTV ' or ' Punch List ' is the " CNC configuration type ."
" Pipe " (HSS round) material can be downloaded when ' Vernon ' or ' DSTV ' is the " CNC configuration type ." For ' DSTV ' you get the header information and holes, but not a contour.
" Plate " materials are rectangular plate , round plate , and flat plate layout . ' DSTV ' and ' DXF ' can download plates.
CNC contents | CNC main menu | top
------ Machine limits ------
| The " Machine limits " entered here are referenced when you select materials to download. If a material's length, depth or thickness is outside of these limits, you will get an error message instead of a download file . Exception: You can check the box for " Disable error checking " to get the download file instead of the error message. |
Maximum material length: The maximum length of material (in the primary dimension " Units " or other units ) that the CNC machine you will be downloading to can handle. This length may depend on the length of your conveyor.
Effect on downloads: As long as the current " CNC configuration " remains active, the SDS2 CNC Module will not generate a download file or fabrication report on materials in your current Job that are longer than this length.
Exception: You can check the box for " Disable error checking " to get the download file or report instead of an error message.
Error message: " Material greater than allowable maximum ."
Minimum material length: The minimum length of material (in the primary dimension " Units " or other units ) that the CNC machine you will be downloading to can handle.
Effect on downloads: As long as the current " CNC configuration " remains active, the SDS2 CNC Module will not generate a download file or fabrication report on materials in your current Job that are shorter than this length.
Exception: You can check the box for " Disable error checking " to get the download file or report instead of the error message.
Error message: " Material length less than allowable minimum ."
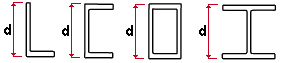
Maximum material depth: The maximum depth of material (in the primary dimension " Units " or other units ) that the CNC machine you will be downloading to can handle.
| d = depth |
|
Effect on downloads: As long as the current " CNC configuration " remains active, the SDS2 CNC Module will not generate a download file or fabrication report on materials in your current Job that are deeper than the maximum you enter here.
Exception: You can check the box for " Disable error checking " to get the download file or report instead of the error message.
Error message: " Material depth greater than allowable minimum ."
Minimum material depth: The minimum depth of material (in the primary dimension " Units " or other units ) that your CNC machine can handle.
| d = depth |
|
|
Effect on downloads: As long as the current " CNC configuration " remains selected, the SDS2 CNC Module will not generate a download file or fabrication report on materials in your current Job that are less deep than the minimum you enter here.
Exception: You can check the box for " Disable error checking " to get the download file or report instead of the error message.
Error message: " Material depth less than allowable minimum ."
Maximum flange thickness: The maximum flange thickness (in the primary dimension " Units " or other units ) that the flange tool on your CNC machine is able to perform a CNC operation on.
| tf = flange thickness |
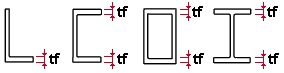
|
Example: If the flange tool on your CNC machine is a drill that cannot penetrate steel thicker than 1 inch, and you are using ' Imperial ' dimensioning units, you would enter ' 1 ' here.
Effect on downloads: As long as the current " CNC configuration " remains active, the SDS2 CNC Module will not generate a download file or fabrication report on materials in your current Job that have flange thicknesses greater than the maximum you enter here.
Exception: You can check the box for " Disable error checking " to get the download file or report instead of the error message.
Error message: " Flange thickness greater than allowable maximum ."
Maximum web thickness: The maximum web thickness (in the primary dimension " Units " or other units ) that can be punched or drilled by the web tool on the CNC machine you are downloading to.
| tw = web thickness |
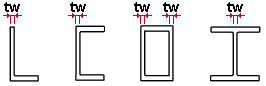
|
Example: If the web tool on your CNC machine is a punch that cannot penetrate steel thicker than 1 inch, and you are using ' Imperial ' dimensioning units, you would enter ' 1 ' here.
Effect on downloads: As long as the current " CNC configuration " remains active, the SDS2 CNC Module will not generate a download file or fabrication report on materials in your current Job that have web thicknesses greater than the maximum you enter here.
Exception: You can check the box for " Disable error checking " to get the download file or report instead of the error message.
Error message: " Web thickness greater than allowable maximum ."
Force plate width and length to match model: ![]() or
or ![]() . In Modeling and the Drawing Editor , a plate's width can be longer than a plate's length. This frequently happens with shear plates, as in the example below.
. In Modeling and the Drawing Editor , a plate's width can be longer than a plate's length. This frequently happens with shear plates, as in the example below.
| The model |
|
|
|
|
|
If this box is checked (
If the box is not checked (
CNC contents | CNC main menu | top
------ Hole fabrication limits ------
|
| " Hole fabrication limits " may result in the piece being failed or the hole being downloaded as a mark or the hole being downloaded anyway depending on the choice made to " Download holes outside diameter range as " or " Download holes too close to edge, web, flange, bend and hole as ." |
Minimum allowable holes size: The minimum hole diameter (in the primary dimension " Units " or other units ) that your CNC machine can drill or punch based on the smallest bit or die size used in the machine.
Error message: " Invalid hole size " (click here for information on handling hole error messages).
Maximum allowable holes size: The maximum hole diameter (in the primary dimension " Units " or other units ) that your CNC machine can drill or punch as based on the largest bit or die size used in the machine.
Error message: " Invalid hole size " (click here for information on handling hole error messages).
Minimum hole-to-hole edge distance: The positive or negative (-) minimum distance (in the primary dimension " Units " or other units ) between the edges of two holes.
|
positive (+)
hole edge distance |
negative (-)
hole edge distance |
|
|
|
Note: If you enter a negative number here, the holes will be allowed to overlap and create slots (see " Replace slots with layout marks or holes "); however, the resulting overlap area can be no greater than 37.5 percent (3/8) of the diameter of either of the holes.
Error message: " Holes overlap or are too close " (click here for information on handling hole error messages).
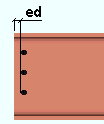
Minimum hole to material edge distance: The minimum distance (in the primary dimensioning " Units ") allowed between the edge of a hole and the nearest edge of the material. Note that this is not measured to the center of the hole.
|
ed = hole edge to material edge distance. |
Error message: " Item is too close to material edge " (click here for information on handling hole error messages).
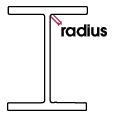
Minimum hole to radius clearance: The minimum positive or negative (-) distance (in the primary dimension " Units " or other units ) that your CNC machine allows between the edge of a hole and the radius on an angle , channel , wide flange or S shape section. The radius is the curved area between the flange and web as specified by the k distance in the local shape file.
Allowable entries: The default setting of ' 0 ' (zero) prevents the radius from being punched, and thus extends the life of the die. A positive distance adds additional hole-to-radius separation. A negative (-) distance allows part of the radius to be punched.
Error messages: " Flange item is too close to the web " or " Web item is too close to the radius " (click here for information on handling hole error messages).
Related setup option: " Maximum amount of allowable k infringement ."
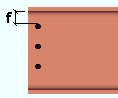
Minimum spindle clearance for web holes or flange punches: The distance (in the primary dimension " Units " or other units ) from the edge of a hole to the flange. Entering a number here allows clearance for the spindle or punch on your machine.
|
f = hole edge to flange distance |
Error messages: " Web item is too close to the flange " (click here for information on handling hole error messages).
Maximum amount of punch overrun: A distance (in the primary dimension " Units " or other units ) that, in addition to the material thickness, is allowed for a hole to be punched.
Example: If the material thickness is 1/2 inch and the punch overrun is set to 1/16 inch, the smallest hole diameter that could be punched is 7/16 inch. In this way, the punching of holes that are smaller than the thickness of material being punched is prevented.
Error messages: " Punch overrun error " (click here for information on handling hole error messages).
CNC contents | CNC main menu | top
"Options" opens one of the following windows:
| Peddinghaus Options | Franklin Options |
| Controlled Automation Options | Punch List Options |
| DSTV Options | DXF Tool Definition |
| CNC Profile Machine Setup Data | |
Which window opens depends on the " CNC type " that is assigned to the currently selected " CNC configuration " file.
" Material Setup " opens a window that lets you define how materials will be placed on the conveyor to the CNC machine (for example, from left to right or right to left).
Proper material setup ensures that CNC data is properly arranged in download files generated using the currently selected " CNC configuration ."
"Reset" undoes all changes made to this window since you first opened it. " Reset " also undoes changes made to any window opened using " Options ." This window remains open.
"Restore Defaults" changes all CNC settings for this configuration to default values.
Defaults that are reset include settings on this window, settings on the window opened using " Options ," and settings in Material Setup .
"OK" (or the Enter key) closes the CNC Setup window and saves the settings on it to the currently selected " CNC configuration " file in your current Job .
If you made changes using " Options " or " Material Setup ," those changes are saved to that file only after " OK " is pressed.
"Cancel" (or the Esc key) closes this window without saving any changes made to it.
The SDS2 Computer Numerically Controlled menu becomes active again.

