The CNC Material Setup Data window

The " CNC configuration " file name, in this example, is cnc_configration and is shown at the top of the window. Entering correct information to this window helps to ensure that CNC data in the download file is consistent with how material is fed to the CNC machine.
- To open this window, press the " Material " button on the CNC Setup window.
------ Wide flange beams ------
| The selections you make here determine the origin point from which the drill/punch will begin to work. These options apply to S shape beams as well as wide flange beams. |
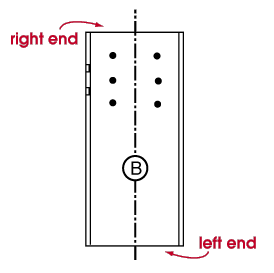
Dimension beam holes from: Left end or Right end . The left end of a beam is the end of that beam that is on the left on its member detail.
Select ' Left end ' if wide flange or S shape beam main material is to be fed into the CNC machine so that holes on the left end of the beam are drilled or punched first.
Select ' Right end ' if the beam is to be fed into the machine so that holes on the right end are drilled or punched first.
Dimension beam holes from: Bottom flange or Top flange . Top and bottom are absolute terms, not relative. Top refers to the top flange of the material as it appears on its member detail.
Select ' Top flange ' if the CNC drill/punch machine you are using dimensions holes from the flange that is shown as the top flange on the detail.
Select ' Bottom flange ' if the CNC machine dimensions holes from the flange that is shown as the bottom flange on the detail.
CNC contents | CNC setup | top
------ Wide flange columns ------
| These options apply to S shape columns as well as wide flange columns. |
Dimension column holes from: Left end or Right end . The bottom end of a column as it appears on a column detail is the left end .
Select ' Left end ' if S shape or wide flange column main material is to be fed into your CNC machine so that the holes that appear on the bottom of the column's detail are drilled or punched first.
Select ' Right end ' if you are feeding S shape or wide flange material for columns into the CNC punch/drill so that holes on the top end the column are drilled or punched first.
Dimension column holes from: Bottom flange or Top flange . Refer to an column detail (or the submaterial detail of the column's main material) to determine which flange is the top or bottom flange. On a column detail, the top flange is face A, the bottom flange is face C.
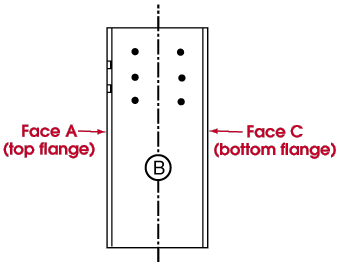
Select ' Bottom flange ' if wide flange or S shape column main material is to be fed into your CNC machine so that the holes that appear on the bottom flange of the submaterial detail (Face C on the member detail) are drilled/punched first.
Select ' Top flange ' if wide flange or S shape column main material is to be fed into your CNC machine so that the holes that appear on the top flange of the submaterial detail (Face A on the member detail) are drilled/punched first.
CNC contents | CNC setup | top
Dimension channel holes from: Left end or Right end . The left end of a channel is the end on the left of a beam detail.
Select ' Left end ' if you are feeding channel material into the CNC punch/drill so that holes on the left end of the channel are drilled or punched first.
Select ' Right end ' if you are feeding channel material into the CNC punch/drill so that holes on the right end of the channel are drilled or punched first.
Dimension channel holes from: Bottom flange or Top flange . The top flange of a channel is the flange that is shown as the top flange on a beam detail.
Select ' Bottom flange ' if you are feeding channel material into the CNC punch/drill so that holes closest to the bottom flange of the channel are drilled or punched first.
Select ' Top flange ' if you are feeding channel material into the CNC punch/drill so that holes closest to the top flange of the channel are drilled or punched first.
Toe direction for channels: Toe down only or Toe up only or Either .
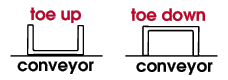
Select ' Toe down only ' if the CNC punch/drill you are using requires that channels be placed onto the conveyor so that they are "toe down."
Select ' Toe up only ' if the CNC punch/drill you are using requires that channels be placed onto the conveyor so that they are "toe up."
Select ' Either ' if it doesn't matter which way the channels are placed into your machine.
CNC contents | CNC setup | top
Beam line horizontal orientation: Long leg or Short leg .
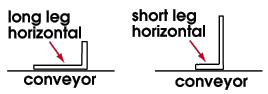
Select ' Long leg ' if the long leg of the angle is to be laid horizontal on the conveyor.
Select ' Short leg ' if the short leg of the angle is to be laid horizontal on the conveyor.
Beam line flange orientation: Top flange or Bottom flange . Beam lines are designed for wide flange sections and therefore have tools for operating on the top and bottom flange of the material. This option is for the case where you want to place angle on a beam line.
Select ' Top flange ' if the leg of the angle to be placed into a beam line is oriented so that it will be operated on by the top flange tool.
Select ' Bottom flange ' if the leg of the angle is to be operated on by the bottom flange tool.
Angle line long leg orientation: Near side or Far side . The option selected here identifies the long leg orientation of an angle run through an angle line. An angle line has a V-shaped conveyor.

Select ' Near side ' if the long leg of an angle is to be placed on the side closest to the controller,
Select ' Far side ' if the long leg of an angle is to be placed on the side farthest from the controller.
CNC contents | CNC setup | top
Angle line leg orientation: Near side or Far side . The selection made here describes the orientation of plate material (with respect to the controller) on an angle line's V-shaped conveyor.
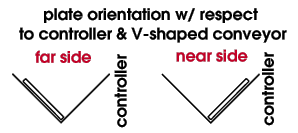
Select ' Near side ' if the plate is to be placed on the side of the V-shaped conveyor which is closest to the controller.
Select ' Far side ' if the plate is to be placed on the side of the V-shaped conveyor which is farthest from the controller.
CNC contents | CNC setup | top
"OK" (or the Enter key) closes the CNC Material Setup Data window. The CNC Setup window again becomes active. Press " OK " on that window to save the choices made on this window to the currently selected " CNC Configuration " file in your current Job .
"Cancel" (or the Esc key) closes this window without saving any changes made to it. The CNC Setup Data window becomes active.
"Reset" undoes all changes made to this window since you first opened it. The window remains open.
CNC contents | CNC setup | top

