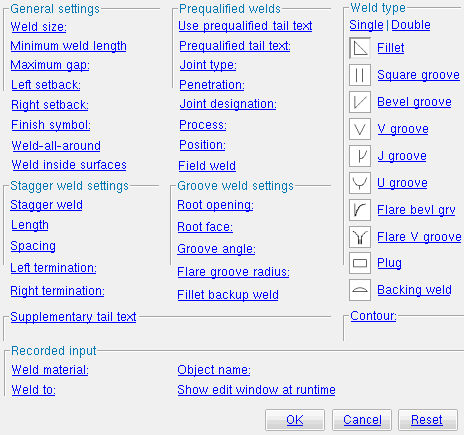
The Parametric Create Weld window
| Using a text editor , you can assign a Layout3D as a weld attribute . If you do this, there is no need to assign a material object to WeldTo . |
| Quick Notes |
Options :
Also see :
- Parametric Point Maps
- Objects, Attributes, Methods and Functions
- Weld Design Settings (setup of system connection welds)
- Process and Create Solids (generates welds)
- Detail Members (generates weld symbol on detail)
Warning :
If your startup code specifies imperial Units("...") , make entries to distance fields on this window in decimal inches, not fractions. Also, do not use hyphens (-). If you enter a fraction using integers, Python truncates the results of the division operation to an integer (examples: 1/8 = 0 ; 5/4 = 1 ). If you enter fractions with decimal points, Python calculates the precise decimal value (examples: 1.0/8.0 = .125 ; 5.0/4.0 = 1.25 ). If you enter a hyphen, Python interprets the hyphen as a minus sign (examples: 1-2 = -1 ; 3-2 = 1 ). See numbers (floating point numbers and integers).
Tips :
To enter a dimension string and convert it to a floating point distance that is properly factored based on the startup code Units("...") , you can use the dim("...") function. See the warning above for an explanation of why the dim() function is needed.
------ General settings ------
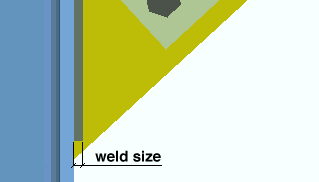
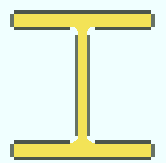
Weld size ( obj . Size or obj.size ): A distance that indicates depth of preparation, size or strength of the weld. A distance is a floating point number in mm or inches, depending on the startup code Units(' ... ') . This distance is modeled in 3D as shown below.
Example: Units("feet") are your startup code units, and you want a 3/16 weld. You can make an entry of 0.1875 or dim("3/16") . An entry of 0.1875 results in a line of parametric code that reads: obj.Size = 0.1875 (where obj is the " Object name "). The equivalent entry of dim("3/16") would generate a line of parametric code that reads: obj.Size = dim("3/16") .
Minimum weld length ( obj . Length or obj.length ): The distance that is the minimum length of the weld that is allowed to be generated. A distance is a floating point number in mm or inches, depending on the startup code Units(' ... ') .
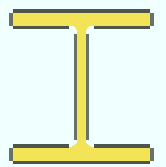
" Minimum weld length " is less than the flange thickness.
 |
" Minimum weld length " is greater than the flange thickness.
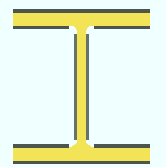 |
When this Python script is Run : If the minimum length entered here is longer than a to-be-welded edge or surface, that edge is not welded (as shown in the example above).
Example: Units("feet") are your startup code units, and you want a 1-3 minimum length. You can make an entry of 15.0 or dim("1-3") . An entry of 15.0 results in a line of parametric code that reads: obj.Length = 15.0 (where obj is the " Object name "). The equivalent entry of dim("1-3") would generate a line of parametric code that reads: obj.Length = dim("1-3") .
Maximum gap ( obj . MaximumGap or obj.max_gap ): The distance that to-be-welded materials must be closer together than. A distance is a floating point number in mm or inches, depending on the startup code Units(' ... ') .
" Maximum gap " is greater than the actual gap.
 |
The actual gap is greater than the " Maximum gap ."
 |
When this Python script is Run : If the maximum gap entered here is greater than the actual gap between the two pieces of material to be welded together, a weld is generated. If the actual gap is greater than the maximum, a weld is not generated.
Example: Units("feet") are your startup code units, and you want a 1/4 inch maximum gap. You can make an entry of 0.25 or dim("1/4") . An entry of 0.25 results in a line of parametric code that reads: obj.MaximumGap = 0.25 (where obj is the " Object name "). The equivalent entry of dim("1/4") would generate a line of parametric code that reads: obj.MaximumGap = dim("1/4") .
Left setback ( obj . LeftSetback or obj.left_setback ): A distance ( floating point number ) in mm or inches, depending on the startup code Units(' ... ') . This setback is the distance that the left end of the weld is to be set back from the edge of the material. 0 (zero) makes the left end of the weld go to the edge of the material that is being welded (the obj.Material in the code).
Example: Units("feet") are your startup code units, and you want a 3/4 inch left setback. You can make an entry of 0.75 or dim("3/4") . An entry of 0.75 results in a line of parametric code that reads: obj.LeftSetback = 0.75 (where obj is the " Object name "). The equivalent entry of dim("3/4") would generate a line of parametric code that reads: obj.LeftSetback = dim("3/4") .
Right setback ( obj . RightSetback or obj.right_setback ): A distance ( floating point number ) in mm or inches, depending on the startup code Units(' ... ') . This setback is the distance that the right end of the weld is to be set back from the edge of the material. 0 (zero) makes the right end of the weld go to the edge of the material that is being welded (the obj.Material in the code).
Example: Units("feet") are your startup code units, and you want a 3/4 inch right setback. You can make an entry of 0.75 or dim("3/4") . An entry of 0.75 results in a line of parametric code that reads: obj.RightSetback = 0.75 (where obj is the " Object name "). The equivalent entry of dim("3/4") would generate a line of parametric code that reads: obj.RightSetback = dim("3/4") .
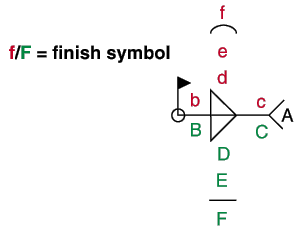
Finish symbol ( obj . WeldSymbolFinishSymbol or obj.finish_symbol ): A single letter ( 1 character ) to appear on the weld symbol to designate the finishing operation (reference f/F in the illustration below). The choice you make here results in the entry of a string to the parametric code.
Note: If no entry is made here, then a line for finish symbol does not appear in the code.
Example: An entry of g results in a line of parametric code that reads: obj.WeldSymbolFinishSymbol = "g" (where obj is the " Object name ").
Weld-all-around ( obj . WeldAllAround or obj.all_around ): ![]() ( "Yes" ) or
( "Yes" ) or ![]() ( "No" ). The choice you make here results in the entry of a string (' Yes ' or ' No ') to the parametric code.
( "No" ). The choice you make here results in the entry of a string (' Yes ' or ' No ') to the parametric code.
 |
 |
If this box is checked (
), a continuous weld is generated around every edge of the material, including material radii. The result is a line of parametric code that reads: obj.WeldAllAround = "Yes" (where obj is the " Object name ").
If the box is not checked (
), weld is not generated on curved surfaces such as the fillet of a rolled shape. The result is a line of parametric code that reads: obj.WeldAllAround = "No" .
Weld inside surfaces ( obj . WeldInside or obj.inside ): ![]() ( "Yes" ) or
( "Yes" ) or ![]() ( "No" ). The choice you make here results in the entry of a string (' Yes ' or ' No ') to the parametric code.
( "No" ). The choice you make here results in the entry of a string (' Yes ' or ' No ') to the parametric code.
 |
 |
If this box is checked (
If the box is not checked (
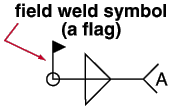
Field weld ( obj . FieldWeld or obj.field_weld ): ![]() ( "Yes" ) or
( "Yes" ) or ![]() ( "No" ). The choice you make here results in the entry of a string (' Yes ' or ' No ') to the parametric code.
( "No" ). The choice you make here results in the entry of a string (' Yes ' or ' No ') to the parametric code.
If this box is checked (
If the box is not checked (
------ Stagger weld settings ------
Stagger weld ( obj . StaggerDescription or obj.stagger ): ![]() ( "Yes" ) or
( "Yes" ) or ![]() ( "No" ). The choice you make here results in the entry of a string (' Yes ' or ' No ') to the parametric code.
( "No" ). The choice you make here results in the entry of a string (' Yes ' or ' No ') to the parametric code.
 |
 |
If this box is checked (
If the box is not checked , (
Length ( obj . StaggerLength or obj.stagger_length ): The distance that is the length of each weld segment in a staggered weld. A distance is a floating point number in mm or inches, depending on the startup code Units(' ... ') .
ln = length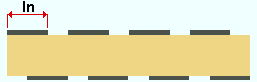 |
Example: Units("feet") are your startup code units, and you want a 4 1/2 inch stagger length. You can make an entry of 4.5 or dim("4 1/2") . An entry of 4.5 results in a line of parametric code that reads: obj.StaggerLength = 4.5 (where obj is the " Object name "). The equivalent entry of dim("4 1/2") would generate a line of parametric code that reads: obj.StaggerLength = dim("4 1/2") .
Spacing ( obj . StaggerSpacing or obj.stagger_length ): The distance from the beginning of one weld segment to the beginning of the next weld segment in a staggered weld. A distance is a floating point number in mm or inches, depending on the startup code Units(' ... ') .
sp = spacing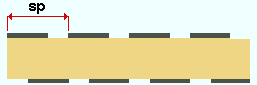 |
Example: Your " Units " are ' Imperial (ft-in frac) ' and you want a 5 1/2 inch spacing. You can make an entry of 5.5 or dim("5 1/2") . An entry of 5.5 results in a line of parametric code that reads: obj.StaggerSpacing = 5.5 (where obj is the " Object name "). The equivalent entry of dim("5 1/2") would generate a line of parametric code that reads: obj.StaggerSpacing = dim("5 1/2") .
Left termination ( obj . LeftTermination or obj.left_termination ): The distance that is the length of the weld segment at the left end of a staggered weld. A distance is a floating point number in mm or inches, depending on the startup code Units(' ... ') .
lt = left termination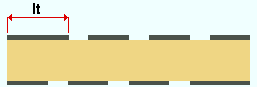 |
Example: Units("feet") are your startup code units, and you want a 5 1/2 inch left termination. You can make an entry of 5.5 or dim("5 1/2") . An entry of 5.5 results in a line of parametric code that reads: obj.LeftTermination = 5.5 (where obj is the " Object name "). The equivalent entry of dim("5 1/2") would generate a line of parametric code that reads: obj.LeftTermination = dim("5 1/2") .
Right termination ( obj . RightTermination or obj.right_termination ): The distance that is the length of the weld segment at the right end of a staggered weld. A distance is a floating point number in mm or inches, depending on the startup code Units(' ... ') .
rt = right termination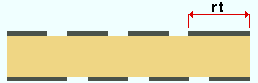 |
Example: Units("feet") are your startup code units, and you want a 5 1/2 inch right termination. You can make an entry of 5.5 or dim("5 1/2") . An entry of 5.5 results in a line of parametric code that reads: obj.RightTermination = 5.5 (where obj is the " Object name "). The equivalent entry of dim("5 1/2") would generate a line of parametric code that reads: obj.RightTermination = dim("5 1/2") .
------ Prequalified weld settings ------
>| See Table 8-2, AISC Thirteenth Edition , p. 8-34 for more information on prequalified welded joints. |
Use prequalified weld tail text ( obj . NonPrequalifiedWeld or obj.use_prequalified ): ![]() ( "Yes" ) or
( "Yes" ) or ![]() ( " No" ). The choice you make here results in the entry of a string (' Yes ' or ' No ') to the parametric code.
( " No" ). The choice you make here results in the entry of a string (' Yes ' or ' No ') to the parametric code.
If this box is checked (
If the box is not checked (
Prequalified tail text : Do not manually type in text yourself. Instead select a " Joint type " and/or " Penetration " and/or " Weld type " and/or " Joint designation " and/or " Process " and/or " Position ." The resulting prequalified tail text is shown here in the following order.
| Order of prequalified tail text:
joint type - penetration weld type joint dsg - process - position --------------------------------------------------------------------- Note: ' Single ' or ' Double ' and " Weld type " sets the weld type. |
Joint type ( obj . JointType or obj.joint_type ): None or B butt joint or C corner joint or T T-joint or BC butt or corner joint or TC T- or corner joint or BTC butt, T-, or corner joint . The selection made here is automatically entered to the appropriate position in the " Prequalified tail text " (above) and on the weld symbol.
Example: Selecting BTC butt, T, or corner joint results in parametric code that reads: obj.JointType = "BTC butt, T-, or corner joint" (where obj is the " Object name ").
Penetration ( obj . Penetration or obj.penetration ): None or L limited thickness, full-pen or U unlimited thickness, full-pen or P partial-pen . The selection made here is automatically entered to the appropriate position in the " Prequalified tail text " (above) and on the weld symbol.
Example: Selecting L limited thickness, full-pen results in parametric code that reads: obj.JointType = "L limited thickness" (where obj is the " Object name ").
Joint designation ( obj . JointDesignation or obj.joint_designation ): The entry you make here ( 1 character ) is automatically entered to the appropriate position in the " Prequalified tail text " (above) and on the weld symbol.
Note: If no entry is made here, then a line for joint designation does not appear in the code.
Example: Entering a results in parametric code that reads: obj.JointDesignation = "a" (where obj is the " Object name ").
Process ( obj . Process or obj.process_type ): None or S submerged arc welding (SAW) or G gas metal arc welding (GMAW) or F flux cored arc welding (FCAW) . The selection made here is automatically entered to the appropriate position in the " Prequalified tail text " (above) and on the weld symbol.
Example: Selecting S submerged arc welding (SAW) results in a line of parametric code that reads: obj.Process = "S submerged arc welding (SAW)" (where obj is the " Object name ").
Position ( obj . Position or obj.position ): None or F flat or H horizontal or V vertical or OH overhead . The selection made here is automatically entered to the appropriate position in the " Prequalified tail text " (above) and on the weld symbol.
Example: Selecting OH overhead results in a line of parametric code that reads: obj.Position = "OH overhead" (where obj is the " Object name ").
------ Groove weld settings ------
Root opening ( obj . RootOpening or obj.root_opening ): The distance that is labeled "r" in the illustration below. A distance is a floating point number in mm or inches, depending on the startup code Units(' ... ') .
r = root opening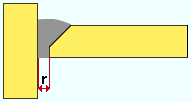 |
Example: Units("feet") are your startup code units, and you want a 1/4 inch root opening. You can make an entry of 0.25 or dim("1/4") . An entry of 0.25 results in a line of parametric code that reads: obj.RootOpening = 0.25 (where obj is the " Object name "). The equivalent entry of dim("1/4") would generate a line of parametric code that reads: obj.RootOpening = dim("1/4") .
Root face ( obj . RootFace or obj.root_face ): The distance that is labeled "rf" in the illustration below. A distance is a floating point number in mm or inches, depending on the startup code Units(' ... ') .
rf = root face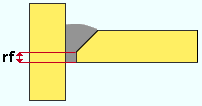 |
Example: Units("feet") are your startup code units, and you want a 1/8 inch root face. You can make an entry of 0.125 or dim("1/8") . An entry of 0.125 results in a line of parametric code that reads: obj.RootFace = 0.125 (where obj is the " Object name "). The equivalent entry of dim("1/8") would generate a line of parametric code that reads: obj.RootFace = dim("1/8") .
Groove angle ( obj . GrooveAngle or obj.weld_groove_angle ): The floating point number of degrees ( -75.0 to 75.0 ) that defines the angle for bevel groove or V groove welds.
a = groove angle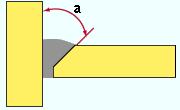 |
Example: Entering 45 results in a line of parametric code that reads: obj.GrooveAngle = 45.0 (where obj is the " Object name ").
Flare groove radius ( obj .GrooveRadius or obj.flare_groove_rad ): OBSOLETE (no longer supported).
Fillet backup weld ( obj . FilletBackupWeld or obj.fillet_back ): ![]() ( "Yes" ) or
( "Yes" ) or ![]() ( "No" ). The choice you make here results in the entry of a string (' Yes ' or ' No ') to the parametric code.
( "No" ). The choice you make here results in the entry of a string (' Yes ' or ' No ') to the parametric code.
If this box is checked (
If the box is not checked (
------ Weld type ------
obj .WeldTypeSingleOrDouble or obj.weld_type_sgl_dbl : OBSOLETE (no longer supported).
Weld type ( obj . Type ): Fillet or Square groove or Bevel groove or V groove or J groove or U groove or Flare bevel groove or Flare V groove or Plug or Backing weld . This applies to " Prequalified tail text " (the 3rd position) and to all other welds.
| symbol | name | weld used for... |
| fillet | General welding of material. | |
| square groove | Butt joints of material 3/8" thick or less. " Prequalified ... " = 1. | |
| bevel groove | General full penetration welding of material. " Prequalified ... " = 4. | |
| V groove | Butt joints of thicker material. " Prequalified ... " = 2. | |
| J groove | Special full penetration welding of material. " Prequalified ... " = 8. | |
| U groove | Butt joints of thicker material. " Prequalified ... " = 6. | |
| flare bevel groove | For a radiused surface to flat surface (e.g., pipe to plate, or tube to plate). " Prequalified ... " = 10. | |
| flare V groove | For a radiused surface to radiused surface (e.g., pipe to pipe). | |
| | plug | For SDS2 software to generate a plug weld, the material requires plug weld holes . |
| backing weld | For the back side of bevel or V, J or U groove welds. |
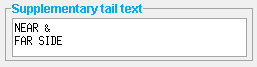
------ Supplementary tail text ------
( obj . WeldSymbolTailText or obj.tail_text )
To enter multi-line tail text such as that shown in the example below, press the Enter key where you want a line break.
| Tail text entered here : |
 |
| Tail text on weld symbol : |
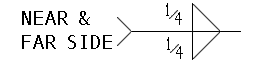 |
Example: If you enter multiple lines of tail text like that shown above, the resulting parametric code covers multiple lines as shown below:
obj.TailText = "Near &
Far Side"
------ Contour ------
Contour ( obj . WeldContourDescription or obj.contour ): None or Flush or Convex or Concave .
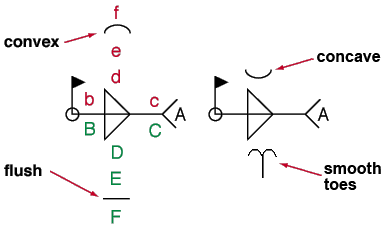
' None ' results in no contour symbol being included as part of the weld symbol. The result is a line of parametric code that reads: obj.WeldContourDescription = "None"
' Flush ' adds a flat line as the contour symbol to the weld symbol. The resulting parametric code reads: obj.WeldContourDescription = "Flush"
' Concave ' adds a concave line. The resulting parametric code reads: obj.WeldContourDescription = "Concave"
' Convex ' adds a convex line. The resulting parametric code reads: obj.WeldContourDescription = "Convex"
To close this window :
![]()
![]()
![]()
"OK" (or the Enter key) closes the Parametric Create Weld window and saves your changes to RAM.
"Cancel" (or the Esc key) closes the window without saving your changes.
"Reset" undoes the changes made to this window since you first opened it. The window remains open.

