 Process and Create Solids ( Modeling & Drawing Editor )
Tool summary :
- Designs connections and creates materials and assigns piecemarks -- as required -- for all members in the model.
- Mark Members for Processing (a related tool) causes members to be required to undergo Process and Create Solids .
- Mark Members followed by Process and Create Solids should be done when, for example, you have made setup changes and you want those changes to be applied to specific members in the model.
- Process and Create Solids should also be done when you have applied Change Options and you want those changes to be applied in the model.
- Any time that you want to ensure that your 3D model is fully up to date, you should Process and Create Solids . For example, you should Process and Create Solids before auto detailing and before printing reports and before using various modules for generating data interchange files that import or export information about an SDS2 project.
- See (on this page):
- Step-by-step instructions (
 )
)
- What happens during Process and Create Solids (phases of Process and phases of Create Solids )
- When members are automatically marked for Process or marked for Create Solids
- Prioritization in Connection Design
- After Process and Create Solids
- Step-by-step instructions (
Also see :
|
- Setup options applied during process
- Automatically process after modeling operation
- Process within member edit
- Mark Members for Processing (to make members require Process and Create Solids )
- Add Member ( Process is done after)
- Model complete ( Process does not affect members with this date set)
- Existing member (allows Process but prevents Detailing , etc.)
- Process Selected Members (first phases of Process and Create Solids )
- Create Solids for Selected Members (last phases of Process and Create Solids )
- Needs to be processed ( Model > Status Display > Detailing and Processing > )
- Needs solids created ( Model > Status Display > Detailing and Processing > )
Process and Create Solids (step by step) :
1 . Invoke Process and Create Solids using any one (1) of the following methods:
Special case: If your Job has more than 100 members that require processing, a yes-no dialog opens. On it is the question, Process all members marked for processing? Press the " Yes " button to continue.
2 (if applicable) : Skip this step if it does not apply.
|
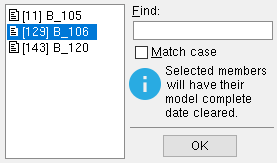
A selection dialog like this one opens when the setup option " Allow model complete date override " is on ( |
Alternative 1 : Select the members whose " Model complete date " you want to clear. All members that have their " Model complete date " set are listed. Press " OK " and go to step 3. The members you selected and any members that frame to those members will undergo Process and Create Solids if necessary.
Alternative 2 : Press " OK " without selecting any members. Those members and any members that frame to them will not undergo Process and Create Solids .
3 . Process and Create Solids is a fully automated event that proceeds without user intervention until all members marked for processing have been assigned piecemarks and are capable of being displayed in one of the solid forms. A progress bar illustrates the progress of the processing as it takes place.
3a : When the progress bar reaches 100%, the progress bar window will close automatically if the box is checked (
) for " Close when done ." If the window does not close automatically, you can close it by checking that same box or by pressing the " OK " button.
4 . Process and Create Solids may open a notification dialog that says, "Members still remain marked for process operations."
4a : This message appears when other users on your network are working on members in the same Job while you Process . Don't worry about the message. The next time the user who was editing that member does a Processes and Creates Solids , that member will be updated.
5 . Stick members that you processed which had been set to be displayed in one of the three solid forms should now be displayed in that form. See things you can do after Process and Create Solids .
What happens during Process and Create Solids :
| (phases of Process and phases of Create Solids ) |
During Process and Create Solids , each member in the 3D model undergoes the phases of Process and Create Solids that are required. The first phases of the operation are referred to as Process ; the last phases are called Create Solids . The phases are as follows:
| ( Process begins ) |
Node matching (a phase of Process ) :
Calculating lengths (a phase of Process ) :
- The results of node matching are used to calculate the geometry of member main material.
- These calculations are based on the work points you located in Modeling during member layout and also on any "
 Setbacks " applied to the member edit window. They are also based on cross referencing user-entered section size information with section size data in the local shape file .
- When " Loads " on member edit windows are set to " Auto ," member lengths are considered in the calculation of member end reactions, which in turn set the required strength of connections.
Connection design (a phase of Process ) :
|
Process within member edit includes the connection design, node matching and framing situation checking phases of Process and Create Solids . User and Site Options > Modeling > Process within member edit sets whether or not on-the-fly process takes place. On-the-fly process is triggered whenever users make changes on a member edit window. |
- The connection design phase of Process looks at settings defined on member edit windows and attempts to design the system connections specified on those windows. For members that have been set to " Break apart ," connection design recombines the connection components, re-designs the connection, then breaks the member apart again.
- System connections are designed based on connection design locks . For a connection design lock that has been locked (
 ) by a user, connection design will use that user-entered value. For a connection design lock that is unlocked (
  ), connection design calculates the value that it needs or looks to Home > Project Settings > Job or Fabricator for the value it needs.
- The system connections that connection design looks at include: 1) Auto standard connections as defined in Job Settings (if ' Auto standard ' is specified as the " Input connection type " on the member edit window) 2) User defined connections as defined at Home > Project Settings > Job (if a user defined connection is specified for the member). 3) Member edit window " Input connection type " connections other than auto standard or user defined. The " Input connection type " is reviewable and editable on Beam , Column , Horizontal Brace , Vertical Brace and Joist edit windows.
- Unless the connection is marked " Graphical " on its member edit window, connection design adjusts the strength of the connection based on the loads set on that same member edit window. When " Auto " is set for " Loads " on the member edit window, connection design looks at Design Settings settings in order to calculate the load.
- For clip angles , shear connections, end plates , bent plates , bolted moment flange plates and splice plates on beams, and for splices on columns, connection design is permitted to increment the user-input " NM bolt diameter " or moment " Bolt diameter " to a larger diameter (of the same units) if that diameter is checked ( ) in the " Available bolt diameters " setup list.
- Connection design is an iterative process which is repeated as many times as necessary to design a connection that stands up to the applied loads. If, by adjusting material thicknesses and dimensions and increasing the bolt size where necessary, connection design still cannot design a connection that stands up to the load, the connection fails. See end connection failure messages .
- For connection plates that are thicker than 5/16 inch, connection design determines the minimum thickness that is required, then rounds up that thickness to the nearest 1/8 inch (e.g., 9/16 would be rounded to 5/8). Or, if " Use miscellaneous plates list " is checked and the appropriate list (section) is filled out in Home > Project Settings > Fabricator > Standard Fabricator Connections > Plates , connection design uses the next-thickest plate on that setup list.
- General information related to your job's Connection design method is provided in the Design Procedure and Notes report. Information about the way individual connections have actually been designed is provided in the Expanded Connection Design Calculations or Design Calculations reports.
Framing situation checking (a phase of Process ) :
( Process ends)
| ( Create Solids begins) |
| If User Opitons > the " Modeling " tab > " Automatically process after modeling operation " is set to ' Process and create solids ', then pressing " OK " on a member edit window causes the member to undergo Create Solids. |
Creating 3D material (a phase of Create Solids ) :
Matching holes (a phase of Create Solids ) :
Generating bolts (a phase of Create Solids ) :
- During this phase of Create Solids , bolts are inserted through holes that match.
- Bolts are inserted through holes that were automatically matched (in the previous step) as well as through holes that were interactively matched using Match Holes . Exception: Bolts are not added if the holes are not " Matchable "
- Material thicknesses derived from the local shape file along with the " Maximum bolt stick-thru " set in Bolt Settings are used to calculate the bolt lengths.
Checking member marks (a phase of Create Solids ) :
Cleaning up submaterial (a phase of Create Solids ) :
Assigning piecemarks [SDS2 piecemarking] (a phase of Create Solids ) :
- This phase of Create Solids ensures that member piecemarks assigned to members are unique and that members that are exactly alike are assigned the same mark.
- Standard piecemarks are assigned to clip angles and/or end plates and/or shear plates ( ) and/or user base/cap plates ( ) for which the user has entered submaterial marks on the appropriate setup windows in the Master Fabricator .
- Members that have not yet received a piecemark are assigned a member piecemark at this time.
- The checking of members to ensure that they are the same only applies to system piecemarks , not user piecemarks . It is the user's responsibility to ensure that members assigned user piecemarks are physically equivalent.
( Create Solids ends)
When members are automatically marked for Process or marked for Create Solids :
|
Model > Member > Copy Model > Member > Move/Stretch
(and Move/Stretch Include Material )Model > Member > Erase (and Delete ) Model > Member > Change Type Component Tools ( Add , Copy , Explode , Move ) Group Member Tools ( Create , Ungroup , Add To , Remove From ) Undelete Tools ( Member Undelete , Visual Undelete , Quick Undelete )
- Members automatically complete all phases of Process and Create Solids when you perform any of the following member operations and User Opitons > the " Modeling " tab > " Automatically process after modeling operation " is set to ' Process and create solids '..
Model > Member > Copy Model > Member > Move/Stretch
(and Move/Stretch Include Material )Model > Member > Erase (and Delete ) Model > Member > Change Type Component Tools ( Add , Copy , Explode , Move ) Group Member Tools ( Create , Ungroup , Add To , Remove From ) Undelete Tools ( Member Undelete , Visual Undelete , Quick Undelete )
- Members that have undergone Process Selected Members are automatically marked for the last phases of Process and Create Solids (that is, for Create Solids ). To create solids for those members, either Create Solids for Selected Members or Process and Create Solids .
- If you change a " Use to split piecemarks " schema entry from checked to unchecked or vice-versa or if you " Add " or " Delete " a " Use to split piecemarks " schema entry, all members in the entire 3D model may optionally be marked for the piecemarking phase of Create Solids . Choosing the option to mark the members ensures that piecemarks will be properly re-assigned where appropriate. Tip: For this reason, it's a good idea to define your custom property schema at the beginning of a Job, before members have been added.
- If you Process Selected Members , it may happen that members connecting to members being processed are marked for Process and Create Solids .
- Members that connect to members that have been altered using Edit Member are not automatically marked for processing, but still may be physically altered during Process and Create Solids .
- Note: You cannot Add Material to a non-miscellaneous member that is marked for process . The fact that such a member can only be displayed in stick form prevents you from doing so. This helps to prevent errors and thus helps to preserve the database integrity of the model.
- Tip 1: To tell which members in a view have been marked for the two primary phases of Process and Create Solids , choose Model > Status Display and set a display color for " Needs to be processed " (priority 1) and another color for " Needs solids created " (priority 2).
- Tip 2: If Process and Create Solids has not automatically marked a member for Process and Create Solids , you can mark it yourself using Model > Member > Mark for Processing . Do this, for example, to apply changes made at Home > Project Settings > Job or Fabricator Setup to specific members.
Prioritization in connection design :
In order to design connections and generate materials during Process and Create Solids , connection design uses information from Job Options and Fabricator Options , from member work points laid out in Modeling , from member edit windows and the local shape file , as well as built-in routines based on the " Connection design method ." Connection design determines what settings are to be used when designing members and their connections in an orderly manner. Users have considerable control over the way that connection design prioritizes how it sorts information used during Process and Create Solids :
|
|
|
|||
|
|
|
|||
|
|
|
|||
|
|
Connection design creates connections based on connection design locks , giving users complete control of the most elemental of connection settings.
You can override a failed connection by generating a forced connection . This gives you the connection that connection design would have created if it had not failed the connection. Care should be taken doing this, as you may get results that are physically impossible or ill advised from an engineering standpoint.
Connection design does not alter "
Members that have a " Model complete date " set are not affected by any phase of Process and Create Solids , including connection design.
Connection design may adjust the design of a connection in order to make it stand up to loading conditions or fit particular framing situations. For example, connection design may increase the bolt diameter or material thickness or cut materials to fit around the materials that they frame to. Tip: Automatic Search options are available for Bolt Diameters Changed by System and Connections Changed by System to help you quickly find members whose connections the system (connection design) has in some way changed.
Connection design looks at "
Assigning of piecemarks: System piecemarks are automatically assigned to members during Process and Create Solids (or as members are revised) unless user piecemarks have been assigned to those members. Piecemarking does not combine or break apart user piecemarks.
Example: at Home > Project Settings > Job , you specify the default bolt diameter for non moment bolts. On the Beam Edit window, you check the box for " Auto " for " NM bolt diameter ," thus causing the Home > Project Settings > Job value to be the minimum bolt diameter that connection design attempts to use in its first attempt to design the " Input connection type ." If, on the other hand, you enter a " NM bolt diameter " on the Beam Edit window, connection design first tries to use that size. If during Process and Create Solids connection design calculates that the connection will fail if it uses a bolt diameter of the size specified, connection design automatically increases the bolt diameter as needed to make the connection work.
Tip: To review the formulas that connection design uses during Process to design and test a connection, generate an Expanded Connection Design Calculations Report.
Things you can do after Process and Create Solids
As stated at the top of this page, Process and Create Solids may take place automatically. You therefore do not necessarily have to manually Process and Create Solids in order to accomplish the following:
- Generate 2D detail drawings .
- Print a Connection Design Calculations Report or Expanded Connection Design Calculations Report .
- Print an Advance Bill of Material .
- Download CNC information. Although it is not necessary, you may also want to create details before generating CNC downloads.
- Find the calculated values for items on Beam Edit , Column Edit , V ertical Brace Edit or Horizontal Brace Edit windows that are marked " Auto " (e.g. " Shear load ," " Minus dimension " & " Material setback ").
- Use Model > Status Display > Search > Failed connections to display members with connection design failures in your choice of color.
- View structural members in one of the three solid forms in order to visually inspect framing conditions and assess the validity of connection design. Members must be displayed in one of the solid forms in order for their associated materials to be shown in the model.
- Add material and fasten it to a member using Modeling operations such as Model > Material > Add , or Model > Hole > Add , or Model > Bolt > Add .
- Use Navigate > Snap to Surface to get to a view whose work plane is on the surface of the material that you click on. Do this in order to check connections or add material that is face-to-face with the surface or to add holes to the surface.
- Use Model > Member > Isolate to create " Preset " member views and " New " user views that you want to appear on the member's detail.
- Use Model > Material > Find Material to isolate members that include a particular material. Usually you would do this in order to inspect the member/material or make modifications.
- Do a clash report ( Reports > Clash Report ) to find materials that are too close together (under a specified tolerance).
- Use Save Assembly ( Model > Assembly > Save ) and Add Assembly ( Model> Assembly > Add ) to copy a connection from one member and add it to, for instance, members with plain ends.
- Make changes on a Beam Edit , Column Edit , Vertical Brace Edit or Horizontal Brace Edit window and assign the changes to all members with the same member piecemark .
- Conduct searches ( Edit > Search ) for members whose connections have specific characteristics (e.g., failed connections or connections that Process and Create Solids has changed).
- Revise connections using connection design locks .

