 Rotate View ( Modeling )
Tool summary :
Also see :
|
- Undo View Change (undoes Rotate View )
- Snap to Adjacent Surface (alternative to Rotate View )
- Snap to Farside Surface (alternative to Rotate View )
page 1 | contents | navigate > | 3D erection views | navigation | top
Quick instructions and a video (also see the detailed instructions ) :
|
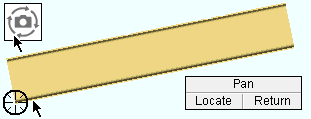
1 . Invoke Rotate View , then left-click ( Locate ) when the point location target snaps to where you want the center of the rotated view. |
|
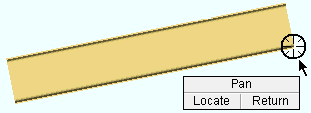
2 . Left-click ( Locate ) an optional direction point. |
|
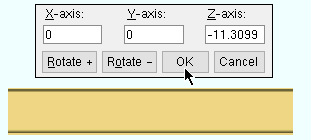
3 . The program automatically rotates the view so that the two points you located are shown as horizontal across the screen. Press the " OK " button to accept the rotation that is shown. |
page 1 | contents | navigate > | 3D erection views | navigation | top
Detailed instructions (also see the quick instructions ) :
The following instructions assume that you are using a 3-button mouse.
1 . From any view in Modeling , begin the Rotate View operation using any one (1) of the following methods:
Method 1 : Choose Navigate > Rotate View .
Method 2 : On your toolbar, click the icon pictured above .
Method 3 : Use a keyboard shortcut (if one has been set up).
2 . Locate- Pan -Return mouse bindings become active, and the status line prompts, "Locate a reference point:" Various Locate options become active.
2a : With the Locate icon you want selected, position your mouse pointer (
) so that the point location target snaps to where you want the center of the rotated view to be, then left-click ( Locate ).
3 . Locate- Pan -Return mouse bindings remain active, and the status line prompts, "Locate optional direction point:"
Alternative 1 : If you don't want to locate a directional point, right-click ( Return ). Go to step 4.
Alternative 2 : Move the point location target to the directional point you want and left-click ( Locate ). Go to step 4.
4 . The Rotate View window opens, and the point you located in step 2 translates to the center of your computer screen.
If in step 3 you located the optional direction point , the imaginary line designated by that point and the point located in step 2 is horizontal across the screen (see example ); if this view is satisfactory, press " OK ." Otherwise, continue.
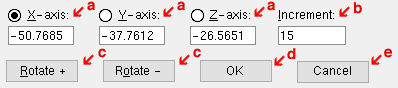
Option 1 ( a ) : If you know exactly the number of degrees of rotation you want, then enter that amount into the fields " X Axis:__ ," " Y Axis:__ " and " Z Axis:__ " The axes referred to are global axis .
Option 2 ( b & c ) : If you want to see the effect of rotating the view in increments, first make sure that the number of degrees in the field " Increment " is the number you want. Then press either the " Rotate + " or " Rotate - " button to rotate the view that number of degrees in a positive or negative direction. ( Alternative: Use the left/right arrow keys on you keyboard instead of the " Rotate +/- " buttons.) Note that the degrees entered to the " X Axis ," " Y Axis " and " Z Axis " fields change as you rotate.
Alternative 1 ( d ): Press the " OK " button to make the rotation permanent. Go to step 5.
Alternative 2 ( e ) : Press " Cancel " to undo all rotation and end this operation. Do not continue.
5 . At this point you have not actually created a new view; you have simply relocated your current view. If you were to Open ( Ctrl + o ) your current view again, you would undo the changes made with this tool.
page 1 | contents | navigate > | 3D erection views | navigation | top