 Save Area ( Modeling )
Tool summary :
- Creates a partial plan view or elevation view whose extents include the members that you select.
- This might be done to help you work on the total 3D model in sections.
- Another reason to create an area view is so you can later regenerate it as a erection view drawing and then place it on a sheet for plotting.
- In Site Planning, you can create erection views for crane placement. These erection views can be made into crane placement drawings using Detail Erection Views .
- Here is an example:
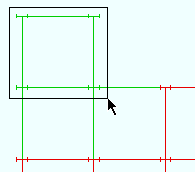
A new area view is shown being created. Note that the program selects members that are within the area box , plus all members that frame to those members. 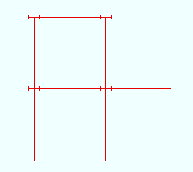
Open View ( Ctrl + o ) if you want to look at the new view that you created. - See the step-by-step instructions .
Also see :
- Depth checking (affects Save Area )
- Point selection by area box (affects Save Area )
- Drawing scale (alternative to scale set with Save Area )
- Detail Erection Views (to create 2D drawing of area view)
- Clip (to create part of a plan view from a plan view drawing)
page 1 | contents | file > | erection views | top
Step-by-step instructions :
The following instructions assume that you are using a 3-button mouse.
1 . In Modeling , invoke Save Area using any one (1) of the following methods:
Method 1 : Click the Save Area icon, which is pictured above. The icon can be taken from the group named ' File ' and placed on a toolbar (classic) or the ribbon (lightning).
Method 2 : If " Modeling layout style " is ' Classic ', you can use the menu system to choose File > Save Area .
Method 3, 4 or 5 : Save Area can also be configured to be invoked using a keyboard shortcut , the context menu , or a mode . For the lightning interface, this configuration is done using Customize Interface .
2 . The status line prompts, "Locate area to save." Locate- Pan -Return mouse bindings become active.
|
|
|
bindings |
2a : Hold down the left mouse button ( Locate ) and drag your mouse pointer (
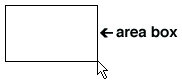
) to form an area box around the members you want to include in the area view.
3 . All members that you selected are displayed in the " Primary selection surface color ." The Name Required window opens. On it are the following entry fields:
Detail scale ( Base 12 or Base 10 ): If the words " Base 12 " are in parenthesis, then make your entry in imperial units (x inches = one foot, where x is the number of inches on the drawing that you want to represent 1 foot at the construction site). If the words " Base 10 " are in parenthesis, make your entry in metric units (x mm = 10 mm). The default scale is the View > Display Options > " Drawing scale " for your current erection view in Modeling (the view you are creating this view from). The entry you make here is the scale of the first 2D erection view drawing that you detail of this new view you are creating -- it doesn't affect the scale of your current view. Subsequent versions of the drawing detailed from this view will use the scale entered for this drawing in the Drawing Editor to File > Drawing Data > " Drawing scale ."
Drawing name: Any string of up to 61 characters that you want to use as the name for this view. Unless you want this view to overwrite an existing erection view (see below ), you should give this view an original name that has not been given to other views.
Erection view type: Primary or Secondary or Dimension only or Placement only . Select the type of straight grid line you want to be associated with the area view you are saving based on how you want it (the grid line) dimensioned when you Detail Erection Views and choose to " Annotate erection views ." Note: Locate options in Modeling such as INCL or INCM snap to points on erection views of any of these types.
Tip: You can, in Display Options , turn on or off the display of grid lines ( curved or straight ) based on their type (' Primary ' or ' Secondary ', etc.).
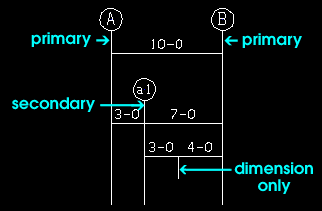
' Primary ' dimensions appear above ' Secondary ' dimensions. ' Dimension only ' erection views are auto dimensioned, but not with grid markers. ' Placement only ' erection views cannot be auto dimensioned during Detail Erection Views .
Pen color: White or red or Yellow or Green or Cyan or Blue or Magenta . Press the button for the display color that you want to apply to the grid line associated with the erection view that Save Area will add. Since that grid line will always be a straight grid line , this sets the color of the grid line in Modeling only. Straight grid lines are not generated when you Detail Erection Views . They can be automatically dimensioned on 2D erection view crane placement drawings, but are not themselves drawn.

Line type: The dash pattern of the straight grid line associated with the erection view that Save Area will add. This sets the line type of the grid line in Modeling only. Grid lines are not generated when you Detail Erection Views .

The button that is pressed sets the line type (dash pattern) of the area view that you are adding.

Alternative 1 : Press " OK " to save the view and go to step 4 (or 5).
Alternative 2 : Press " Cancel " to end the Save Area operation without creating a new view. Do not continue.
4 . Skip this step if it does not apply. If you typed in the name of a view that already has been created, you get a yes-no dialog with the question, "_ already exists. Replace? "
![]()
![]()
Alternative 1 : Press " Yes " to replace the view that already has that name with the view you are saving. Go to step 5.
Alternative 2 : Press " No " to end the Save Area operation without creating a new view. Do not continue.
5 . You remain in the same view that you were in before step 1.
Note: To look at the 3D model through the area view you just created, Open ( Ctrl + o ) the newly created view. You will find that the members you selected in step 2a are included in the view.
page 1 | contents | file > | erection views | top