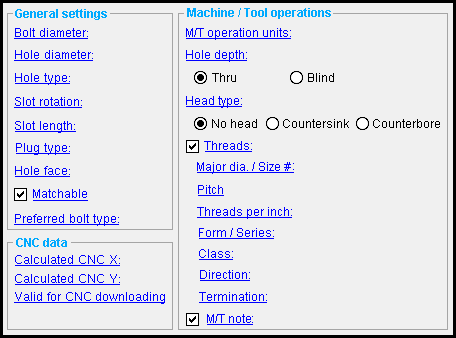
The Hole Edit window: ( hole number printed in title bar) (read-only)
Choices made on this window tell you the specifications applied to this hole in a full-featured SDS2 program .
- To open this window:
- Double-click (to review a hole or hole group)
- Use "Review Other ..." on the context menu (when the hole is covered by a bolt)
- Review Multiple 3D Holes
- Double-click a hole in the Model Tree
- Review 2D Items ( Drawing Editor -- opens a non-editable version of this window)
Also see :
page 1 | contents | 3D holes | top
------ General settings ------
Bolt diameter: The diameter (inches or mm) of the shank of the bolt to be inserted into the hole you are reviewing.
| diameter |
|
For AISC connection design methods: From this diameter and the " Hole type " selected below, the " Hole diameter " is calculated per AISC Table J3.3 or Table J3.3M ( Thirteenth Edition , p. 16.1-105). Also, when a bolt is added to this hole in a full-featured SDS2 program , the program looks here to determine the diameter of bolt that is required. If the " Hole type " is ' User slot #1 ' or ' User slot #2 ', the calculated slot length comes from the User Slot Lengths setup window.
Hole diameter: A system-calculated or user-entered distance. On a ' Standard round ' hole, the calculated value will be 1/16 inch larger than the input bolt diameter.
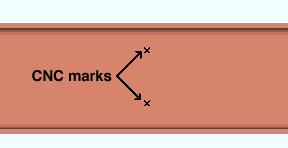
To add a CNC mark: Enter a diameter of ' 0 ' (zero). An "X" is used to represent a CNC mark in a view (or, for that matter, on a detail drawing).
Status Display: Hole status > Hole diameter
Hole type: Standard round or Short slot or Oversized round or Long slot or Cope hole or Erection pin hole or Anchor bolt hole or Plug weld hole or Grout or User slot #1 or User slot #2 or Vent/Drain .
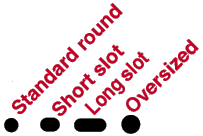
A ' Standard round ' hole is perfectly round and has a " Hole diameter " that is typically 1/16 inch larger than the input bolt diameter. See Table J3.3 or Table J3.3M ( AISC Thirteenth Edition , p. 16.1-105).
A ' Short slot ' is oblong in shape, has a diameter that is typically 1/16 inch larger than the input bolt diameter, and has a relatively short " Slot length " (1 5/16 inch for a 1 inch diameter bolt).
An ' Oversized ' hole typically inputs a " Hole diameter " 3/16 inch larger than the input bolt diameter. See Table J3.3 or Table J3.3M ( AISC Thirteenth Edition , p. 16.1-105).
A ' Long slot ' is oblong in shape, has a diameter 1/16 inch larger than the input bolt diameter, and has a relatively long " Slot length " (2 1/2 inch for a 1 inch diameter bolt).
A ' Cope hole ' is for using a punch or drilling machine instead of a cutting machine to cope a piece of material. By default, cope holes are not matchable ("
Matchable ").
An ' Erection pin hole ' is a hole on the end of a column for use by a crane to lift the column into place (see show erection pin holes on columns ). By default, erection pin holes are set to be not matchable ("
Matchable ").
An ' Anchor bolt hole ' is a hole for anchor bolts in a column base plate. By default, anchor bolt holes are not matchable ("
Matchable ").
A ' Plug weld hole ' is for adding to a material before the material is plug welded . By default, plug weld holes are not matchable ("
Matchable ").
A ' Grout ' hole may be used for pouring grout under a base plate. By default, grout holes are not matchable ("
Matchable ").
' User slot #1 ' and ' User slot #2 ' are slots whose " Slot length " are set, based on the " Bolt diameter ," from user-entered length settings maintained in the User Slot Lengths setup window.
' Vent/Drain ' is a vent hole or drain hole for galvanizing. For this type of hole, a " Plug type " can be entered When this type of hole is selected, the " Hole diameter " entered here matches the " Default vent/drain hole diameter " on the Galvanizing Settings window. By default, vent/drain holes are not matchable ("
Matchable ").
Status Display: Hole status > Hole type
Slot rotation: A positive or negative value from 90 to -90 degrees. This applies when the " Hole type " is ' Long slot ' or ' Short slot '. Slot rotations can be modeled to a precision of 0.1 degree.
| when the hole group X axis
is horizontal (<==>) |
when the hole group X axis
is vertical |
| Example of Slot Rotation | |
|
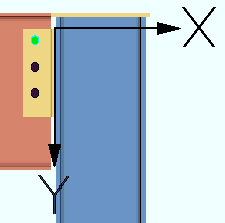
Verify Hole Group Reference Point shows the hole group X axis as horizontal (parallel with the beam). The slots on this clip angle are rotated 90 or -90 degrees, thus making them vertical. |
' 0 ' (zero) degrees rotates the slot so that its length is parallel to the " Hole group rotation ." The " Hole group rotation " is the hole group X axis that is shown when you Verify Hole Group Reference Point .
A ' positive number ' of degrees rotates the slot counterclockwise from its ' 0 ' orientation.
A ' negative number ' of degrees rotates the slot clockwise.
Status Display: Hole status > Slot rotation
Slot length: The system-calculated or user-entered distance (in the primary dimension " Units " or other units ) between the two points farthest from one another on the perimeter of a slot. This applies when the " Hole type " is ' Long slot ' or ' Short slot ' or ' User slot #1 ' or ' User slot #2 ' .
| slot length |
|
|
A ' system-calculated slot length ' is -- for a ' Long slot ' or a ' Short slot ' when an AISC connection design method is employed -- the standard slot length based on the " Bolt diameter " and " Hole type " per AISC Table J3.3 or Table J3.3M ( Thirteenth Edition , p. 16.1-105). For a ' User slot #1 ' or ' User slot #2 ', the system-calculated slot length comes from the User Slot Lengths setup window.
A ' user-entered slot length ' may be entered after the " Hole type " has been established.
Status Display: Hole status > Slot length
Plug type: No Plug or Zinc Plug or Plug Weld or Aluminum or Epoxy . This applies when the " Hole type " is ' Vent/Drain '.
' No Plug ' should be selected if there is no reason for plugging the vent/drain hole.
' Zinc Plug ' or ' Plug Weld ' or ' Aluminum ' or ' Epoxy ' are various types of plugs or methods for plugging vent/drain holes after galvanizing in order to seal the hole and smooth the surface of the material.
Status Display: Hole status > Plug type
Hole face: This reports the face that the hole is to be drilled or punched from. The faces of different materials are illustrated below.
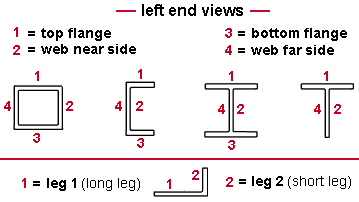
If this box is checked (
) and the hole(s) are in a material that is face-to-face with a beam, column or brace main material, the matching holes phase of Create Solids automatically matches holes to the member main material and a later phase of Create Solids inserts bolts through the matching holes. Also, when this box is checked, users of a full-featured SDS2 program can manually match hole(s) to a different material.
If the box is not checked (
), the hole(s) will not be matched to another face-to-face material.
Status Display: Hole status > Matchable
Preferred bolt type: Auto or A325N or etc.
When ' Auto ' is selected, the " Default non-moment bolt type for this job " or " Default moment bolt type for this job " becomes the bolt type when bolts are added to this hole.
If a ' specific bolt type ' is selected, that type will be used.
Status Display: Hole status > Preferred bolt type
page 1 | contents | 3D holes | top
------ CNC (Computer Numerically Controlled) data ------
| The hole number displayed in this window's title bar is the hole that settings in this section apply to. The hole number also identifies holes under " Select other " or " Edit other " in the context menu and in the balloon description when your mouse pointer hovers a hole. The hole number is not displayed for multi-hole edit . |
Calculated CNC X: The calculated distance (in the primary dimension " Units ") from the end of the material along the X material axis to the center of the hole, slot or mark. This should exactly match the equivalent coordinate that is reported in a CNC file that is in the DSTV format.
Calculated CNC Y: The calculated distance (in the primary dimension " Units ") along the Y material axis to the center of the hole, slot or mark. This should exactly match the equivalent coordinate that is reported in a CNC file that is in the DSTV format.
For web holes , this is the distance from the bottom flange to the center of the hole/slot/mark.
For flange holes , this is the distance from the web center line and will be negative (-) if the CNC item is on the far side of the center line, positive (+) if the CNC item is on the near side of the center line.
Valid for CNC downloading: ![]() or
or ![]() .
.
If this box is checked (
), this hole is permitted to be downloaded to a CNC file.
If the box is not checked (
), then the hole will not appear in the CNC file for the member or material that the hole is a part of. The hole will have to be fabricated manually.
page 1 | contents | 3D holes | top
------ Machine / Tool operations ------
| Please note: For these options to be enabled, the " Hole type " must be ' Standard round '. |
M/T operation units: ![]() Imperial or
Imperial or ![]() Metric .
Metric .
'
Imperial ' results in distance entries to various fields in this section being expressed in the primary dimension " Units " that are specified in Drawing Presentation in Fabricator Setup .
'
Metric ' results in distance entries to the fields in this section being expressed in millimeters. These distance-entry fields include " Depth " (blind hole), " Diameter " (countersink), " Diameter " (counterbore), " Depth " (counterbore), etc.
Hole depth: ![]() Thru or
Thru or ![]() Blind . The " Hole type " for a blind hole must be ' Standard round '.
Blind . The " Hole type " for a blind hole must be ' Standard round '.
|

'
Thru ' makes the hole the full depth of the ply of the material to which the hole has been added.
'
Blind ' plus a ' Depth ' results in a blind hole that is the specified " Depth ." The blind hole will be visible on the " Hole face " of the material, but will not be visible on the opposite face.
VIDEO 
Hole information for a blind hole is shown on a miscellaneous member detail. (Recorded in SDS2 Detailing , v2016.) 'Depth' is the length of the blind hole in the " M/T units ."

A blind hole's depth is the distance from the material's surface (the " Hole face ") to the bottom of the hole.

A label on a member detail indicating that the depth of a blind hole is 0.75 inch. Status Display: Hole status > Thru hole and Blind hole and Blind hole depth
Head type: ![]() No head (straight) or
No head (straight) or ![]() Countersink or
Countersink or ![]() Counterbore . The " Hole type " for a countersink or counterbore hole must be ' Standard round '.
Counterbore . The " Hole type " for a countersink or counterbore hole must be ' Standard round '.
|

'
No head (straight) ' results in a perfectly cylindrical hole that is the same diameter (the " Hole diameter ") at any cross section across its entire length.
'
Countersink ' plus a " Diameter " and " Angle " prepares the hole to receive the head of a bolt or screw so that the head will not project beyond the face of the material.
VIDEO 
The label for a countersink hole with threads is shown on the member detail. (Recorded in SDS2 Detailing , v2016.)

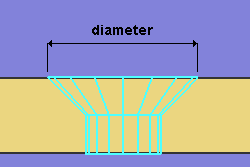
A label on a member detail that calls out a 0.81 inch hole with a countersink diameter of 1.63 inch and an angle of 82 degrees. 'Diameter' is the countersink hole's maximum diameter (in the " M/T units ").. The hole is at its maximum diameter at the surface of the material.
|
The diameter of the hole at the end opposite to the countersink is the " Hole diameter " or, if the hole is threaded, the " Major dia ." |
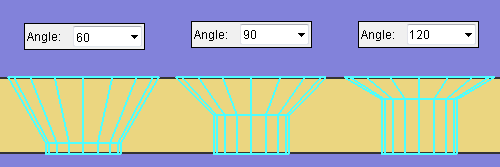
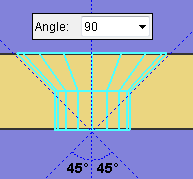
'Angle' is the angle of the countersink (in degrees). This is the angle between opposite sides of the countersink conical bore.
|
The specified " Angle " (' 90 ' in this example) sets the angle between opposite sides of the countersink cone. |
Status Display: Hole status > Countersink and Countersink diameter and Countersink angle
'
Counterbore ' is like ' Countersink ', except that the hole is bored to receive a cylindrical head rather than a conical head.
VIDEO 
Hole information for a counterbore hole is shown on a miscellaneous member detail. (Recorded in SDS2 Detailing , v2016.)
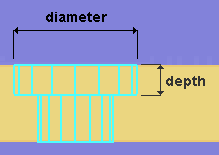
A counterbore is defined by its " Diameter " and a " Depth ."

A label on a member detail that calls out a 0.81 inch hole with a counterbore diameter of 1.63 inch and a counterbore depth of 0.25 inch. 'Diameter' is the counterbore diameter (in the " M/T units ") at the " Hole face " surface of the material.
'Depth' is the length of the counterbore (in the " M/T units "). This distance is from the material's surface (the " Hole face ") to the bottom of the counterbore.
Status Display: Hole status > Counterbore and Counterbore diameter and Counterbore depth
Threads: ![]() or
or ![]() . The " Hole type " for a hole with threads must be ' Standard round '. The hole can be a blind hole or thru hole or have any " Head type ."
. The " Hole type " for a hole with threads must be ' Standard round '. The hole can be a blind hole or thru hole or have any " Head type ."
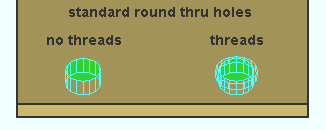
|
Most thread information is not modeled, but the thread information does affect the hole symbol callout label that may be generated during auto detailing. |
If this box is checked (
), options such as " Threads per inch " or " Pitch " and " Direction " may be used to define hole threads. Most thread settings do not affect the model, but will affect the hole symbol callout label for a threaded hole.
If the box is not checked (
), the hole will not be threaded.
Status Display: Hole status > Threads
Major dia. / Size #: The nominal diameter of the threaded hole. This is the threaded portion of a hole's largest diameter or outside diameter. By default, the major diameter is the same as the " Hole diameter ." " Major dia. " affects the hole symbol callout label for a threaded hole.
When " M/T units " is ' Imperial ', a diameter symbol ø precedes the major diameter value, which is expressed in decimal inches.

|
ø.8 1 = " Major dia. " (inch) 16 = " Threads per inch " UNC = " Form / Series " 2 = " Class " RH = " Direction " |
When " M/T units " is ' Metric ', the letter M precedes the major diameter, which is expressed in millimeters. In the example below, the major diameter is 21 mm.

|
M21 = " Major dia. " (mm)
1.588 = " Pitch " 5H/5g = " Class " |
Status Display: Hole status > Thread major dia./size #
Threads per inch: This is the count of the threads per inch (TPI) along the depth of the hole. This applies when " M/T units " is ' Imperial '. " Threads per inch " affects the hole symbol callout label for a threaded hole. TPI does not affect the representation of a hole in Modeling .

|
ø.81 = " Major dia. " (inch) 16 = " Threads per inch " UNC = " Form / Series " 2 = " Class " RH = " Direction " |
| Threads per inch (TPI) is the inverse of " Pitch ." For example, if the threads per inch are 32, then 1/32 (the inverse) = 0.03125 inch. Converting this to mm gives you: 0. 0.031250 inch x 25.4 mm/inch = 0.79375 mm. Thus, in a standard table of screw threads, a TPI of 32 is equal to a pitch of 0.7938 mm. |
Status Display: Hole status > Threads per unit
Pitch: The distance between thread peaks in millimeters. Pitch is the inverse of threads per inch, but expressed in mm: In other words, pitch is millimeters per thread. " Pitch " is available as an entry field when the " M/T units " is ' Metric '. The pitch value entered here is recorded in the hole symbol callout label for a threaded hole. Pitch does not affect the representation of a hole in Modeling .

|
M21 = " Major dia. " (mm)
1.588 = " Pitch " 5H/5g = " Class " |
Status Display: Hole status > Threads per unit
Form / Series: None or UNC (coarse) or UNF (fine) or UNEF (extra fine).. This applies when " M/T units " is ' Imperial ' and " ![]() Threads " is checked. It affects the hole symbol callout label for a threaded hole. In the example below, the series is UNC (coarse).
Threads " is checked. It affects the hole symbol callout label for a threaded hole. In the example below, the series is UNC (coarse).

|
ø.81 = " Major dia. " (inch) 16 = " Threads per inch " UNC = " Form / Series " 2 = " Class " RH = " Direction " |
' None ' results in the form / series not being included in the hole callout label. If ' None ' had been selected for the above example, the label would read: ø.81-16-2B-RH ,
' UNC ' stands for Unified National Course. For the example above. 'UNC' was selected as the "Form / Series," and therefore the label reads ø.81-16UNC-2B-RH ,
' UNF ' stands for Unified National Fine. If 'UNF' had been selected for the example above, the label would read ø.81-16UNF-2B-RH .
' UNEF ' stand for Unified National Extra Fine. For the example above. 'UNEF' was selected as the " Form / Series ," and therefore the label reads ø.81-16UNC-2B-RH .
Status Display: Hole status > Thread form/series
Class: 1 or 2 or 3 or 6H/6g or etc. . " Class " is a designation of tolerance, or the closeness of fit between two mating parts. The class is recorded to the thread information line on the hole symbol callout label for a threaded hole. Class does not affect the representation of a hole in Modeling . In the example below, the class is 2, and B indicates that the thread is internal.

|
ø.81 = " Major dia. " (inch) 16 = " Threads per inch " UNC = " Form / Series " 2 = " Class " RH = " Direction " |
When " M/T units " is ' Imperial ': 1
'' indicates generous tolerance.' 2 ' designates normal production. If no class is designated, common practice is to assume that 2 is the class. .
' 3 ' designates high accuracy.
Note: The letter B in the imperial example shown above indicates internal thread, i.e., threads in a hole, the female part. A nut would also have internal threads. The letter A would indicate external threads, i.e., threads in a screw, the male part.

M21 = " Major dia. " (mm)
1.588 = " Pitch "
5H/5g = " Class "When " M/T units " is ' Metric ':
' 6H/6g ' indicates general purpose. If no class is designated, common practice is to assume that 6H/6g is the class.' 4H/4g ' and ' 5H/5g ' and ' 7H/7g ' are a few other possible selections.
Direction: ![]() RH or
RH or ![]() LH . In the example below, the direction is RH (right-handed).
LH . In the example below, the direction is RH (right-handed).

|
ø.81 = " Major dia. " (inch) 16 = " Threads per inch " UNC = " Form / Series " 2 = " Class " RH = " Direction " |
'
RH ' stands for right-handed. For the example above, ' RH ' was selected as the " Direction ," and therefore the label reads ø.81-16UNC-2B-RH . If neither RH or LH is designated in the label, common practice is to assume that the threads are right-handed.
'
LH ' stands for left-handed. If 'LH' had been selected as the " Direction " for the example above, that label would read ø.81-16UNC-2B-LH .
Status Display: Hole status > Right hand thread direction and Left hand thread direction
Termination: ![]() Thru or
Thru or ![]() Thread depth .
Thread depth .
'
Thru ' specifies that the threads be along the entire depth of the hole.
'
Thread depth ' specifies that the threads be the depth entered here. An additional annotation will appear on the hole symbol that will be auto detailed on the member detail on which this hole appears. .

The " Depth " specified for this example is 0.5 inch. 'Depth' is the length of the threads (in the " M/T units "). This distance is from the material's surface (the " Hole face ") to the depth of the hole at which the threads end.
Status Display: Hole status > Thread thru and Thread depth
M/T note: Any text that is entered will appear below other lines in the hole symbol callout label for a M/T hole.

|
TYPICAL is the " M/T note " in this example of a hole callout label. |
page 1 | contents | 3D holes | top

"OK" (or the Enter key) closes this window when you are done reviewing the settings on it.
