The Edit Detailing Rule window
|
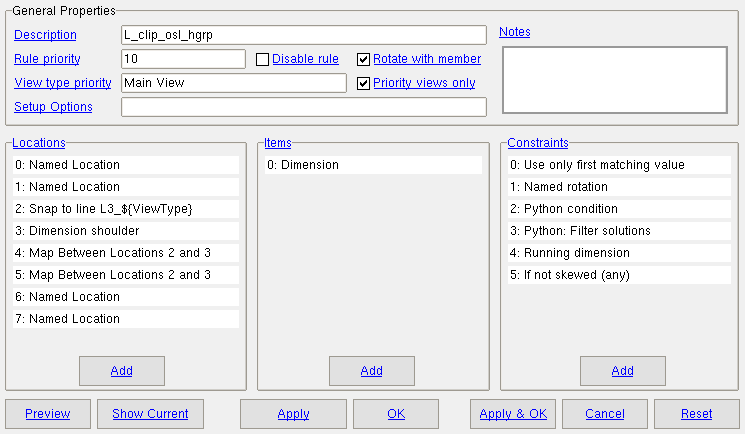
To open this window :
- Load Template , then invoke Display Rules , then double-click a rule.
- Invoke Display Rules , then press " Add new " to create a new rule.
Also see
- List Setup Attributes (for writing rules keyed to setup choices)
- detail_lib.py (contains functions for defining rules)
page 1 | contents | display rules
------ General Properties ------
| Tip: The template development tool List Rule Settings outputs get a report on the General Properties of all templates available to your current Job . |
Description: the name of the rule. This is the name that you click when to open this window from the Detailing Rules window.
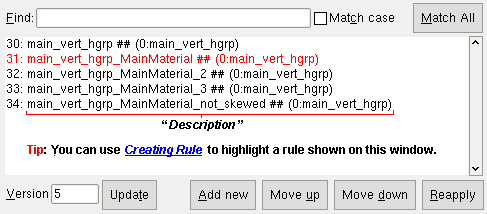 |
| To open the Detailing Rules window, you can use Display Rules . Double-clicking a rule on the Detailing Rules window opens the Edit Rule window. |
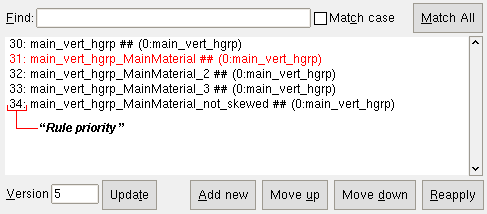
Rule priority: a number . The priority is the number that is listed in front of each rule " Description " that is shown on the Detailing Rules window. The priority sets the order in which rules from an individual template are applied. Rules with lower numbers take precedence over rules with higher numbers, meaning that the lower number rule, if it applies, will be used over a rule with a higher number.
|
| Rules are sorted on the Dealing Rules window per their " Rule priority ," with the rule that has the lowest priority number listed first. |
View type priority: lets you enter view types separated by commas . For example, on a column you might enter Main View , Face 1 or Face 3 or you may choose to simply enter Main View . The view types that are available depend on the member type. The option " Priority view only " affects how automatic detailing with templates interprets the " View type priority " that is set for a rule.
| Beam Views | |
| template detailing view type | member isolation preset |
| Main View | MAIN VIEW |
| Face1 | TOP FLANGE VIEW |
| Face3 | BOTTOM FLANGE VIEW, CROSS SECTIION |
| Cross Section | CROSS SECTION |
| End View 0 | LEFT END VIEW |
| End View 1 | RIGHT END VIEW |
| Column Views | |
| template detailing view type | member isolation preset |
| Main View | MAIN VIEW |
| Face1 | FACE 'A' VIEW |
| Face3 | FACE 'C' VIEW |
| Main Section | MAIN VIEW, CROSS SECTION |
| End View 0 | BOTTOM END VIEW |
| End View 1 | TOP END VIEW |
| Horizontal Brace and Vertical Brace Views | |
| template detailing view type | member isolation preset |
| Main View | MAIN VIEW |
| Face1 | TOP FLANGE VIEW |
| Face3 | BOTTOM FLANGE VIEW |
| Cross Section | MAIN VIEW, CROSS SECTION |
| End View 0 |
LEFT END VIEW |
| End View 1 | RIGHT END VIEW |
|
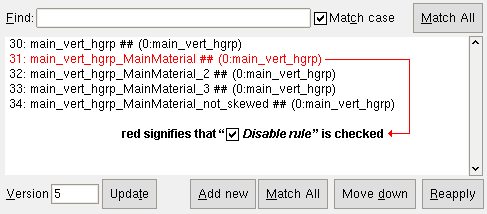
If this box is checked (
), the rule will not be applied during automatic detailing with templates . The rule will be printed in red on the Detailing Rules window.
If the box is not checked (
), the rule is permitted to be applied during automatic detailing with templates.
If this box is checked (
), dimensions and annotations will be allowed to be rotated automatically so that they are orthogonal (at right angles) to the material depicted in a particular view.
If the box is not checked (
), dimensions and annotations will still be allowed to be rotated, but the template developer needs to enter a " Rotation " such as MemberLeft or MemberRight or MemberDown or MemberUp instead of slimply Left or Right or Up or Down .
If this box is checked (
), the rule will be permitted to be applied only to view types which have been assigned a " View type priority ."
If the box is not checked (
), the rule will be applied first to those views which have been assigned a " View type priority ," but may also be applied to other views. The rules listed under " View type priority " will be applied in the order that they are listed.
Setup options: a setup attribute == or != assigned value Python statement can be entered here as a boolean test to determine whether a particular value has been assigned to a particular setup field. If the statement returns True, then that setup field has been set to the assigned value, and the rule will be applied. If the statement returns False, the rule will not be applied. Here are some examples:
| setup attribute == assigned value
or setup attribute != assigned value |
The rule will be applied when ... |
| bm_flgs.show_from_end == EndOfBeam | " Extension dimensions from (bolted connection) " is set to ' End of beam ' in Dimension Settings setup. |
| bm_flgs.show_ext_orig == Yes |
" Show extension dimension origin " is checked ( |
| column_vert_pos != Horizontal | " Detailed " for columns is not set to ' Horizontal ' in Member Detailing Settings . |
Composing the Python statement: Refer to the report that is output for List Setup Attributes . Compose a statement in the form setup attribute == assigned value or setup attribute != assigned value , where the setup attribute corresponds to a particular setup field and the assigned value corresponds to the choice made to that setup field. != and == are boolean operators .
Notes: You can write comments to yourself or other developers in this area. Information written in this area does not affect automatic detailing with templates . The information is for people to read, not for the detailing program to read.
page 1 | contents | display rules | top
------ Locations ------
Absolute location (inches): The X, Y coordinates of the location.
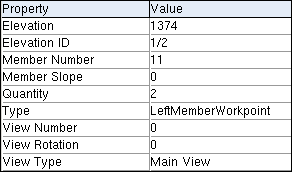
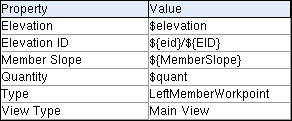
Named location: A series of property-value pairs that describe a given location. The Nearest Names tool can be used to get a complete set of such property-value pairs for any shown location on a given drawing. However, such a precisely described named location is probably not what you want for writing a rule. Instead, you want to write a named location using variables.
|
The named location showed here was found using Nearest Names ( |
|
This is a named location written for finding a member's left-end workpoint elevation in a rule. Variables are used, thus making the rule more general in its application than if that same rule used the named location shown in the example above. |
page 1 | contents | display rules | top
------ Items ------
|
|
When you Detail with templates , items that may be added using the template are arcs , arc dimensions , bevel symbols , circles , clouds , construction circles , construction lines , dimensions , extension dimensions , hole symbols , labels , lines , named locations , pointers , snap lines, symbols , weld symbols , view cuts, workpoints .
Items may be positioned based on the " Locations " that are specified.
page 1 | contents | display rules | top
------ Constraints ------
The job of constraints is to apply limitations to when the " Items " are drawn at the specified " Locations ."
page 1 | contents | display rules | top


