Import/Export to/from Revit Structure
| To import from Autodesk Revit Structure, or export to Revit Structure, the Revit user needs to purchase a plug-in for their program. Information is available at https://sds2connect.com/ . The medium of interchange between SDS2 software and Revit is an XML file. Beams , columns , vertical brace and horizontal braces can be seamlessly transferred to and from Revit Structure. Joists can also be transferred. To transfer other member types , such as miscellaneous members, you need to use a different import/export method. To import and export connections, the Revit Structure user needs the "Revit SDS2 Connect" plugin as well as the "Revit SDS2 Roundtripping" plugin. System connections can be transferred, but graphical connections cannot. |
On this page :
- Model > Revit > Import ...
- Model > Revit > Export ...
- Model > Revit > Export selected ...
- Model > Revit > Export to new Revit project ...
Model > Revit > Import (in Modeling ) :
Choose this tool if you are importing from Revit Structure for the first time, or if you have imported from Revit previously. If you have imported from Revit previously, the XML file that you select to be imported will introduce to your current Job changes made in Revit to beams , columns , vertical brace , horizontal braces and joists that are currently in your model, but will not affect members of those types that are exactly the same in both models. The XML file will also include information on new beams, columns and braces that have been added to or deleted from Revit since the last time you imported. As a result of this operation, members may be added to or deleted from or altered in your 3D model, toward the end that your 3D model is made to exactly match the equivalent 3D model as it existed in Revit at the time that the XML file was generated in Revit.
Before importing: If you have previously done a Model > Revit > Import of an XML file to your current Job and current Fabricator from a particular Revit project, the XML file that you are now importing needs to have originated from that same Revit project. If you have never imported to your current Job and Fabricator, the XML file you are now importing must have originated from a Revit project that has never imported from a different SDS2 Job and Fabricator. During the process of "roundtripping" between SDS2 and Revit models, the XML files that are generated "tie together" the SDS2 Job and the Revit project so that equivalency can be maintained between the unique identities of entities in the two models.
1 . In Modeling , choose Model > Revit > Import ... , or click the Import icon (shown above).
2 . Select the XML file that you want to import. Be aware that once you import an XML file from a particular Revit project to your current Job, the next XML file that you Model > Revit > Export from your current Job can only be used in the Revit project that created the XML file you are currently importing. In other words, the process of "roundtripping" between SDS2 and Revit "ties together" the SDS2 Job and the Revit project.
3 (if applicable) : Skip this step if none of these possibilities apply. For example, skip this step if you have never before done a Model > Revit > Export or a Model > Revit > Import from your current Job.
Possibility 1 : If you have done a Model > Revit > Export from your current Job but have never before imported, you will get a message like the following, where revit_project.rvt is the name of the Revit project which the XML file you selected in step 2 was exported from. If you have never done a Model > Revit > Export from your current Job, this won't happen. Press the "OK" button if you want to continue.
|
Possibility 2 : If the XML file you selected in step 2 was exported from a Revit project which previously had done a "Roundtripping" import from a different SDS2 Job, you will get a message like the following. You will not be able to continue on to step 4. That file is not importable.
|
Possibility 3 : If the XML file you selected in step 2 cannot be read, you may get a parsing error. An XML file is unreadable as an import file if, for example, it was generated for a purpose unrelated to "Roundtripping." You will not be able to continue on to step 4. The file is not importable.
|
Possibility 4 : If the XML file you selected in step 2 was exported from SDS2 software and not from Revit, you will get a message like the following. You will not be able to continue on to step 4. The file is not importable.
|
Possibility 5 : If the XML file you selected in step 2 was exported from a Revit project in which no member or connection information was changed since you last imported from Revit, you will get a message like the following. You will not be able to continue on to step 4. That file is not importable.
|
Possibility 6 : If the XML file you selected in step 2 has already been imported into your current job, you will get a message like the following. You will not be able to continue on to step 4. That file is not importable.
|
4 . Where there are differences between entities in your current Job and the analogs to those entities in the XML file, you will be given options to import or not import the entities. If the XML file contains members which exactly match members in your current Job, those members will be skipped over, and you will not be given the option to import them. Optionally, you may press " Print " at the bottom of this window to save a report listing member deletions, additions, and modifications. Press " OK " on the bottom of this window to continue with the import.
|
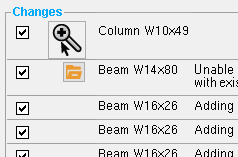
When you import, you get a list of to-be-added or to-be-modified members like this one. To prevent a member from being imported or changed, uncheck its check
box ( |
If Revit Import is unable to match the imported material with an entry in your Job's shape file, you may press the "file cabinet" browse button (
) to map that member to a different material. If the connection is changed in the XML file, you may click the Zoom to Fit button (
) next to the member description so that the member fills up the Modeling window.
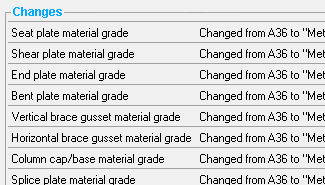
5 . Where there are differences between the Job or Fabricator Options in your current Job and the analogs in the XML file, you will get a list of setup changes that will be made in your current Job. Optionally, you may press " Print " at the bottom of this window to save a report listing member changes, press " Cancel " to stop the import, or press " OK " to continue with the import.
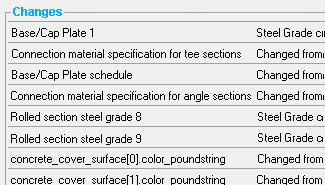
When you import, you may get a list of Job Setup changes like this that you may examine and print.
You may also get a list of Fabricator Setup changes like this one that you may examine and print. 6 . Members in your model which have been changed due to information imported from the XML file will be displayed in stick form. To see the results of this import in solids form, you will need to Process and Create Solids .
As a result of an import, new members ( beams , columns , vertical brace , horizontal braces, joists only) may be added or modified in your current Job . Beams, columns, braces or joists may also be deleted from your current Job, if their counterparts in the Revit Structure Project have been deleted. If the Revit user has the "Revit SDS2 Connect" plugin, connections in SDS2 will also be updated to match their state in the Revit model at the time that the XML file was generated. Changes may also be made to setup -- for example, if new plate definitions were added to the Base/Cap Plate Schedule in Revit, they will now also be added to your current Job in SDS2.
Model > Revit > Export (in Modeling ) :
Choose this tool if, for example, you have previously done an Import Model from Revit and you now wish to export your changes back to Revit so that the two models can become synchronized. Information on all beams , columns , vertical brace , horizontal braces and joists that exist in your current Job may potentially be exported in the XML file that is generated. Information on beams, columns, braces and joists which have not changed since you did the Import from Revit will not be included in the XML file. If you deleted members that were originally imported from Revit, information about that deletion will be included in the XML file; upon import of the XML file into Revit, the import routine will delete the deleted SDS2 member from the Revit model. Similarly, if you added a new beam, column, brace or joist in SDS2, that new member will be added to Revit when the XML file you are exporting is imported into Revit.
Model > Revit > Export selected (in Modeling ) :
This tool is provided for special circumstances under which you wish to share only a part of you current Job with Revit Structure. For routine synchronization with Revit Structure, you should instead use Export Model to Revit , since that tool provides the full set of data that is needed for complete synchronization of a model that is shared between the two programs. Be aware that you can select members that will not be exported. For example, you can select stairs or miscellaneous members, but they will not be exported. The only member types that can be exported are beams , columns , vertical brace , horizontal braces and joists .
Model > Revit > Export to new Revit project (in Modeling ) :
If you are having problems synchronizing your SDS2 model with the Revit model and the original Revit project has been corrupted, this may be your best option. It lets you export your entire SDS2 model to a Revit Structure project in which no "roundtripping" has yet been done.
Warning: Assuming that you have previously been exporting and/or importing XML files to/from a particular Revit project, this "reset" tool breaks the tie to that Revit project, which means that you will no longer be able to export XML files to that Revit project. The XML file which this tool creates will need to be imported to a Revit project which has never before imported from SDS2.

