 Edit Selection Filter
- General Overview
- Step-By-Step
- Tips and Tricks
- Related Tools
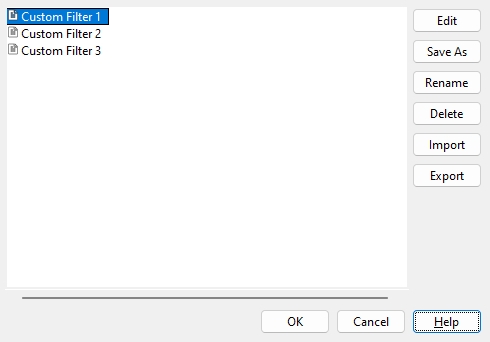
Edit : Opens an edit window to add or remove filters to the selected custom filter.
Save As : Creates an exact copy of the selected custom filter. This opens a window that prompts you to enter the new " Custom filter name ".
Rename : Opens a window that prompts the user to give the selected custom filter a new name.
Delete : Removes the selected custom filter(s) from the list.
Import : Imports custom filters from previously saved files.
Export : Saves the selected filter(s) to a specified location given the exact name of the custom filter. This opens a window that prompts you to specify where you want the filters saved.
Ok : Closes this window. If a custom filter is selected in the list, it will be the selected filter on the selection filter toolbar item.
Cancel : Closes this window. If a custom filter is selected in the list, the selection filter will remain as it was before.
1 . Click Edit Custom, which can be found at the bottom of the Selection Filter .
Alternative: Open Edit Selection Filter using the Find Tool by searching the name and clicking the icon, which is pictured above.
Learn more about alternative methods for launching commands.
2 . The Edit Selection Filter window will open. When you are done using the Edit Selection Filter window, click OK or press Enter to close it. The selected custom filter will be set for your selection filter.
Alternative: Click cancel to close the window and not update the current selection filter in the model. All changes will be saved to the custom filters.
- Set Selection Filter (one way to save custom selection filters)
- Select Items (inside of selection dialogs)
- Selection filter (toolbar or ribbon item)

