Member Isolation
About member isolation :
Also see :
- Status Display (select ' None ' and ' Masked ' to isolate)
- Find Material (isolates members in a different way)
- Display Options (isolates members in a different way)
member | loc | pcmk | num | top
How member isolation relates to detailing :
|
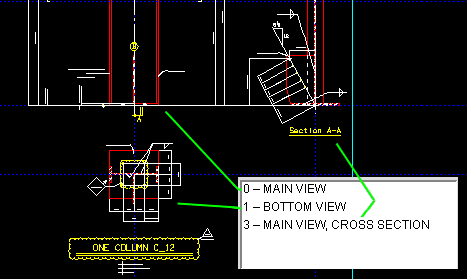
All views of the member that appear on the view list window will be regenerated in 2D on the member detail (when auto detailing of members is done in a full-featured SDS2 program ). The illustration below shows the three views on a detail along with the view list window.
Member views shown in Modeling of a member in isolation will be in exact proportions; on 2D details, views may be shortened. This shortening takes place automatically during auto detailing of members.
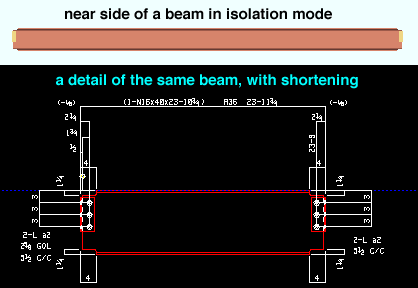
The same submaterials shown on a member's detail drawing are shown when the member is viewed in isolation. Materials that are not submaterials of the member will not be shown.
Example: A beam-to-column shear plate will be detailed with the column, not the beam; therefore the plate will be shown when the column is in isolation. It will NOT be shown when the beam is in isolation.
Views of members are created automatically as those members are created in a full-featured SDS2 program . Users can also create views. All views, regardless of whether they are system views or user views, are automatically are regenerated in 2D and appear on the member detail when that member is detailed. In Site Planning, users can use member isolation mode to look at a member using any of these views and to perform operations such as Member Review , Review Material , Hole Review and Bolt Review to review that member's various settings.
1 . While you are in Modeling , invoke any one of the following commands to isolate the member:
Note: Members cannot be brought into isolation until they have undergone Process and Create Solids .
2 . The main view (web near side) of the member you selected will be shown in isolation, and the Member View Toolbox will appear on screen.
3 (optional) . To access a different view, either double-click on its listing or select its listing and press the " Open " button.
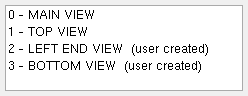
Note: The views listed will include the same submaterials that will be drawn on the member detail. The views with the words "(user created)" in parenthesis are views that the user added in a full-featured SDS2 program . The other views were automatically created when the member was created.
4 (optional) . While a member is in isolation, you can optionally execute commands such as Member Review , Review Material , Hole Review and Bolt Review to review the specifications of the various components of that member.
5 . Press the " OK " button on the Member View Toolbox (or press the Enter key on your keyboard) when you want to exit member isolation and return to Modeling 's normal operating mode.