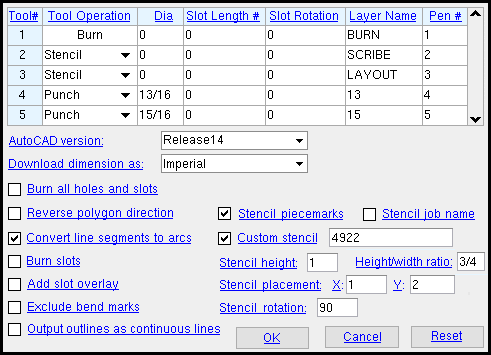
The DXF Tool Definitions window
DXF downloads bent plate and rolled plate as flat. On a bent plate, a CNC mark is placed 1 inch in from the edge on each end of the bend line. DXF download files are written in the " DXF version " set in " DXF Export Configuration " or, if this is unspecified, in the R10 format.
To open this window :
1 . On the Computer Numerically Controlled window, confirm that the " CNC type " is ' DXF Plate '. Then press the " Setup " button to open the CNC Setup window.
2 . Press the " Options " button on the CNC Setup window.
3 . The DXF Tool Definition window opens. Click here for information about the options that appear on this window.
Tip: If the " CNC Configuration " listed on the Computer Numerically Controlled window is not the one you want, use the " File " browse button (
) to select a different configuration or create an entirely new one.
Burn all holes and slots: ![]() or
or ![]() .
.
If this box is checked (
), the Layer Table is disabled , and all tool operations are written to the burn layer.
If the box is not checked (
), the Layer Table sets the DXF layer you want particular operations to be written to and identifies the operation to be performed on that layer.
| Layer Table
( sets the layer you want a tool operation to be written to ) |
||||||
| Tool # | Tool
Operation |
Dia | Slot
Length # |
Slot
Rotation |
Layer
Name |
Pen # |
| See the user manual for the CNC machine. | The operation to be performed on the layer. |

The diameter of the hole or slot. |
 In the primary dimension " Units ." |
Degrees counter- clockwise from horizontal. |
The name of the DXF layer to which you want the information for this tool to be output. | The drawing pen number for the layer set in the previous field. |
AutoCAD version: Unspecified (sets version to minimum) or Release 10 or Release 11/12 or Release 13 or Release 14 or 2000 - 2002 or 2004 - 2006 or 2007 - 2009 or 2010 or 2013 . This is the export version of the files that are output when you download DSTV files. After version R14, AutoDesk began to name their versions after the years in which they were released.
Also see: On the Drawing Export Configuration window, you'll also find an " AutoCAD version " option. That option applies to the export of DWG, DXF, DXB and DNG files and is independent of this option.
Download dimensions as: Imperial or Metric . The units that are being used in the current Job are irrelevant to the selection you make here. What is important is the units that are used by the CNC machine you are downloading to.
Select ' Imperial ' if you want data to be output in decimal inches.
Select ' Metric ' if you want data to be output in millimeters.
Reverse polygon direction: ![]() or
or ![]() . Downloads for CNC plate burners that read DXF output dictate a particular direction (clockwise or counterclockwise) for cuts interior to the material (for example, holes) and the opposite direction for exterior cuts (such as corner cuts). The direction dictates whether or not the material that is cut away is waste.
. Downloads for CNC plate burners that read DXF output dictate a particular direction (clockwise or counterclockwise) for cuts interior to the material (for example, holes) and the opposite direction for exterior cuts (such as corner cuts). The direction dictates whether or not the material that is cut away is waste.
If this box is checked (
If the box is not checked (
Convert line segments to arcs: ![]() or
or ![]() .
.
If this box is checked (
If the box is not checked (
If this box is checked (
If this is not checked (
overlay no
overlay

If this box is checked (
If this is not checked (
Exclude bend marks: ![]() or
or ![]() . SDS2 downloads bent plates flat, with their bends removed. This option lets you add bend marks to designate where the removed bend was. The option applies only if "
. SDS2 downloads bent plates flat, with their bends removed. This option lets you add bend marks to designate where the removed bend was. The option applies only if " ![]() Include layout marks in download " is on (checked).
Include layout marks in download " is on (checked).
If this box is checked (
If the box is not checked (
Warning : When "
Output outlines as continuous lines: ![]() or
or ![]() .
.
If this box is checked (
If this is not checked (
 |
 |
If this box is checked (
If the box is not checked (
 |
|
If this box is checked (
If the box is not checked (
If this box is checked (
If the box is not checked (
Stencil height: The maximum height (in the primary dimension " Units " or other units ) of characters that are stenciled when " Stencil piecemarks " and/or " Stencil job name " are checked.
Why 'maximum'? The " Stencil height " that you enter here is applied only if there is there is enough room for the stencil to be placed in. If there is not enough room, the height of the stencil is reduced to make it fit.
Tip: If the stencil gets reduced in height so that it can fit, then increase its " Character height/width ratio " and thus make the characters narrower so that the stencil can fit without the character height having to be reduced.
Character height/width ratio: The height-to-width ratio of characters that are stenciled when " Stencil piecemarks " and/or " Stencil job name " are checked. As the following examples show, the actual width of the stencil is equal to the " Stencil height " divided by the " Character height/width ratio ." Consequently, a ratio of ' 2 ' entered here results in a stencil character width of .5 if the " Stencil height " is ' 1 '.
| example | stencil
height |
stencil width | ratio
( ht / w ) |
height / ratio |
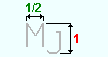
|
1 | .5 | 2
( 1 / .5 ) |
.5
( 1 /2) |
|
1 | 1 | 1
( 1 / 1 ) |
1
( 1 /1) |
|
1 | 1.5 | 2/3 or .667 ( 1 / 1.5 ) | 1.5 ( 1 /.667) |
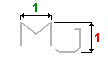
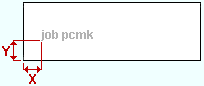
Stencil placement: Sets the X and Y distance that the stenciled piecemarks and/or Job name are placed from the reference point. If both " Stencil piecemarks " and " Stencil job name " are checked, the Job name is placed first, followed by a space and the piecemark as shown in the illustration below.
|
' X ': The distance (in the primary dimension " Units " or other units ) from the left edge of the plate to the left end of the stenciled characters.
' Y ': The distance (in the primary dimension " Units " or other units ) from the bottom edge of the plate to the bottom of the stenciled characters.
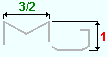
Stencil rotation: A positive or negative (-) number of degrees. This applies to characters that are stenciled when " Stencil piecemarks " and/or " Stencil job name " are checked.

|
|
rotation is around the left end of the text |
An entry of ' 0 ' (zero) degrees sets the stenciled characters to be horizontal. That is, parallel with the X axis (length) of the material.
A ' positive number ' of degrees rotates the stenciled characters counterclockwise from horizontal around the left end of the text.
A ' negative (-) number ' of degrees rotates the stenciled characters clockwise from horizontal around the left end of the text.
"OK" (or the Enter key) closes the DXF Tool Definition window. The CNC Setup window again becomes active. Press " OK " on that window to save the choices made on this window to the currently selected " CNC Configuration " file in your current Job .
"Cancel" (or the Esc key) closes this window without saving any changes made to it. The CNC Setup window again becomes active.
"Reset" undoes all changes made to this window since you first opened it. The window remains open.

