 Vertex Point (VTPT) ( Modeling & Drawing Editor )
Tool summary :
Also see :
- Modeling and the Drawing Editor (where VTPT can be found)
- Construction Line Add Material (adds through vertex points)
- Point location target (shows the point's position)
- X-Y-Z display (shows the point's coordinates)
- Annotation text ( Display Options in Modeling )
- Annotation text ( Display Options in the Drawing Editor )
- Offset Controls (affect VTPT )
- Noticed points (may be created with VTPT )
- status line (shows a dimensional constraint, if one is entered)
Examples :
|
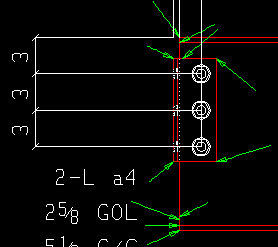
The pointers in this illustration indicate the position of vertex points on material in the Drawing Editor . |
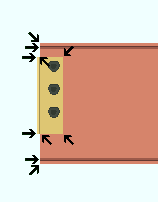
| These pointers show the position of vertex points on material in Modeling . |
|
|
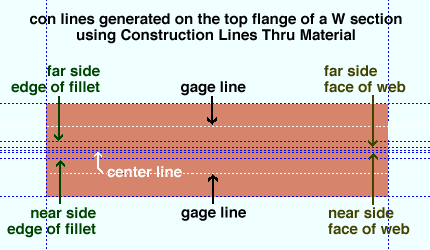
| Construction Line Add Material draws construction lines through vertex points of a material as illustrated above. |
Locating a point using VTPT :
1 . Begin this operation in Modeling or the Drawing Editor . In Modeling , members need to be displayed in a solids form in order for you to be able to locate material vertex points.
1a : Invoke Construction Line Add or Add Bevel Symbol or any other tool that permits the use VTPT as a Locate option.
2 . Various Locate icons become active, and the status line prompts you to locate a point.
2a : Select the VTPT icon or choose Locate > Vertex Point or select ' VTPT ' on the Set Location Mode toolbar item or , if you want to use Auto point location, move your mouse pointer as described in step 2b.


Vertex text indicates that VTPT is active 2b : Place the mouse pointer (
) so that the point location target (
) snaps to the vertex point that is closest to the mouse pointer. The X-Y-Z display shows the coordinates of the point. Left-click ( Locate ) to locate (place) a point at the center of the target.
2c : Continue to perform the operation you began in step 1a.
Tip: For second point location (step 3 if these instrucitions were to continue), you can optionally type in a distance and/or angle to constrain the second point to the typed-in distance/angle from the first point. The distance/angle you type will be shown in brackets [ ] in the status line .

